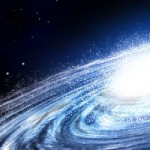
Bring deep space closer to home with this nebula Photoshop tutorial
In our previous tutorial, we took you closer to home with our moon Photoshop tutorial. For today’s tutorial, as we did with our previous Spiral Galaxy tutorial, we are going further out in space once more by creating our very own deep space nebula using Adobe Photoshop.
This tutorial will show you that we don’t necessarily need our own Hubble Space Telescope to come up with stunning nebula images.
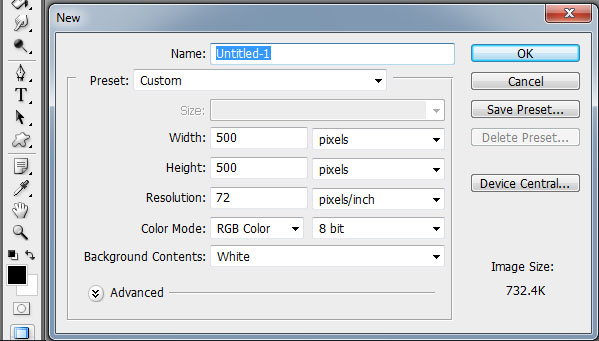
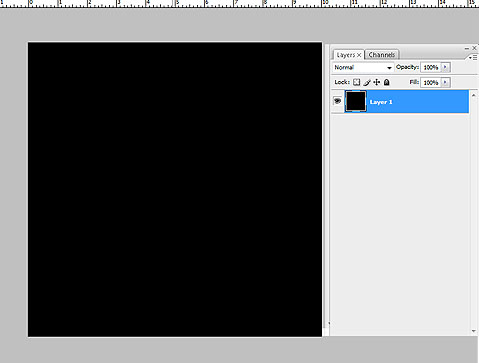
let’s go small with 450 x 350 pixels, 72 dpi. Make sure the background color is BLACK.
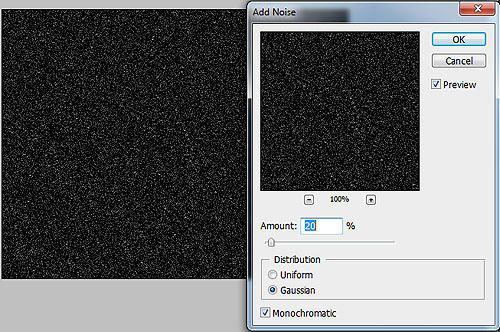
Go to FILTER > NOISE > ADD NOISE with the values: Amount 20%; Distribution Gaussian; Monochromatic.
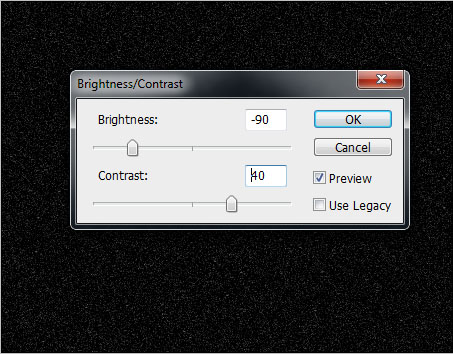
Go to IMAGE > ADJUSTMENTS > BRIGHTNESS AND CONTRAST with BRIGHTNESS at -90 and CONTRAST at 40.
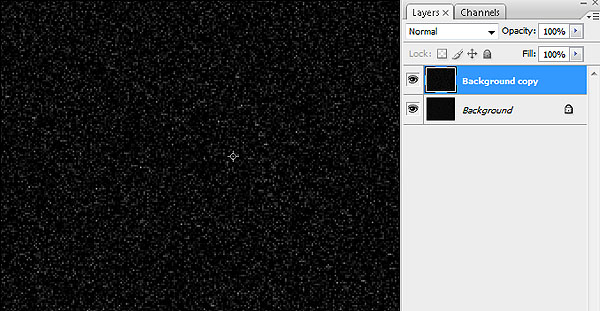
DUPLICATE THE BACKGROUND LAYER and RESIZE the BACKGROUND COPY LAYER. Do this by pressing CTRL + T and dragging the layer into a larger size.
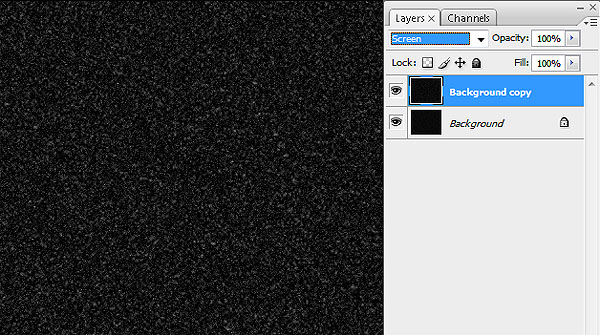
Change the Background Copy layer’s Blending Mode to SCREEN.
NOTE: Don’t worry if the image seems a bit dusty. That’s for visibility purposes. We will edit this further as we go on with our Photoshop tutorial.
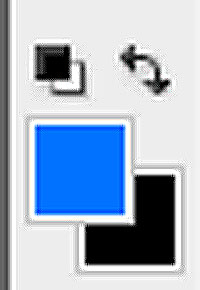
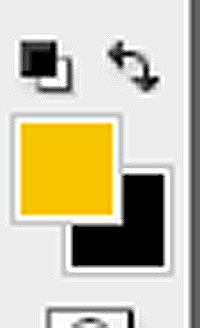
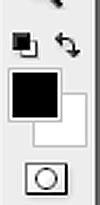
Next, make sure you have you BACKGROUND COLOR at BLACK and your FOREGROUND COLOR at a VIBRANT BLUE COLOR.
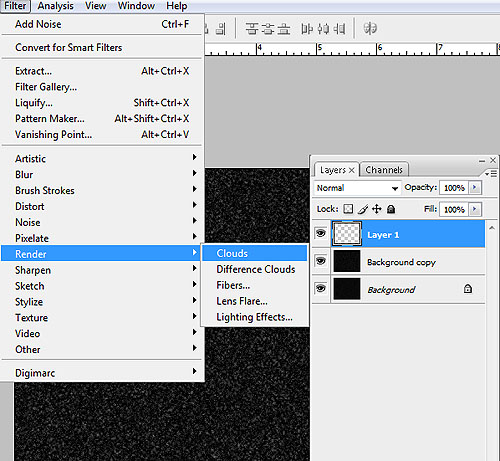
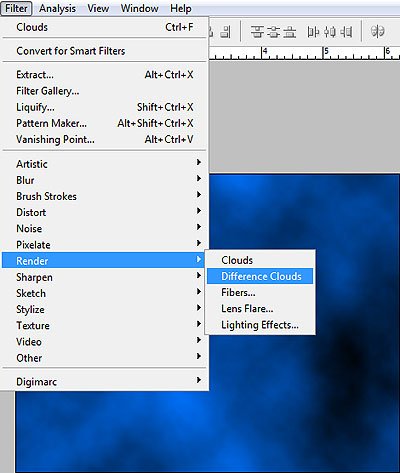
Then, go to FILTER > RENDER > CLOUDS.
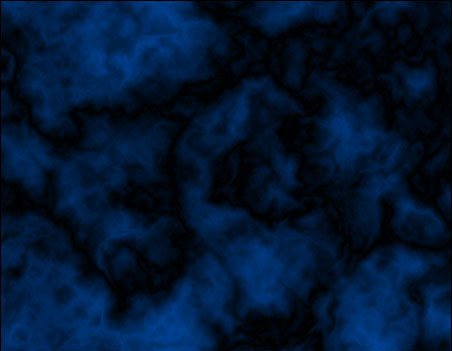
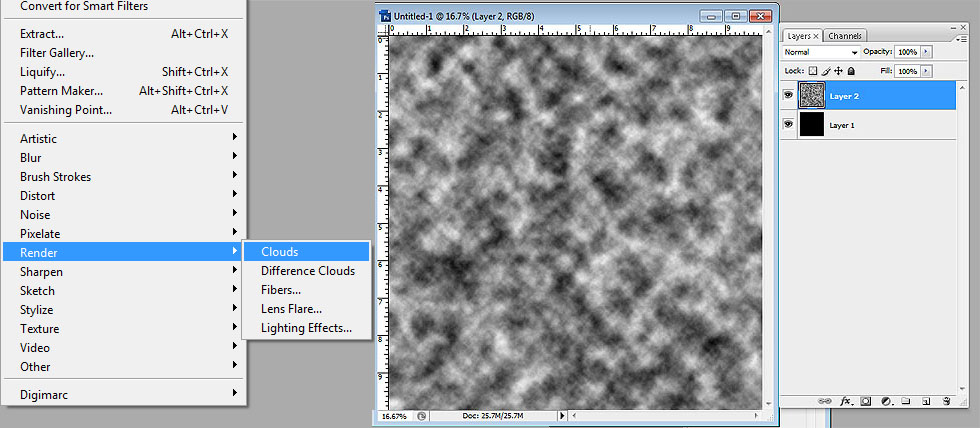
You should have a nice bluish cloud by now, but it’s not exactly the nebula we are going for in this Photoshop tutorial. So go to FILTER > RENDER > DIFFERENCE CLOUDS. You may need to repeat the process to get the results you want. Do this by pressing CTRL + F.
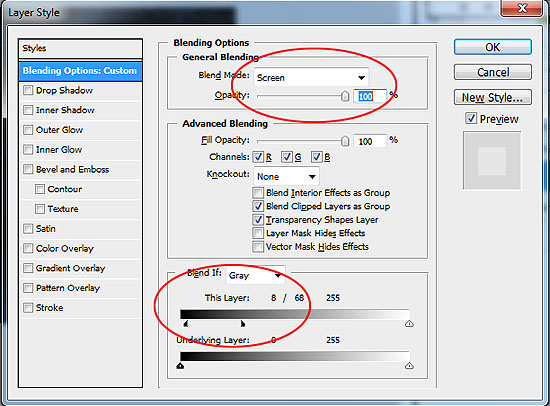
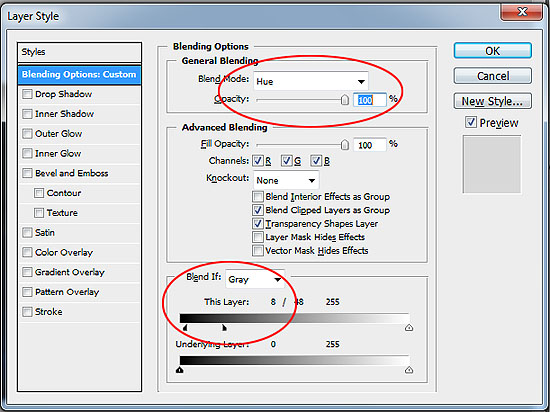
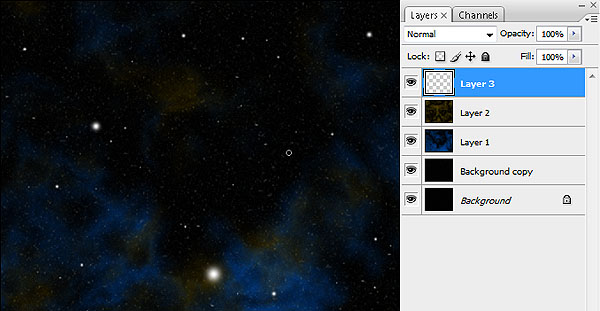
DOUBLE CLICK the clouds layer to let the LAYER STYLE WINDOW pop out. Change the BLEND MODE to SCREEN. Then, look at the bottom of the layer style window and you should see THIS LAYER. HOLD THE ALT KEY and drag the arrows. Make sure they are separated into two arrows and drag them to your desired results. Please refer to the image below.
Results should be something like this. Again, don’t worry about the stars in the background. We will fix that later on in this Photoshop tutorial.

Now, ADD A NEW LAYER on top of the CLOUDS LAYER. This time, change your FOREGROUND COLOR to another vibrant color, preferably somewhere between yellow and bright orange.
Repeat the process you did with the clouds layer. FILTER > RENDER > CLOUDS, then FILTER > RENDER > DIFFERENCE CLOUDS (again, you may need to repeat the difference clouds process). You should have something like the image below.
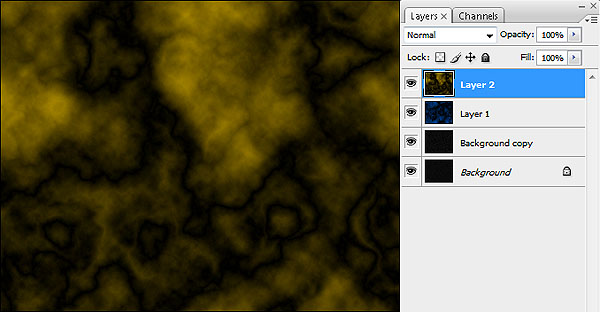
DOUBLE CLICK on this new cloud layer. Once the LAYER STYLE WINDOW pops out, change the BLEND MODE to HUE. Also, like what we did earlier, HOLD THE ALT KEY and drag the arrows of the THIS LAYER option until you have the results you want.
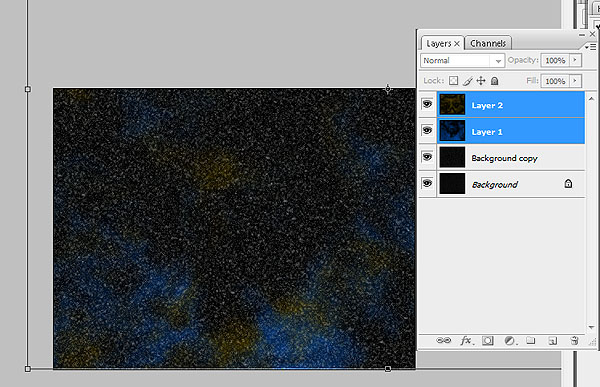
Now, we have two clouds layers, each of a different color. Select both layers by HIGHLIGHTING ONE OF THE CLOUDS LAYERS then HOLDING CTRL and CLICKING THE OTHER REMAINING CLOUD LAYER. You will then need to resize both layers at the same time, and you can do this by pressing CTRL + T and dragging both layers to a larger size. Refer to the image below.
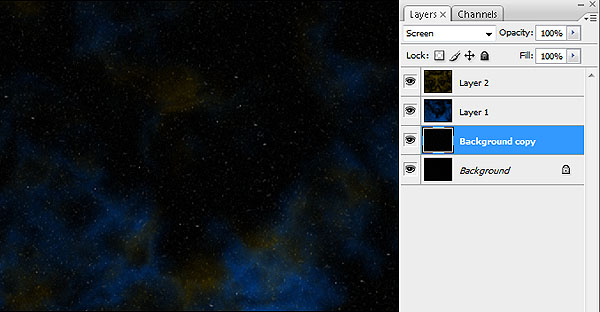
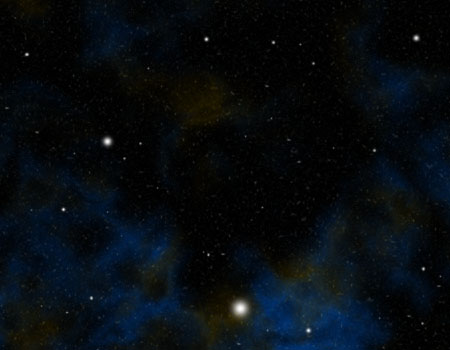
You may notice that the background still appears too dusty. Now it’s time to fix that. Go to the BACKGROUND LAYER and go to IMAGE > ADJUSTMENTS > BRIGHTNESS AND CONTRAST. Make sure the contrast is high and the brightness is low. Do the same for the BACKGROUND COPY LAYER. Your results should be something similar to the image below.
And finally, add a new layer on top of all the other layers and using varying sizes of SOFT BRUSH TOOL with the COLOR WHITE, add in a few “stars”.
There you have it. With this Photoshop tutorial, we have reached deeper into space and took our shot at a deep space nebula. Now try this tutorial again at a larger canvas. Go and create backgrounds or wallpapers for your desktop or website.
Make Your New Photographs Look Old In Today’s Photoshop Tutorial
In one of our last tutorials, we discussed on how to make your regular digital photographs appear new and HDR-like. For this tutorial, we will be going back a few years and turn any ordinary photograph into an old sepia photo, complete with scratches, dust film and tears.
For your photo to be very effective, it is best to choose a photograph which can transcend time. That is, no modern or current day technology or method of photography should be seen, unless it is your choice to really incorporate the modern world into the era of sepia films.
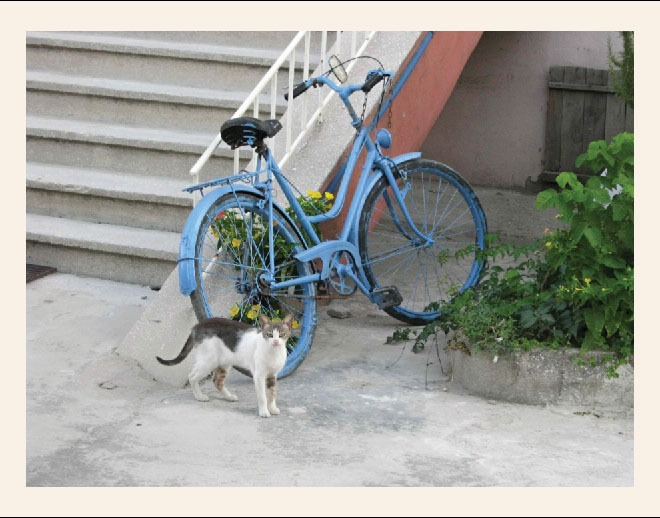
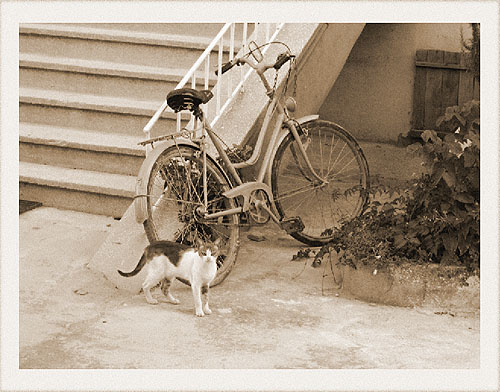
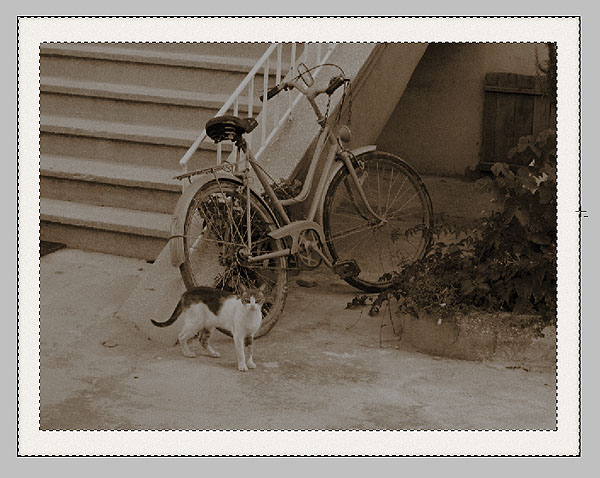
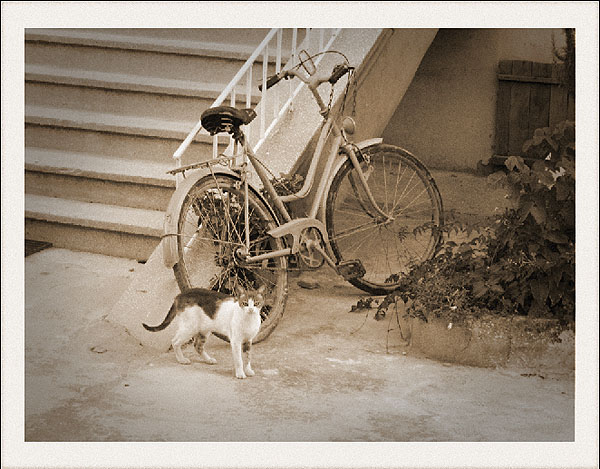
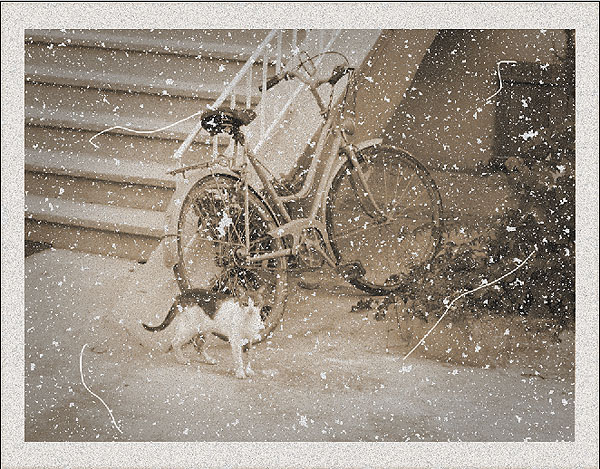
For this tutorial, we will be using this image of a cat, sitting beside a bicycle, taken from www.stockvault.com

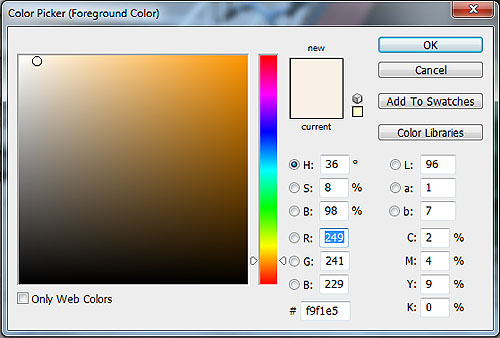
To start off, change your background color to #F9F1E5. You can find your background color in the TOOLS PALETTE.
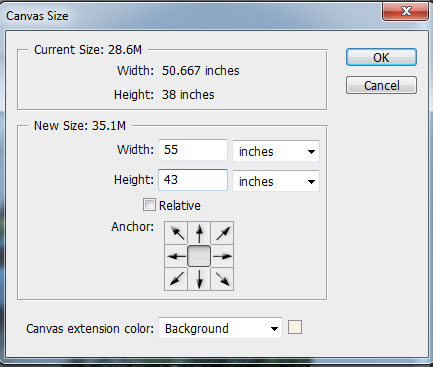
Go to IMAGE > CANVAS > and increase the width and length to form a border. For this tutorial, we will increase the canvas size by 5 inches.
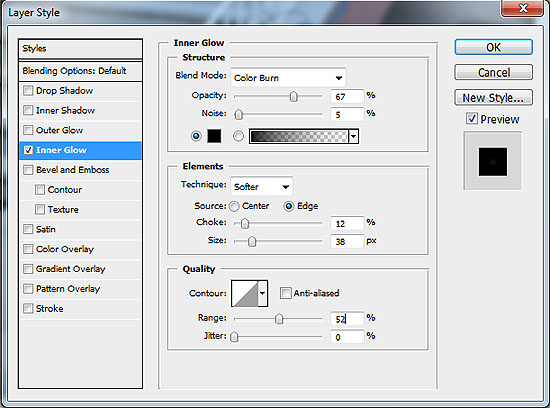
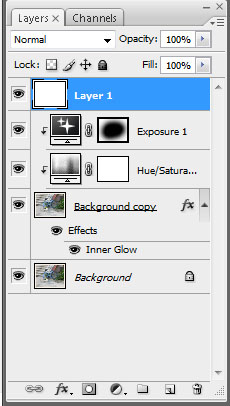
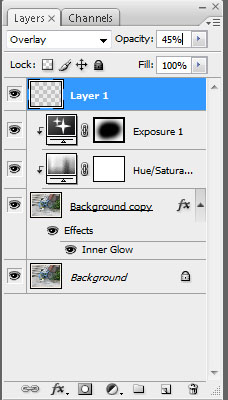
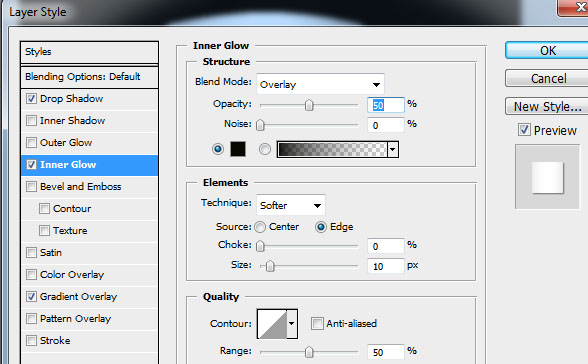
DUPLICATE THE LAYER. Then, on the new duplicated layer, change the BLENDING OPTIONS an add INNER GLOW with the following values: Blend Mode Color Burn; Opacity 67; Noise 5; Color Black; Choke 12; Size 38; Range 52. This will provide your image with a brownish, burnt edge.
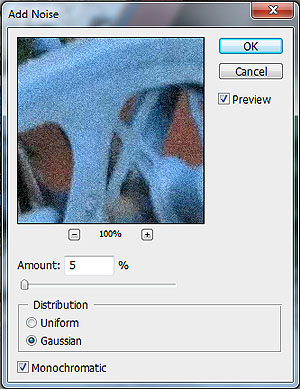
Let’s add a bit of the noise, as seen in several old photographs. Go to FILER > NOISE > Amount 5; Distribution Gaussian; Monochromatic.
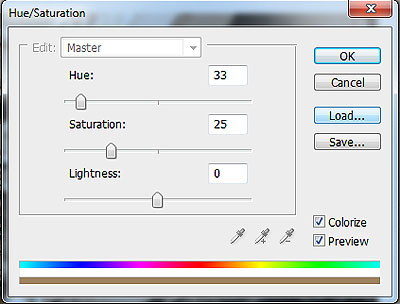
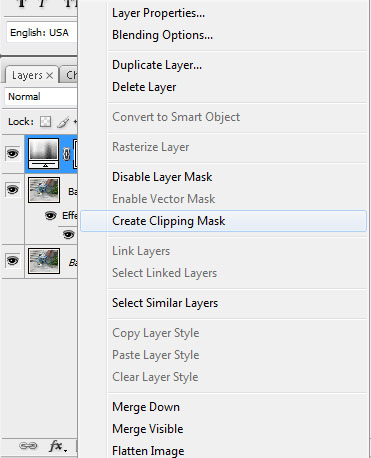
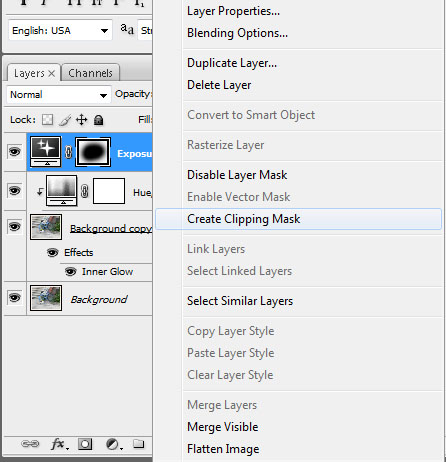
On the same layer, CREATE A NEW ADJUSTMENT LAYER and choose HUE / SATURATION with the following inputs: Hue -33; Saturation -25; Lightness 0. Then, right click on new adjustment layer and choose CREATE CLIPPING MASK

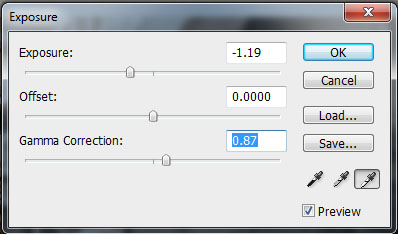
Add another ADJUSTMENT LAYER and choose EXPOSURE with the values: Exposure -1.19; Offset 0; Gamma Correction 0.87.
The photo may be very dark at this point but we will fix that. First though, you will need to fix the border. Make sure you are in the EXPOSURE ADJUSTMENT LAYER. Use the ERASER TOOL to lighten up the border, or if you wish to make it easier, use the RECTANGULAR MARQUEE TOOL and delete the darkened area of the border.
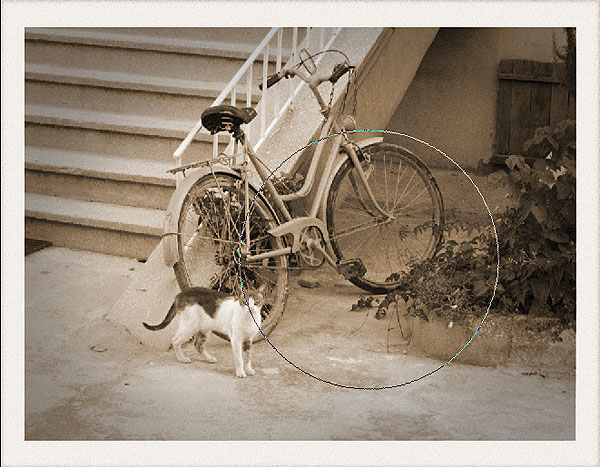
Time to work on the image. Use a large, soft brush with the ERASER TOOL and erase the center area of the image. Take care to retain darkened areas near the border.
Again, do not forget to CREATE A CLIPPING MASK in the EXPOSURE ADJUSTMENT LAYER by right-clicking on that layer and choosing create clipping mask.
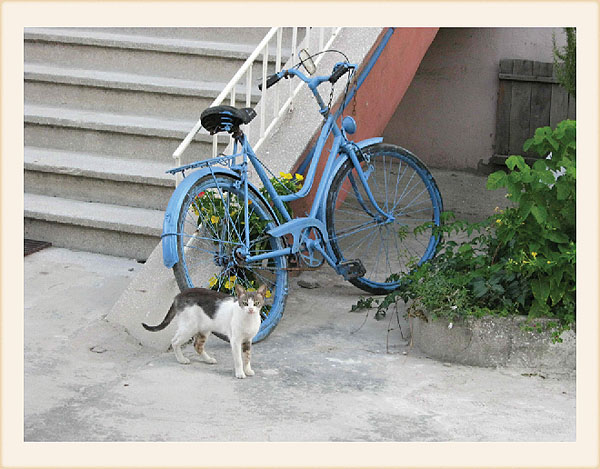
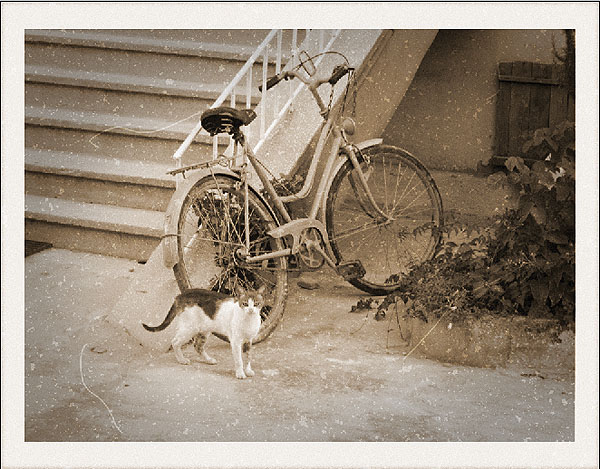
Results so far should be something like this.
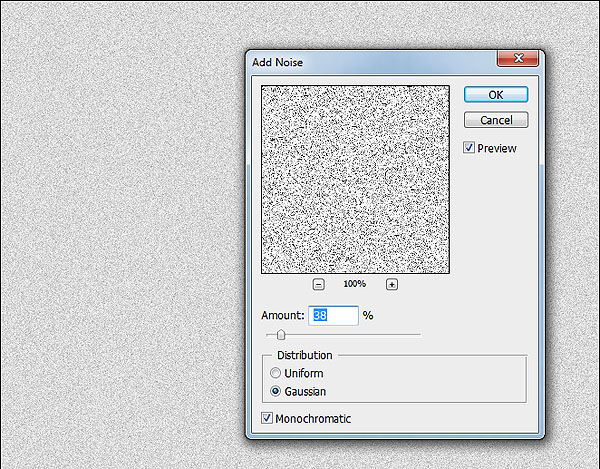
Next, add another layer on top of all the other layers and fill this with white.
For this white layer, go to FILTER > NOISE with these values: Amount 38; Distribution Gaussian; Monochromatic.
Then, choose the MAGIC WAND TOOL. Play around with the tolerance level at 30 and below. For this, we used tolerance 27. Click on the NOISE LAYER and hit DELETE to achieve the results below.

Choose the BRUSH TOOL and choose a thin, soft brush to create some lines on the NOISE LAYER. This simulates scratches.
Still on the NOISE LAYER, change the BLENDING MODE to OVERLAY with 45% OPACITY.
And you’re done! Try with other images and see how well you can turn something new into something old.
Shoot for the Moon in This Week’s Photoshop Tutorial

In one of our previous tutorials, we created the spiral galaxy from scratch using Adobe Photoshop. It’s time we head closer to home as we create the moon from scratch with this Photoshop tutorial.
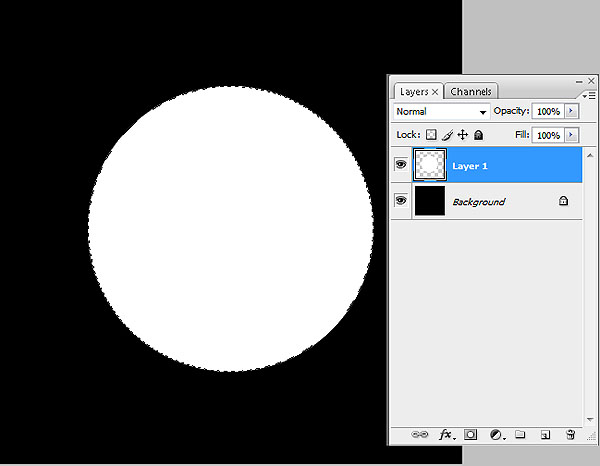
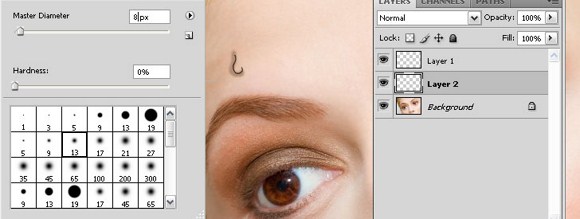
To start, let’s open a new document at 500 x 500 pixels and 72 dpi. Make sure the background is black, because of course, the outer space is pitch black.
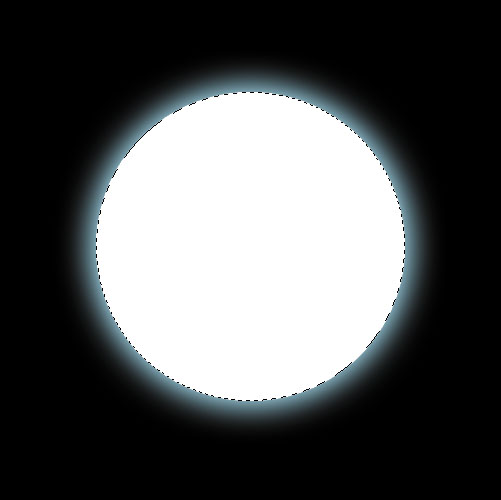
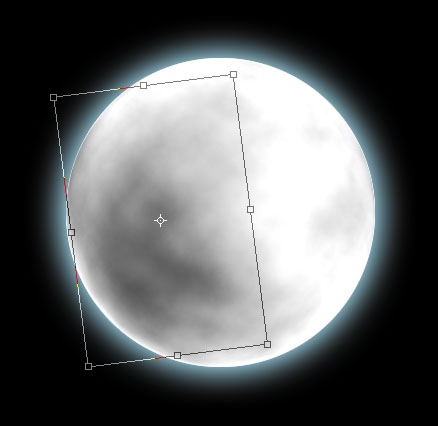
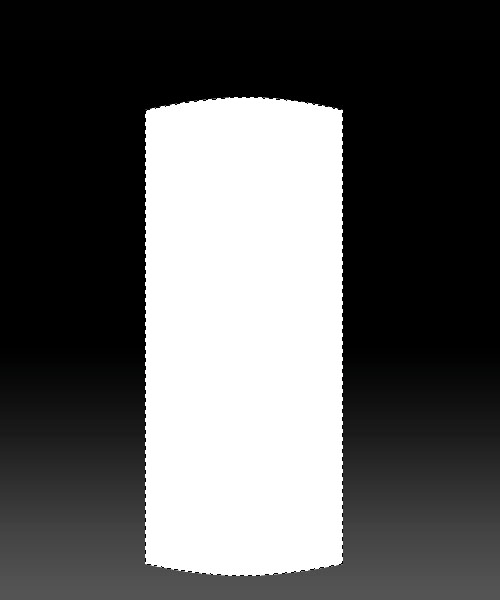
Next, add a new layer (it would be best to later rename this layer as “moon”). Using the ELLIPSE TOOL, draw a perfect circle. Do this by holding down the SHIFT key while creating the circle. Then, fill this circle with WHITE.
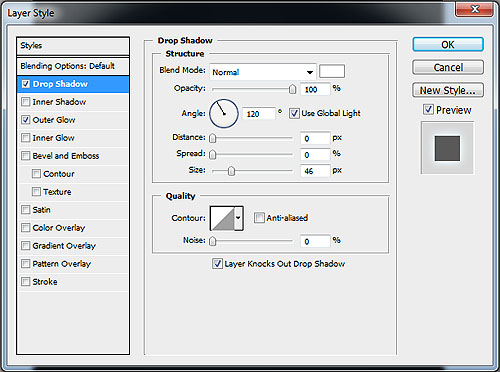
On this “moon” layer, let’s add some LAYER STYLES. What we need first is the DROP SHADOW, with the following values: Blend Mode Normal; Color White; Opacity 100%; Angle 120; Distance 0; Spread 0; Size 46. Refer to the image below.
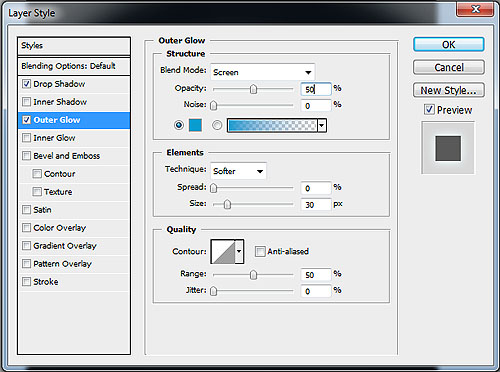
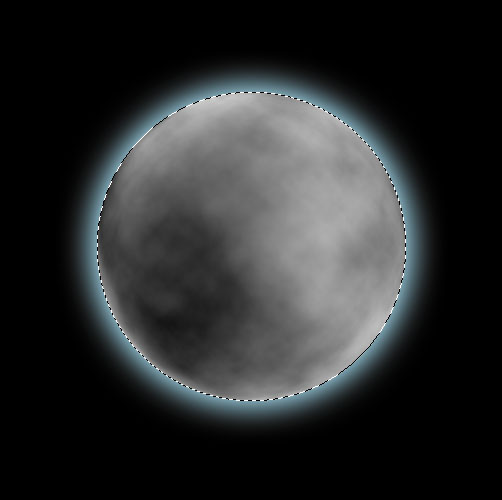
Now let’s add OUTER GLOW with the values: Blend Mode Screen; Opacity 50%; Color Light Blue (#99ccff); Size 30. See image below for reference.
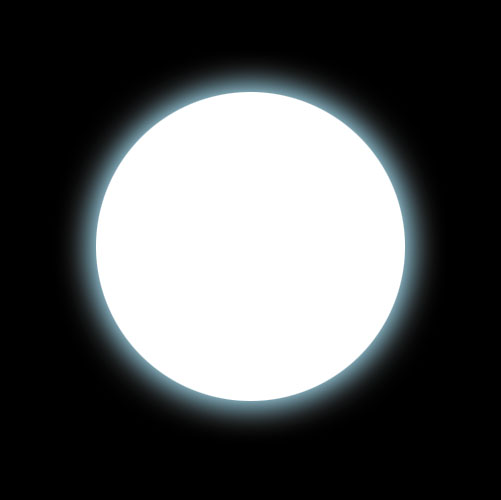
Your moon should look like this. It may not look much, but we will add more as this Photoshop tutorial progresses.
Select the moon. You can do this by holding the CTRL key and clicking on the moon layer.
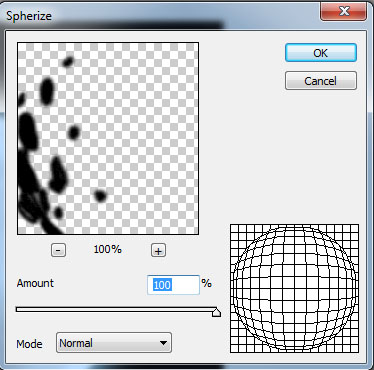
Make sure your FOREGROUND COLOR is BLACK and your BACKGROUND COLOR is WHITE. Then, go to FILTER > RENDER > CLOUDS. You may need to repeat the process to get the right “moon texture” that you want.
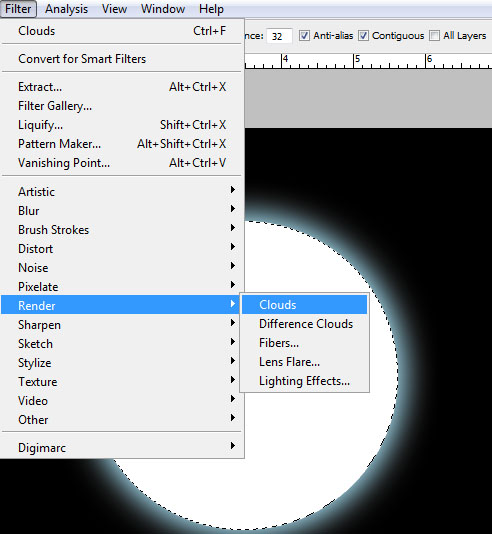
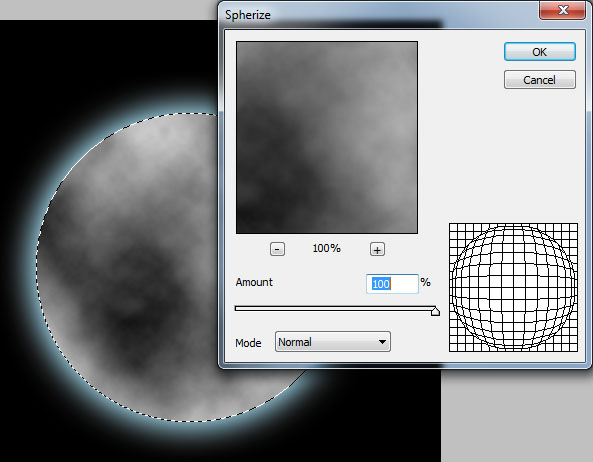
Then, go to FILTER > DISTORT > SPHERIZE. Results should be something like the image below.
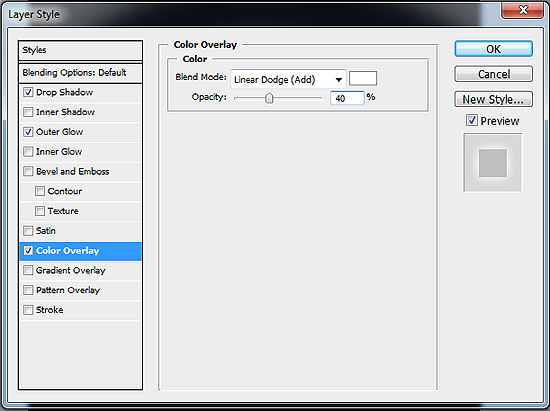
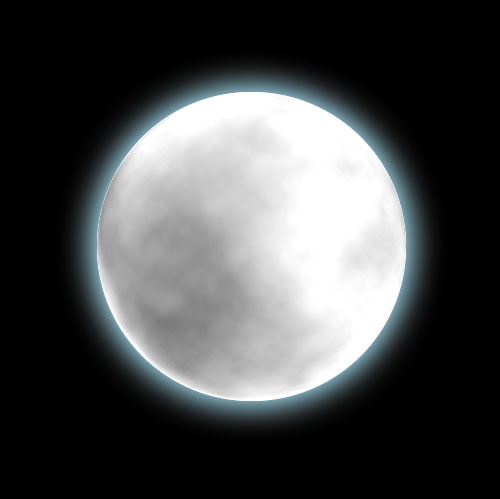
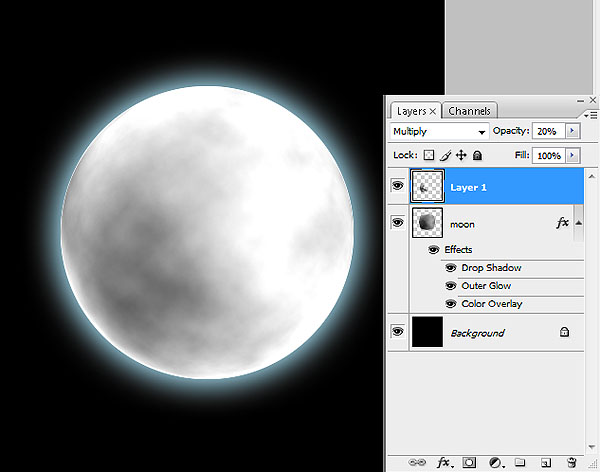
Now we’re going to add a final layer style to our moon layer. Add the layer style COLOR OVERLAY with the values: Blend Mode Linear Dodge (Add); Color White; Opacity 40%. The end result should be similar to the image below.
You can actually stop at this point but it would be best to completely finish this moon Photoshop tutorial.
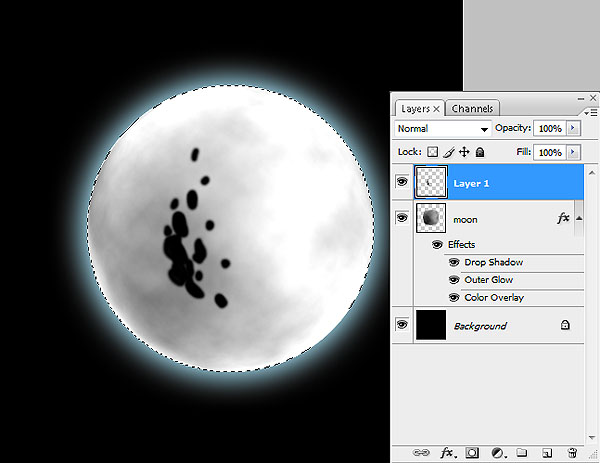
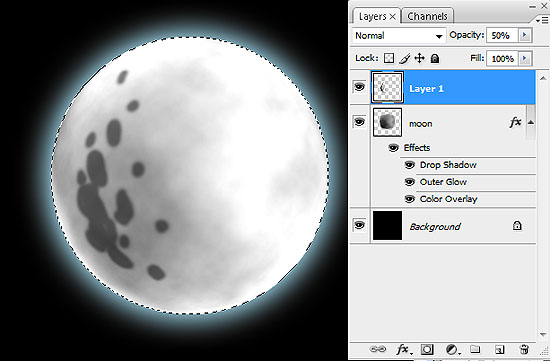
You may find that our moon actually lacks a bit of the indications of craters. Let’s remedy that by adding another layer on top of the moon layer. Using a HARD BRUSH TOOL, draw some spots close to the center of our moon.
Stay on this new layer and go to FILTER > DISTORT > SPHERIZE.
It may be necessary for you to move the dark spots a little to the side. Once you’re satisfied, change this layer’s opacity to 50% (you may need to reduce this opacity later on though).
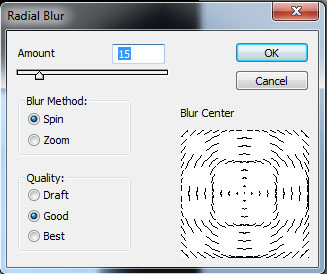
Still on this “spots” layer, go to FILTER > BLUR > RADIAL BLUR and input the following values: Amount 15; Blur Method Spin; Quality Good.
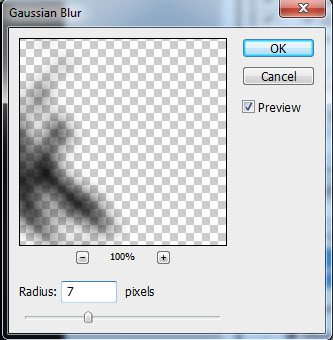
You may find the end result a bit “smeared” but let’s fix that by going to FILTER > BLUR > GAUSSIAN BLUR at 7.0.
You may then need to distort, rotate, or resize the dark spots to your liking.
For finishing touches, change the BLENDING MODE of the dark spots to MULTIPLY with OPACITY at 20%.
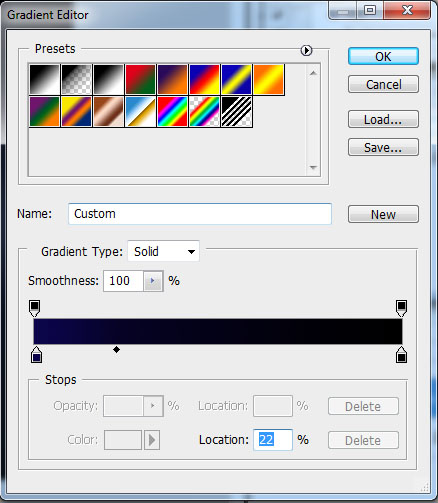
We’re almost done. One last detail would be to add a bluish glow around the moon. Do this by going to the background layer and adding a RADIAL GRADIENT FILL with colors ranging from dark blue to black as shown below.
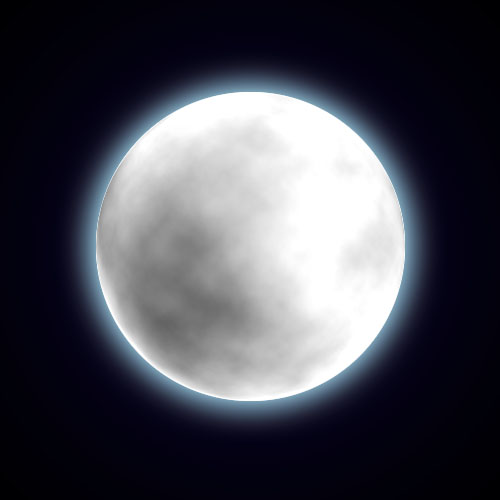
And there you have it! Your very own moon made from scratch using Adobe Photoshop. Watch out for our planets tutorial coming very soon.
Make your own IPOD with Photoshop

Everyone wants an iPod but did you know you can actually make one using Photoshop? You probably did. There are an almost infinite number of possibilities in Photoshop and that includes the creation of your very own image, and for this tutorial, your very own iPod.
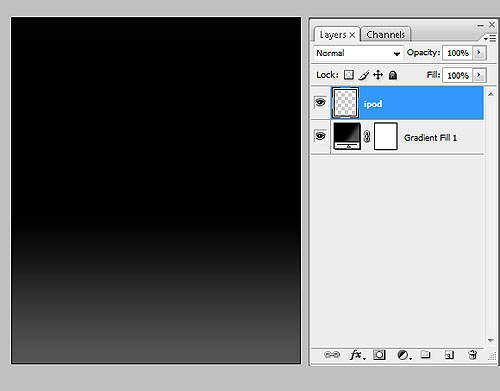
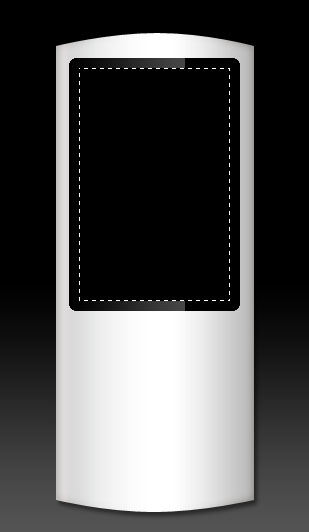
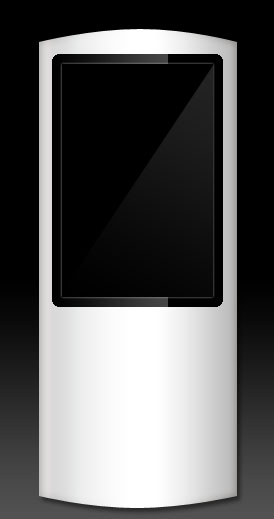
Let’s begin. Start by creating a new document, preferably 500 X 600 pixels at 300dpi. You can have a variety of backgrounds but it is recommended you have a gradient background. For this tutorial, we will use black, going to gray at the bottom.
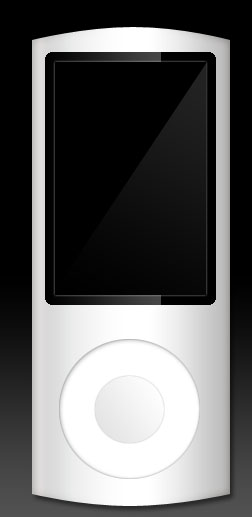
Create a new layer above the background layer and rename it ipod (or don’t name it at all, it’s up to you). Here’s a preview of what you should have so far.
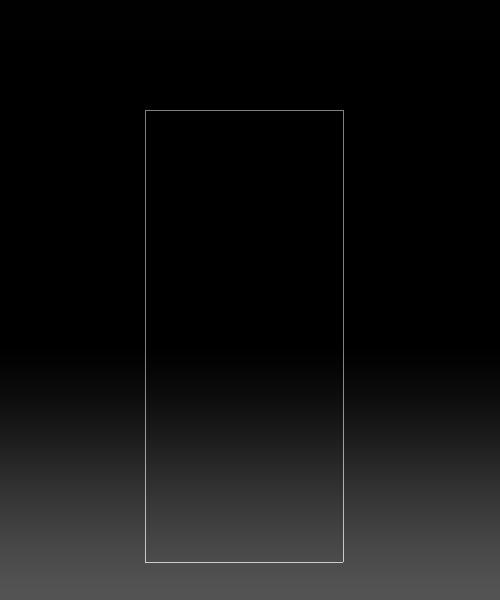
Using the RECTANGLE TOOL, create a long, ipod shape.
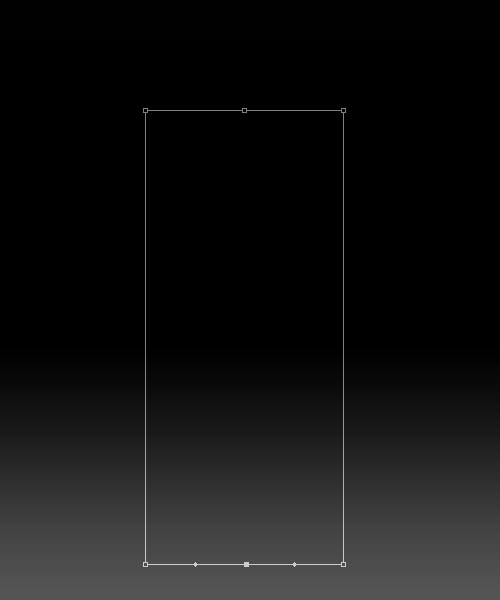
Get the PEN TOOL. Choose ADD ANCHOR POINT TOOL and ADD THE NODES on all four corners of the rectangle, as well as at the middle top and bottom. See image below for reference.
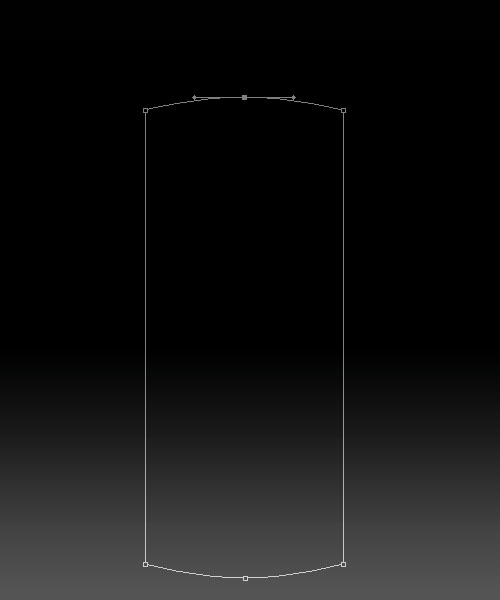
PULL THE MIDDLE NODES to create a semi-cylindrical shape. DO NOT PULL TOO FAR OUT. Do this for the top and bottom nodes as show in the image below.
Get the PEN TOOL. RIGHT CLICK ON THE RECTANGLE and choose MAKE SELECTION. Then, FILL UP the selection with WHITE.
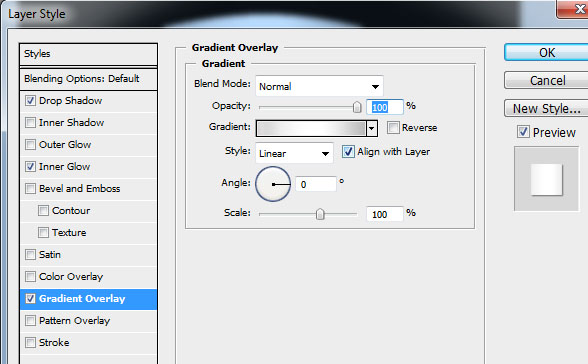
Change the BLENDING OPTIONS / LAYER STYLE of the ipod layer with the following values:
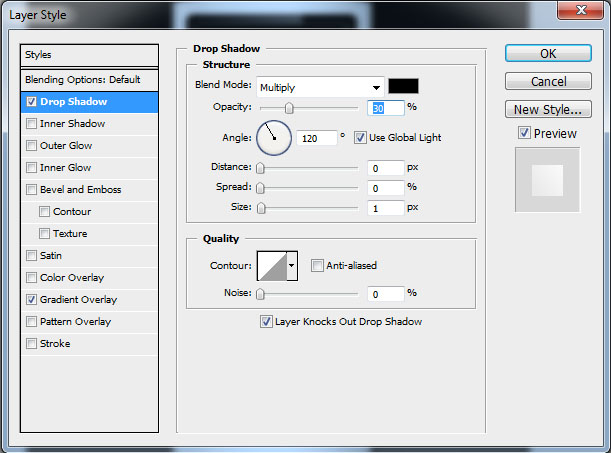
DROP SHADOW – Opacity 50 ; Distance 0; Spread 0; Size 1
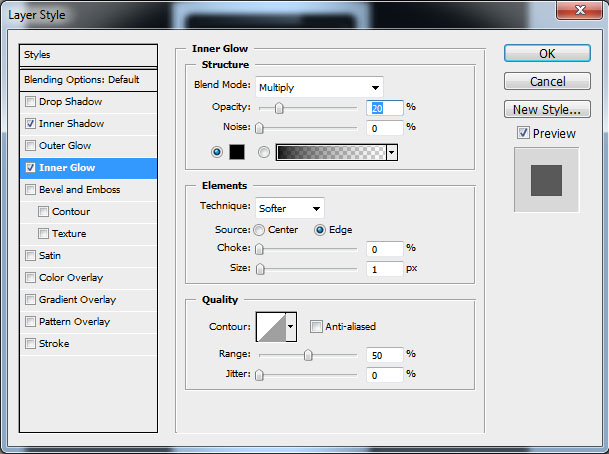
INNER GLOW – Blend Mode Overlay; Color Black; Opacity 50; Size 10
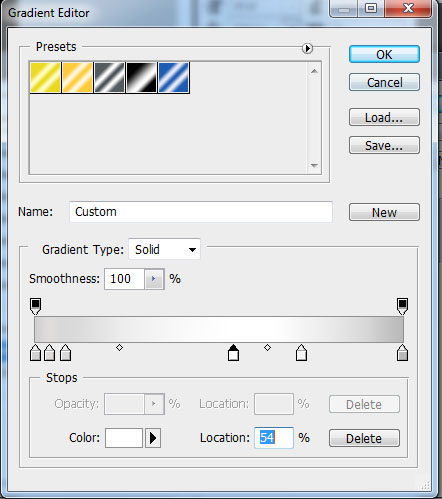
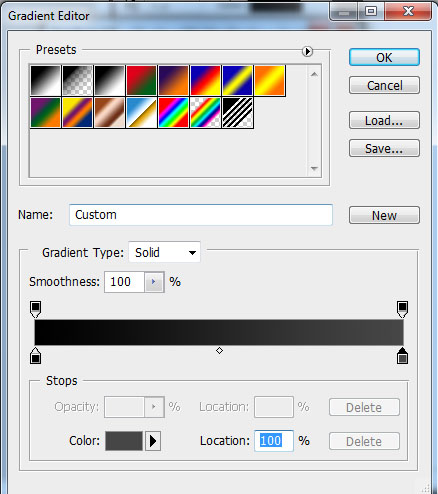
GRADIENT – Angle 0. View image below for gradient colors.

Now let’s start with the ipod screen. CREATE A NEW LAYER using the SELECTION TOOL.
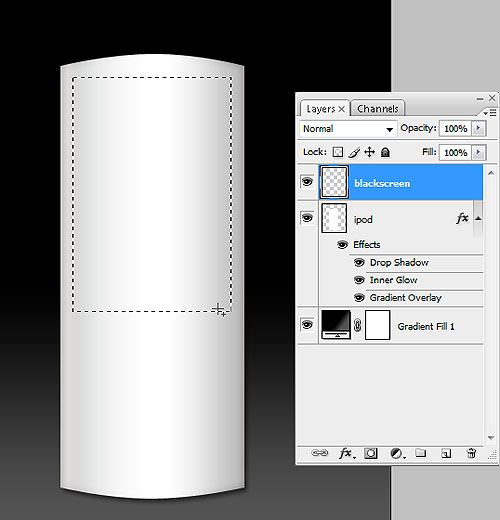
Then, go to SELECT > MODIFY > SMOOTH > 5px. You should see the borders of the selection become smoother. Fill this selection with BLACK and you should achieve the result below.
Next, select about three-fourths (3/4) of the screen size.
Go to LAYER > NEW FILL LAYER > GRADIENT and create a BLACK TO GRAY GRADIENT as shown below.
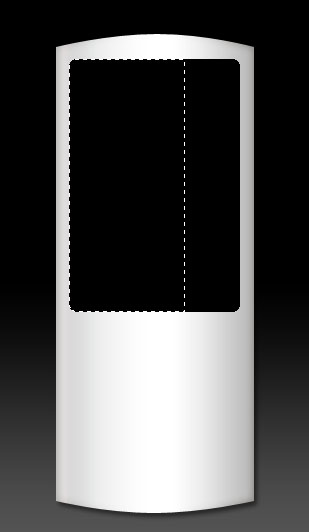
CREATE A NEW LAYER and select a smaller section of the ipod’s screen. DO NOT SMOOTHEN THE SELECTION.

Fill this new selection layer with black.
Next, ADD A BLENDING OPTION / LAYER STYLE to this new black screen layer: OUTER GLOW – Blend mode Screen; Color White; Opacity 30; Size 3.
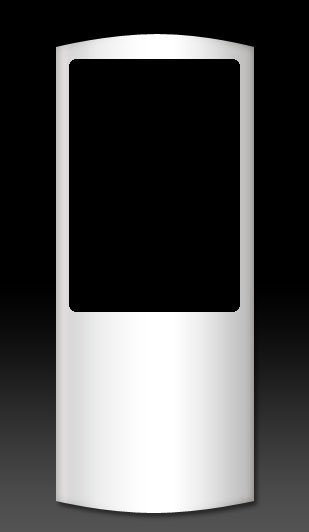
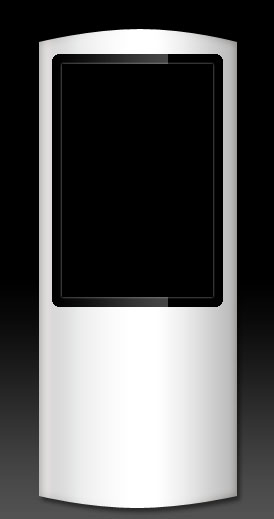
You should achieve these results.
The screen seems a bit dull, isn’t it? Let’s add a bit of shiny reflection. Using the POLYGONAL LASSO TOOL, select a small, RIGHT TRIANGLE part of the small black screen. See below for reference.
Go to LAYER > NEW FILL LAYER > GRADIENT and create a BLACK TO GRAY GRADIENT. See below for reference.
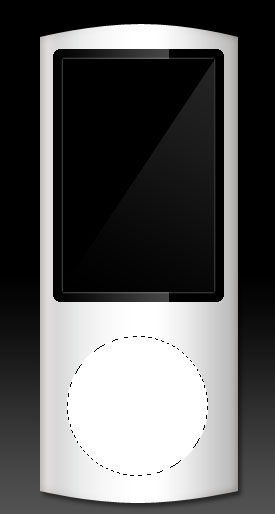
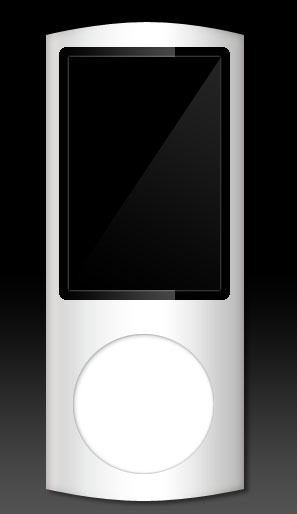
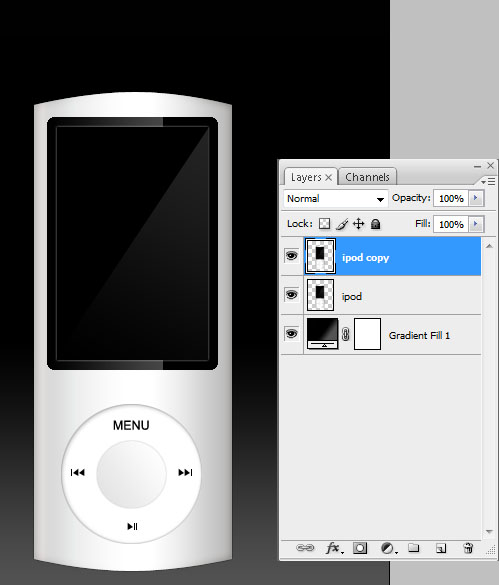
We’re halfway there. An ipod won’t function without the menu button, so let’s go make one. CREATE A NEW LAYER. For this layer, you can rename it button. Get the ELLIPTICAL MARQUEE TOOL and create a circle at the bottom of the ipod. Fill this circular selection with WHITE.
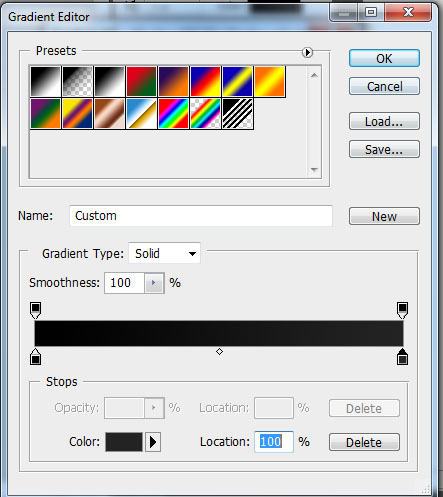
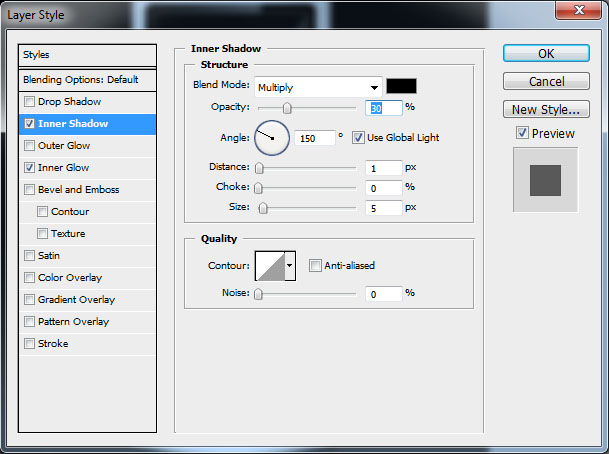
Time to add a few BLENDING OPTIONS / LAYER STYLE to the button. Here are the following options you need to add:
INNER SHADOW – Blending Mode Multiply; Opacity 30; Angle 150; Distance 1; Choke 0; Size 5.
INNER GLOW – Blending Mode Multiply; Opacity 20; Size 1
Results should be something like this.
Time to place a button in the middle. CREATE A NEW LAYER and make a SMALLER CIRCULAR SELECTION in the middle. Fill this with WHITE and add BLENDING OPTIONS / LAYER STYLE:
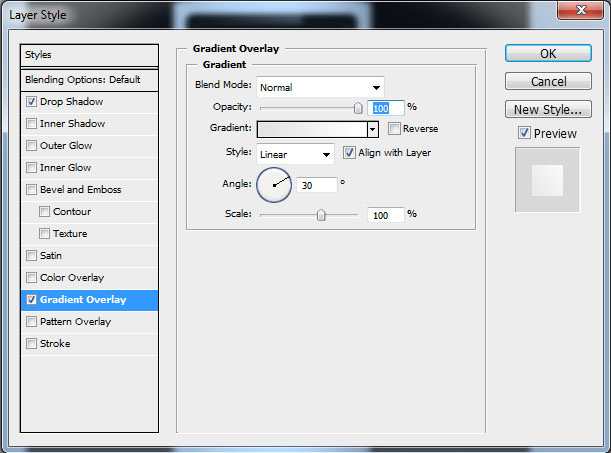
DROP SHADOW – Blending Mode Multiply; Opacity 30; Angle 120; Distance 0; Spread 0; Distance 1
GRADIENT OVERLAY – Angle 30; create a LIGHT GRAY TO WHITE GRADIENT.
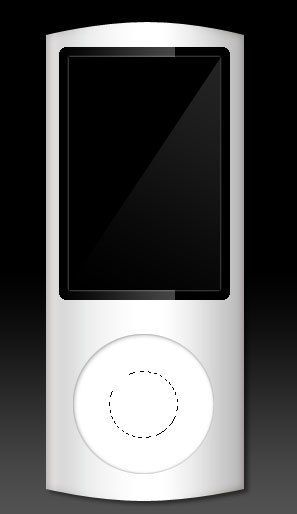
Results should be something like this.
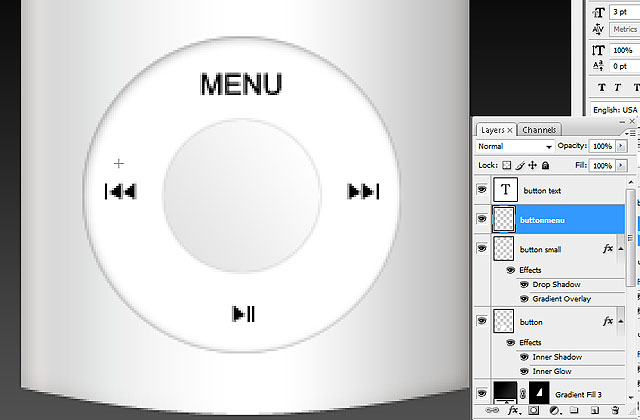
Time to add the MENU. Do so by using the TYPE TOOL. As for the arrows, you can use either the SELECTION TOOLS, PEN TOOLS, or for the BRUSH TOOL.
We’re almost done. You can stop here, but it’s better to add a bit of reflection at the bottom of the ipod. MERGE the layers EXCEPT THE BACKGROUND LAYER. Then, DUPLICATE the layer with the ipod, as shown below.
For the ipod layer at the bottom, go to EDIT > TRANSFORM > FLIP VERTICAL. You may need to move the ipod layers to achieve the effect below.
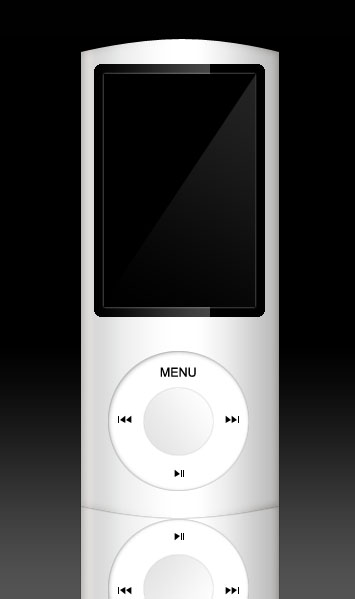
Get the ERASER TOOL. Use VARIOUS SIZES with VARIOUS OPACITIES to achieve the effect below.
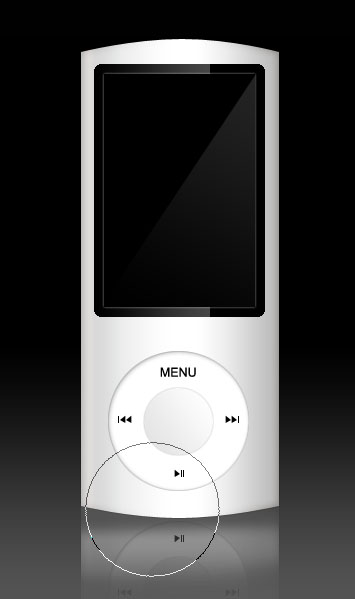
TIP: It’s best to blur the reflection layer a bit by going to FILTER> BLUR> GAUSSIAN BLUR> 1.0
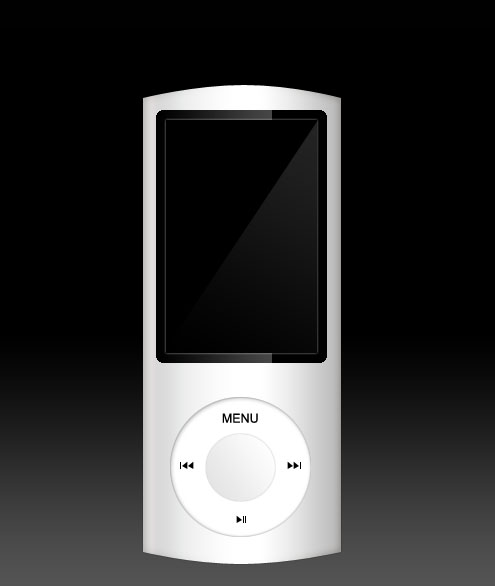
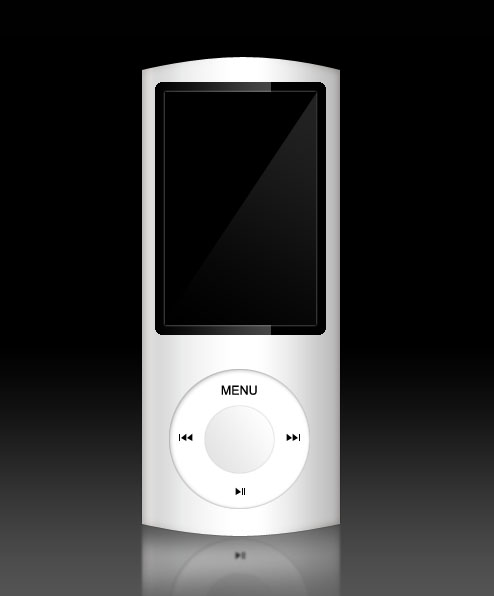
And now, we’re done! Depending on your chosen gradients, you can actually have a variety of colors for your Photoshopped ipod. Have fun!
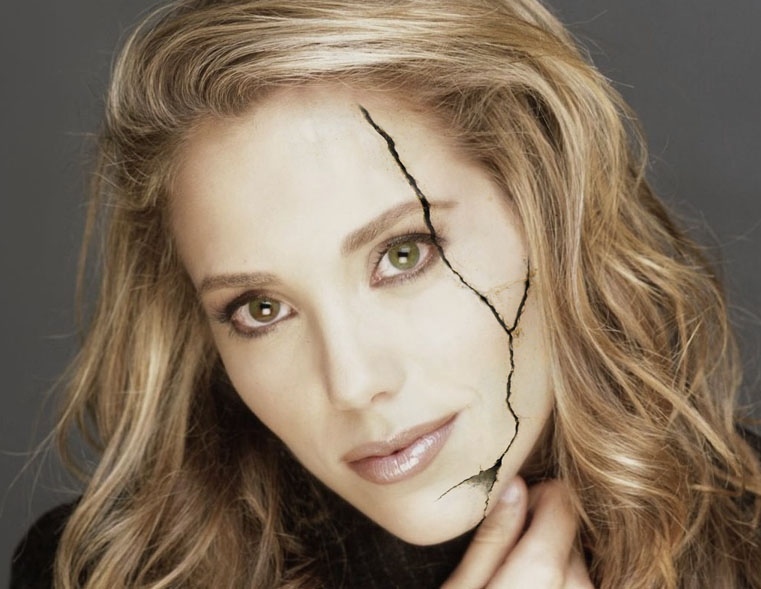
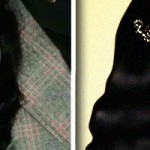
Create a Cool Photo With This Cool Black Swan Cracked Face Tutorial
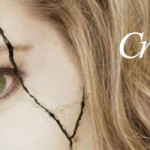
In this tutorial, you will be taught how to mimic the cracked face effect as seen in Natalie Portman’s movie poster, “The Black Swan”.

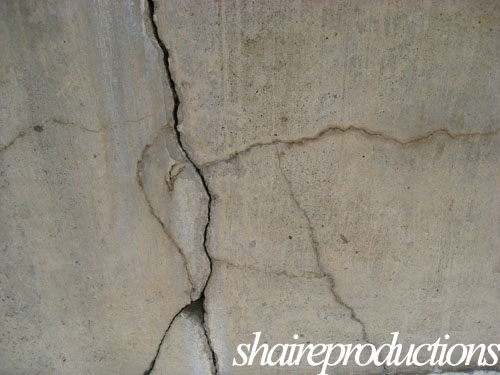
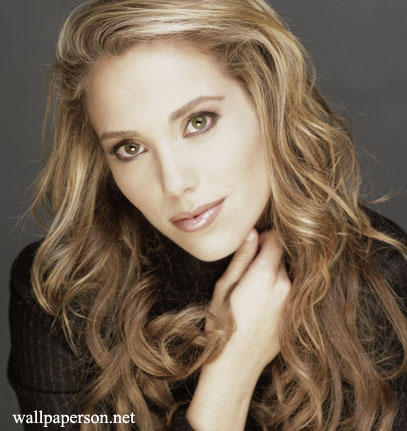
This type of effect is quite simple, and has been used to create such effects as cracked and peeling faces. However, the trick here is to find a stock image that is just right to make it look realistic. The hardest part is finding the right cracked floor, or cracked soil, or cracked wall to incorporate into the face.
For this tutorial, we have found a good cracked wall image, courtesy of shaireproductions. For the woman’s face, we have an image courtesy of www.wallpaperson.net
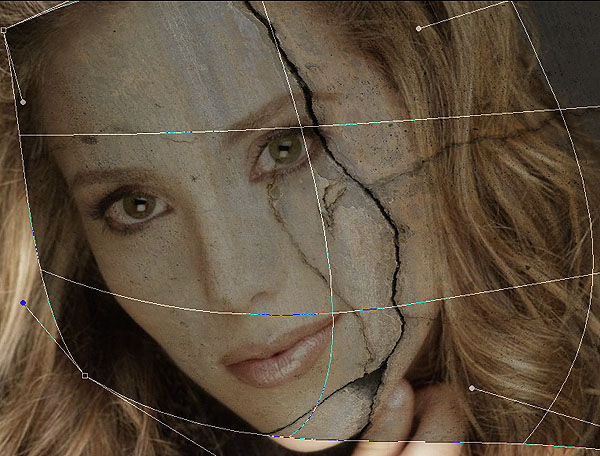
On the image of the woman’s face, copy the entire cracked wall to the layer on top of it. Make sure the cracked wall’s BLENDING OPTION is set to MULTIPLY so you’ll know where you’re going.

Go to EDIT > TRANSFORM > WARP and distort the cracked wall to match the contour of the woman’s face or simply to your preferences.
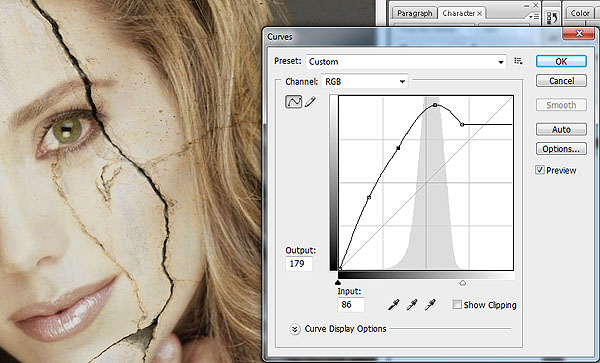
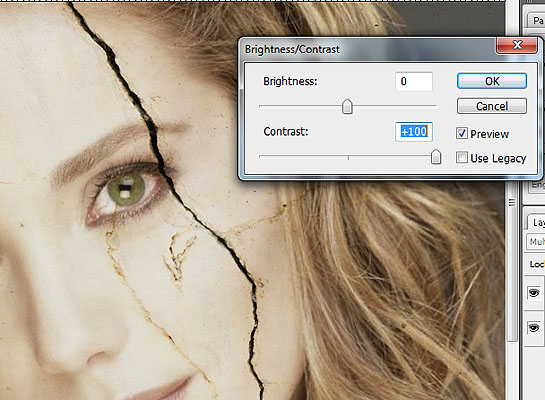
Go to IMAGE > ADJUSTMENTS > CURVES. Depending on your cracked wall image, set the curves until the crack is visible and the rest of the wall, save for a few details, is gone. Again, depending on your cracked wall image, you may need to utilize more adjustments. For this image, we used IMAGE > ADJUSTMENTS > BRIGHTNESS AND CONTRAST and adjusted the CONTRAST to 100%.
Using the ERASER TOOL set at 100% SOFTNESS, erase the other details of the crack until you achieve the desired results. You may want to use a variety of OPACITIES or VISIBILITIES for the eraser tool to get the effect you want.
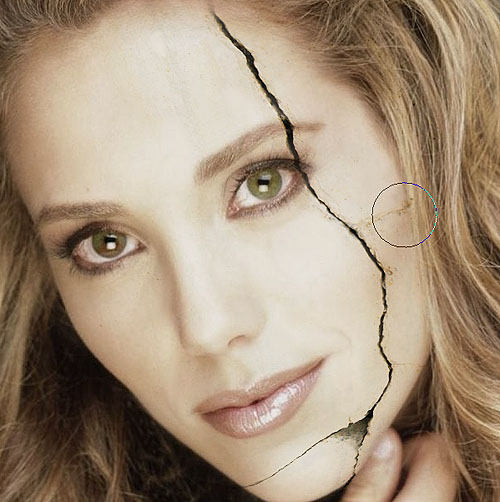
So far, so good. You can stop if you’re already happy with this but if you wish to add more cracks, just simply DUPLICATE the cracked wall layer and position it to your preferences.

Again, using the ERASER TOOL, erase the unwanted details of the new crack. Also, it is recommended that you use various OPACITIES for the eraser tool in order to get the effect you want.
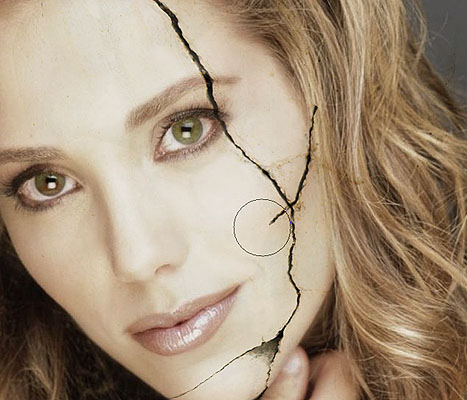
And there you have it! A realistic crack on the face. You can do several more cracks at this (excuse the pun) or if you are able to find an even better stock image to use, then go out and have fun with this.
Love the Look of HDR Photos? Check Out This Awesome Photoshop Tutorial
Many of us artists and photography enthusiasts dream of owning the latest DSLR camera. But high prices have left us with only those dime a dozen digital cameras.
So what can you do to get those awesome shots that are just bursting with color and life? The trick is to fake it, and Photoshop, as always, is your best friend.
This is a quick Photoshop tutorial which will teach you how to transform a regular digital still image to an HDR wonder.
Firstly, what exactly is HDR? HDR stands for High Dynamic Range imaging. This can be achieved through a series of shots with varying exposures in order to take the wide range of luminescence and colors that the eye can see but the camera cannot.
DSLR cameras are of course the staple in taking HDR photographs since you can change the exposure, lighting and colors to varying degrees. This feature is sadly not available in regular digital cameras but with a bit of Photoshop know-how, you can do wonders.
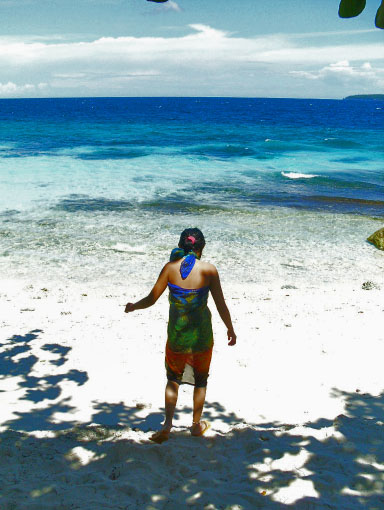
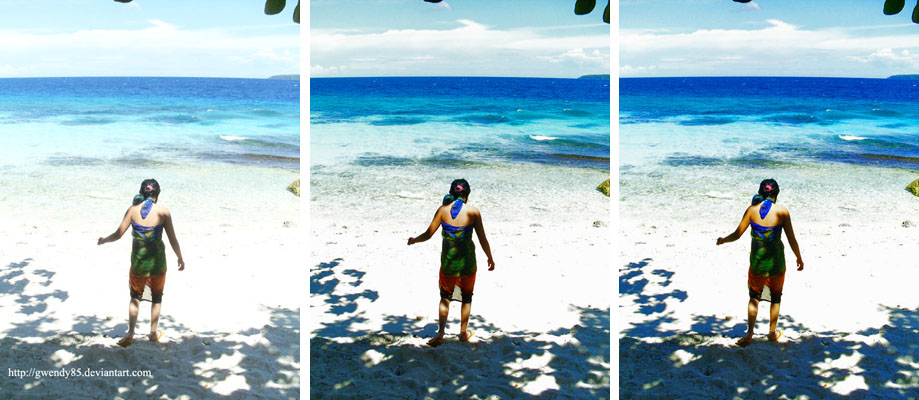
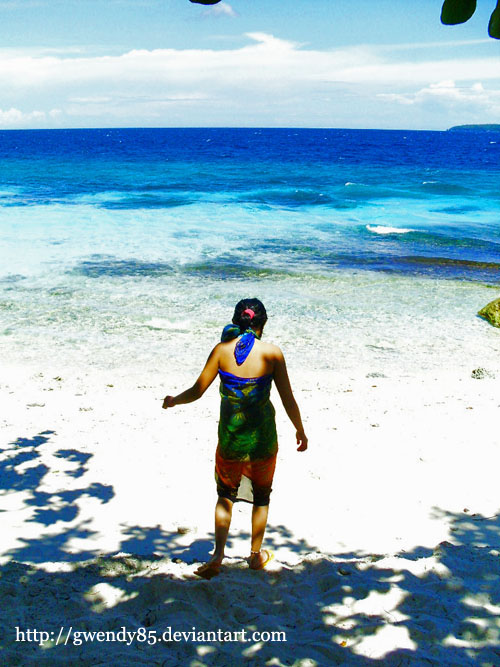
Remember that when shooting your photo through your digital camera, set it at the highest quality as possible. A bigger image resolution setting is also highly recommended. For this tutorial, we will use an image borrowed from http://gwendy85.deviantart.com . This image was shot using a Samsung digital camera, with 7 megapixel capabilities.
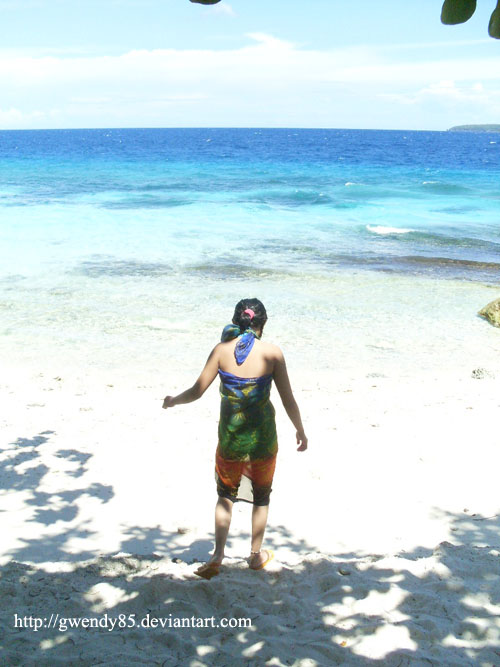
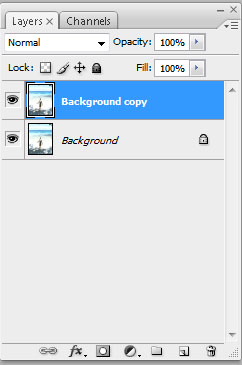
Though the image is nicely executed, the colors are quite bland. It’s time to do our Photoshop magic. Start by duplicating the background layer. Shortcut key is Ctrl+J.
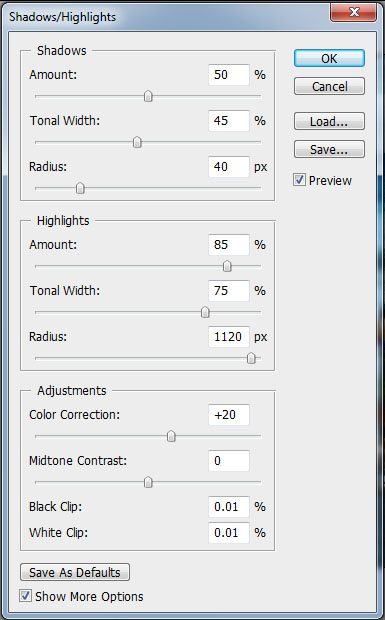
Next, go to EDIT > ADJUSTMENTS > SHADOWS/HIGHLIGHTS and set the values as follows: Shadows Amount 50%; Shadows Tonal Width 45%; Shadows Radius 40 pixels; Highlights Amount 85%; Highlights Tonal Width 75%; Highlights Radius 1120 pixels. Do not bother with the adjustments. You may refer to the image below for the values settings.
Below is a preview of the resulting image. It looks weird now, but nothing a few Photoshop tricks can’t fix.
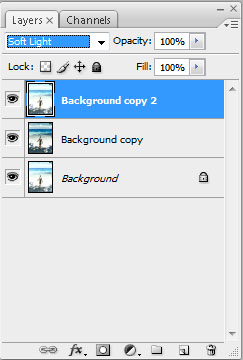
Now let’s go and fix this image. Duplicate your background layer and drag it up so it will now become the top most layer. Then, change its BLENDING OPTIONS to SOFT LIGHT. See below for reference.
By now, you should start seeing the changes but we’re not quite there yet. We need to add a bit more color, and this is where a bit of saturation and tinting comes in.
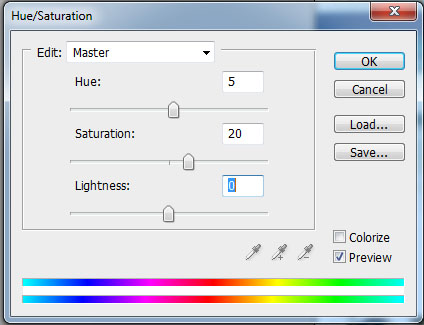
FLATTEN THE IMAGE. Then, go to EDIT > ADJUSTMENTS > HUE, SATURATION AND LIGHTNESS. Adjust it to your liking. For this image though, we will have Hue at 5 and Saturation at 20. The values here will really depend on the image you’re editing as well as your tastes and preferences.
And here is the final result, along with a comparison of what it was previously. See the difference a bit of Photoshop knowledge can make? Now keep this trick in mind as you go out there and shoot to your heart’s content with your now not-so-ordinary digital camera, or find some old shots you took and give it an HDR Photoshop make over.
Stunning Optic Fiber Light Rays Tutorial
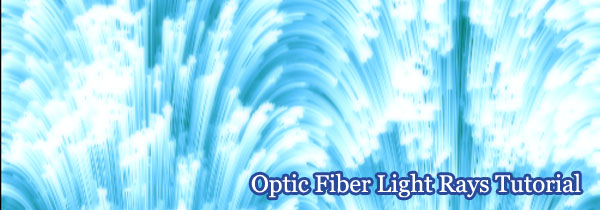
Let’s play around a bit by creating a stunning optic fiber inspired light rays background (or pattern, texture, or brush, whichever way you think of it). Just a bit of Photoshop know-how and you’ll be able to do this tutorial in a matter of minutes.
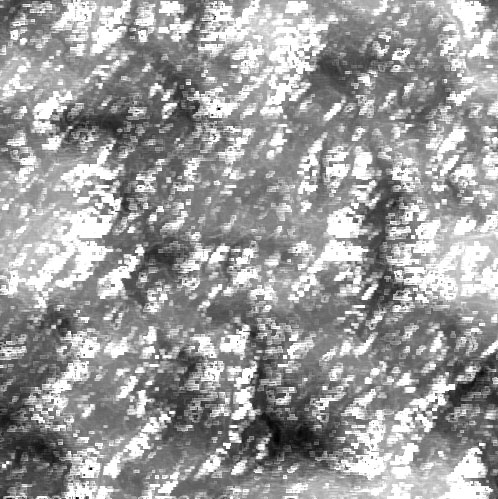
Step 1. Open a new document. Make sure the background is white. It can be any size you wish but for this tutorial, we’ll use 500 x 500 pixels. Make sure your foreground color is black, and your background color is white.
Step 2. Go to FILTER > RENDER > CLOUDS.

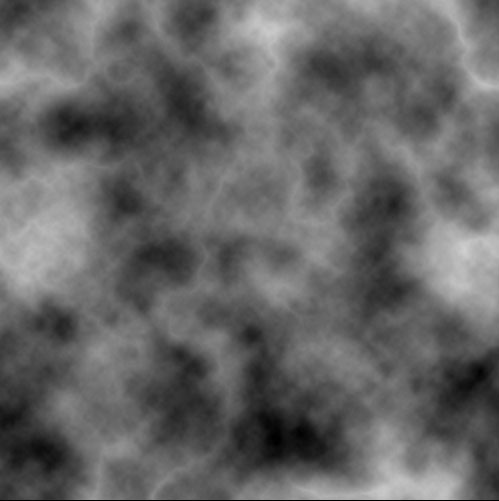
Step 3. Go to FILTER > RENDER > DIFFERENCE CLOUDS. Do this twice to achieve similar results below.
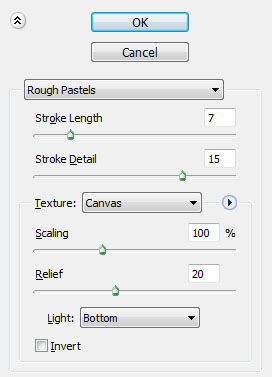
Step 4. Go to FILTER > ARTISTIC > ROUGH PASTELS and use the following values: Stroke Length 7; Stroke Detail 15; Texture Canvas; Scaling 100; Relief 20; Light Bottom. DO NOT INVERT.
The resulting image should look something like this.
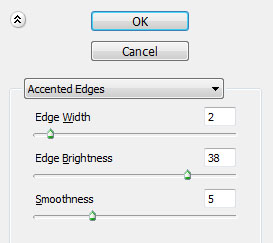
Step 5. Go to FILTER > BRUSH STROKES > ACCENTED EDGES. Set the following values: Edge Width 2; Edge Brightness 38; Smoothness 5.
This will be the result.
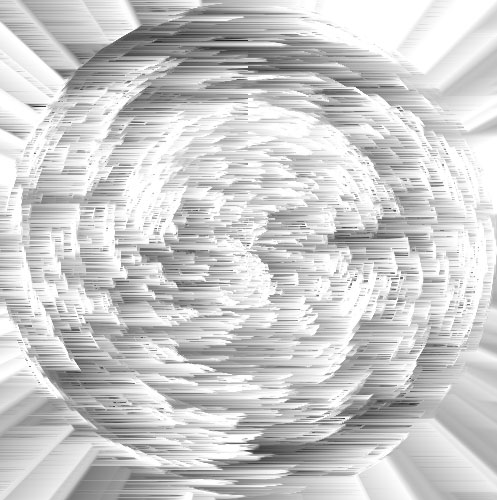
Step 6. Go to FILTER > DISTORT > POLAR COORDINATES and set it at RECTANGULAR TO POLAR.
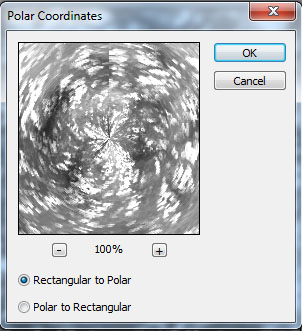
You should achieve this result.
Step 7. Go to FILTER > STYLIZE > WIND. Do this THREE (3) times.
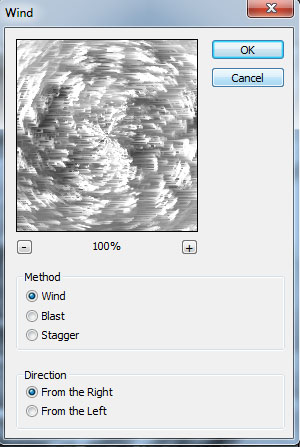
You should have something like this.
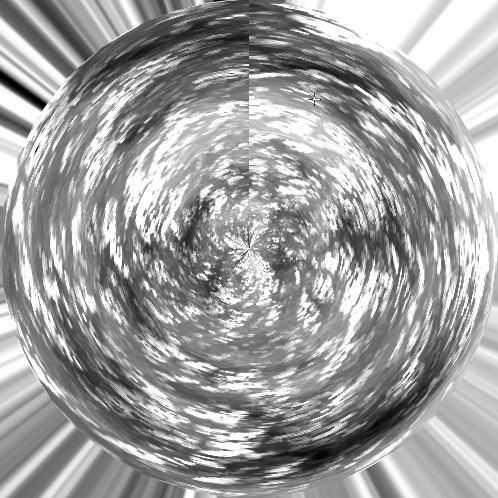
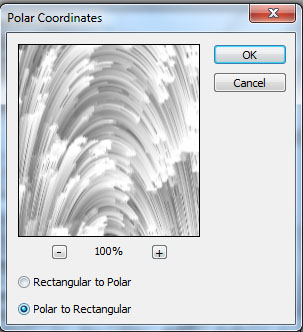
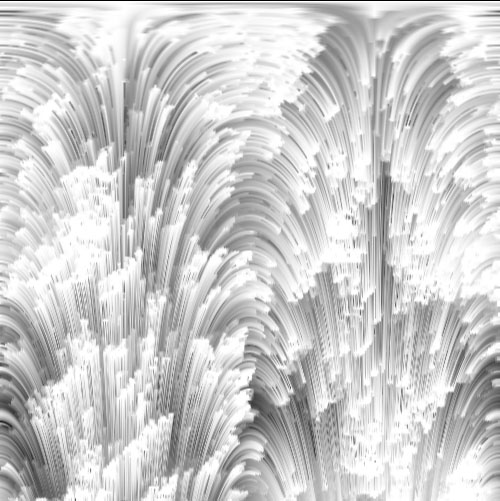
Step 8. Go to FILTER > DISTORT > POLAR COORDINATES. This time, go with POLAR TO RECTANGULAR.
We’re getting quite close. By this step, you will already have achieved this result. It looks like a bunch of optic fibers clashing against each other.
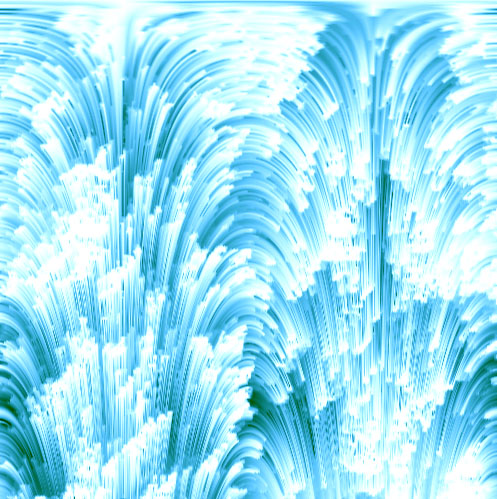
Step 9. Time to put in a bit of color. Each and every person may have his or her own color preferences, so go to EDIT > COLOR BALANCE and just go crazy with the colors. For this tutorial, we’re going for a bright blue tint.
Hint: If you wish to add more colors, you can either blend this with gradients or other colors.
Step 10. The optic fibers seem to be a bit too sharp. Let’s add a bit of soft glow now. Duplicate this layer and go to FILTER > BLUR > GAUSSIAN BLUR. Set it to 2.5
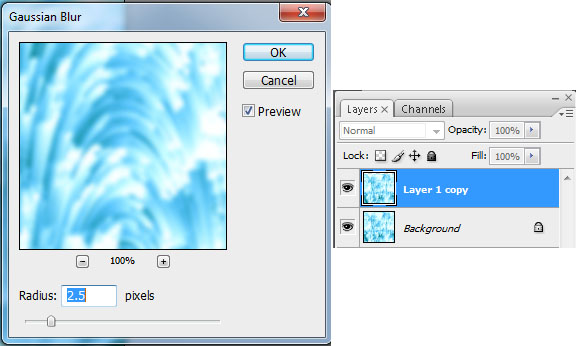
Step 11. Now it’s a little too blurred. In order to fix this, just go to the blurred layer, and change the OPACITY to 50.
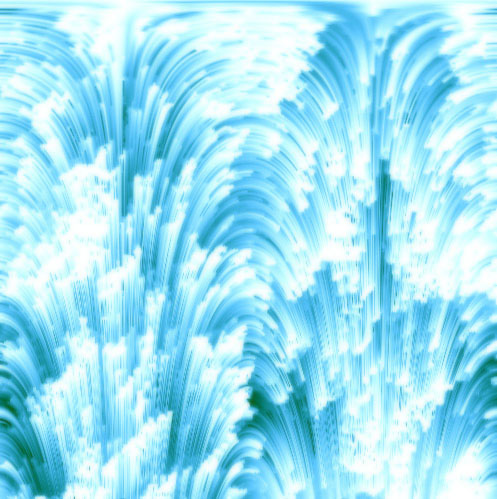
And we’re done! As mentioned, you can use this quick tutorial for backgrounds, patterns, textures, brushes, and whatnot. Just have fun with it!
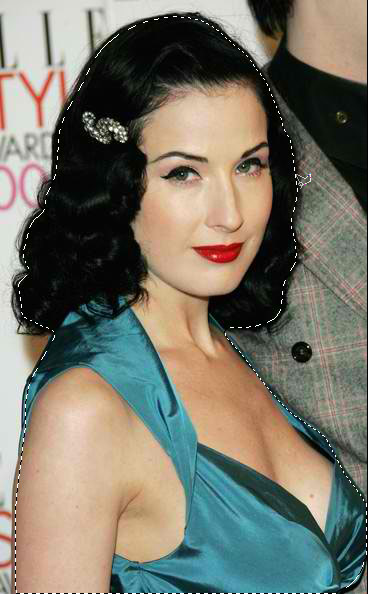
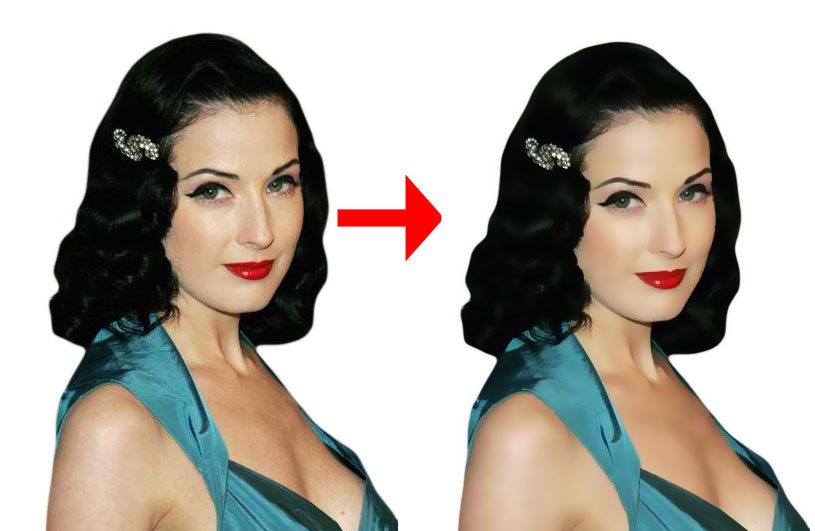
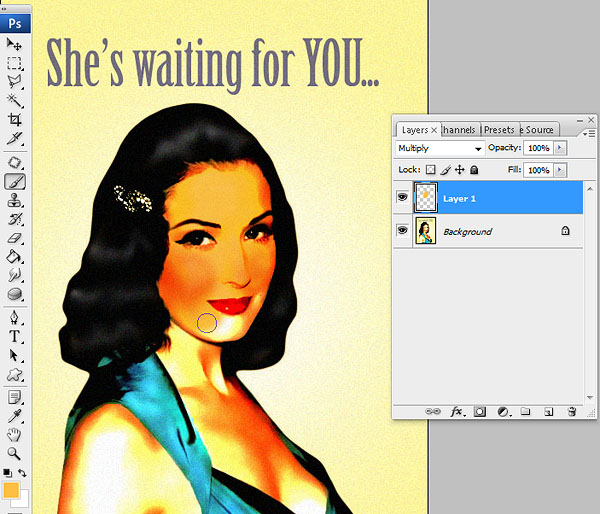
Make your own 1950s Pin-up Girl
You’ve seen them—painted posters of models and actresses pinned up on the walls of military barracks to give the boys something to fight for. With this tutorial, you can turn a normal photograph of a woman into one of those vintage pin-up girl posters.
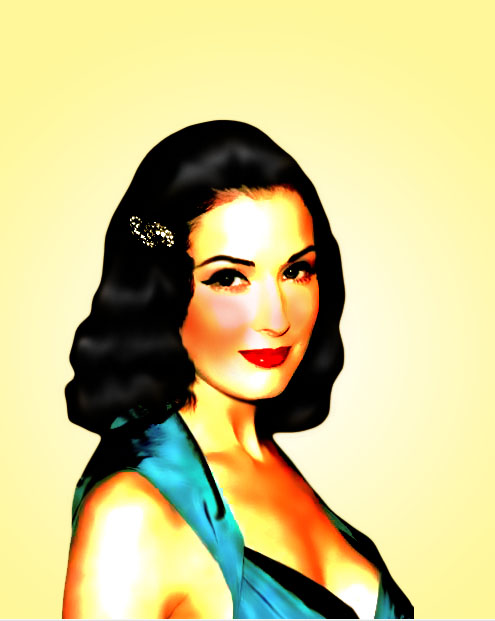
For this tutorial, we will use a photo of burlesque dance Dita Von Teese, courtesy of zimbio.com
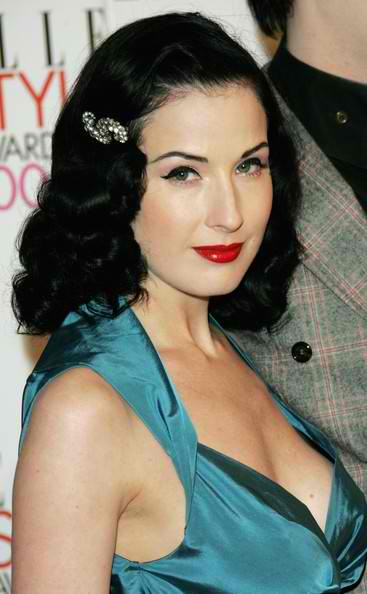
First, select the outline of your model. Use either the regular LASSO TOOL if you have a steady hand or the POLYGONAL LASSO TOOL. You may also use the PEN TOOL if you’re more comfortable with it. Make sure to refine the edge by going to SELECT > REFINE EDGE. Set the values until you are satisfied with the results.
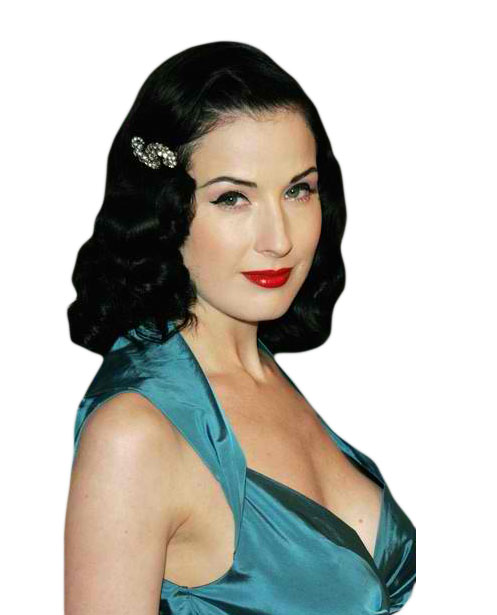
Copy the selection into a new document with a larger canvas. Choose WHITE for the BACKGROUND.
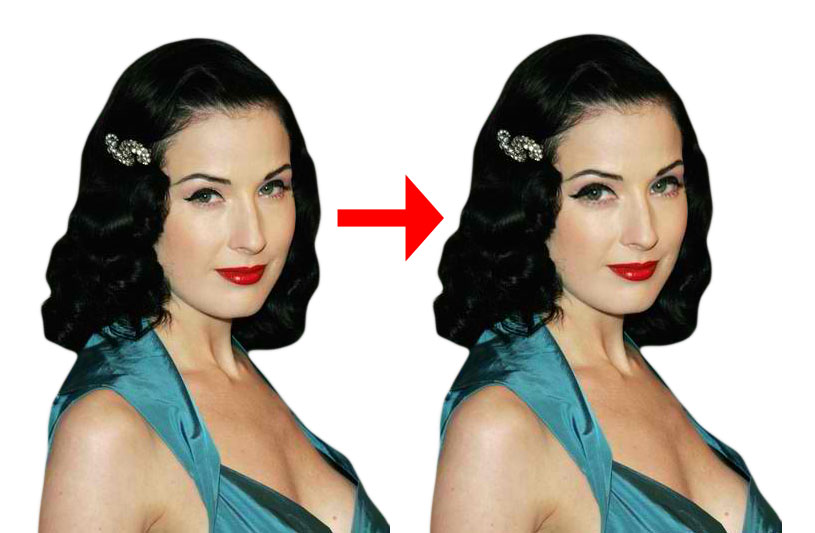
Magnify the picture and make the eyes larger to make it look more cartoonish, but still keeping it pretty. Do this by selecting the area around the eye, copying the eye to a new layer and resizing it. Make sure to refine the edge of the selection to make for a seamless image. Do the same with the other eye until you achieve the desired results.

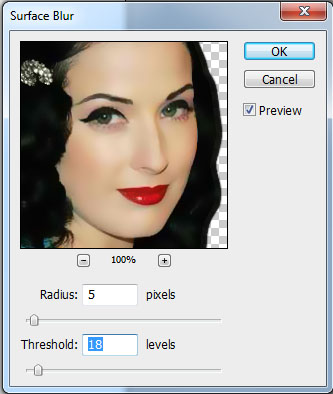
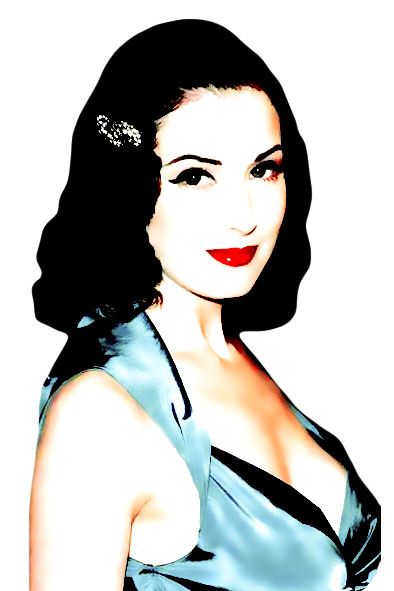
Go to BLUR > SURFACE BLUR and set RADIUS at 5 and THRESHOLD at 18 to get a nice, semi-painted look.
Next, copy this semi-painted into a new layer and set BLENDING OPTIONS to OVERLAY with 50% OPACITY.
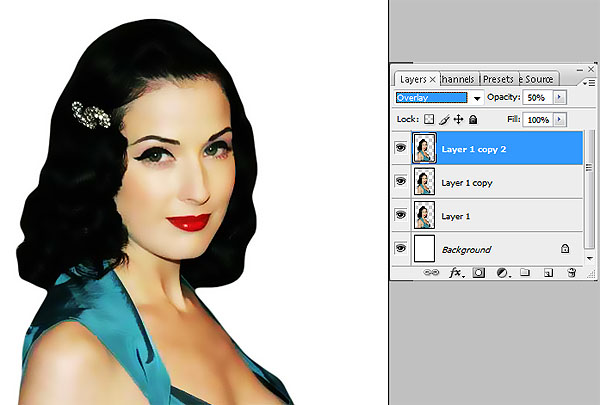
Copy the semi-painted layer again and set BLENDING OPTIONS to VIVID LIGHT with 100% OPACITY.
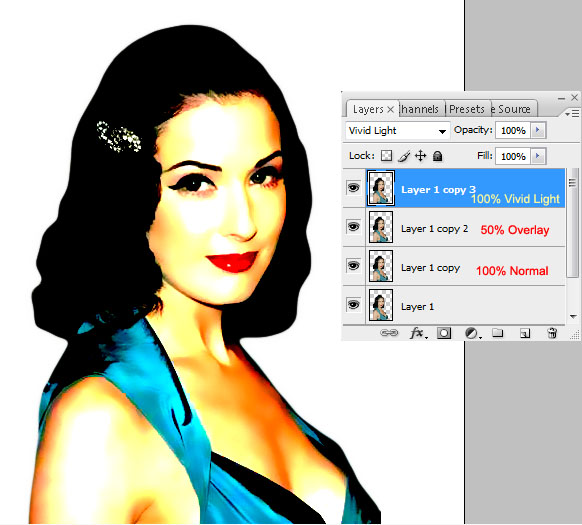
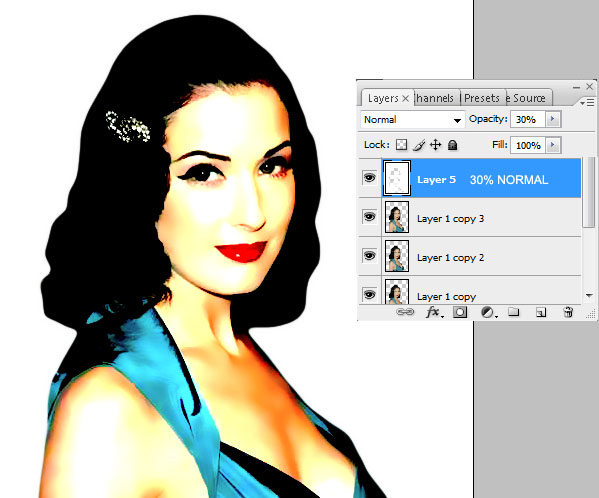
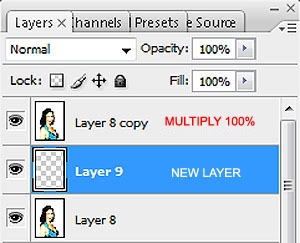
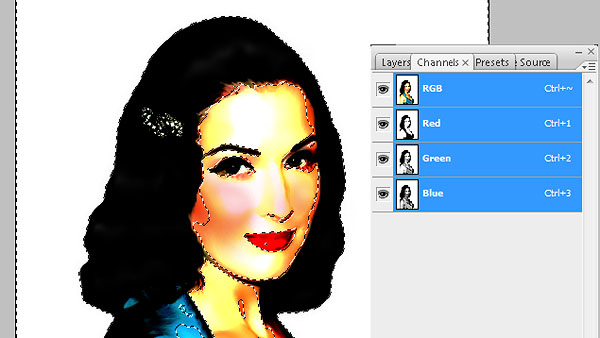
Go to CHANNELS tab. Hold the CTRL key and click on the RGB layer.

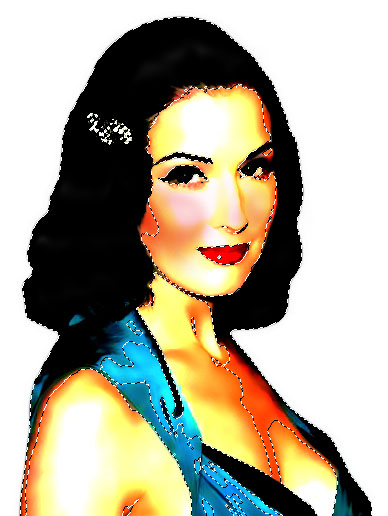
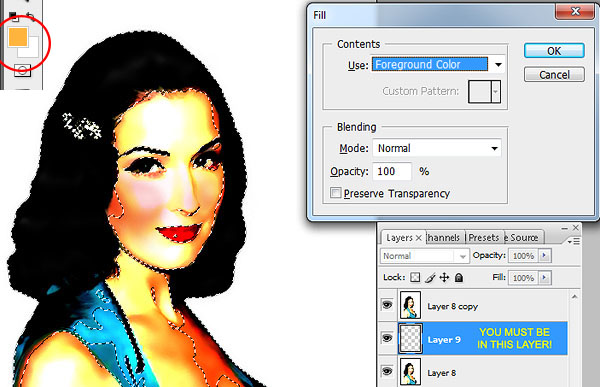
Go back to the LAYERS tab and add a NEW LAYER above the rest. Fill this layer by going to EDIT>FILL or by pressing SHIFT+F5. Fill with WHITE. The result will be the image below.

Change the OPACITY of the newly-filled WHITE layer to 30%.
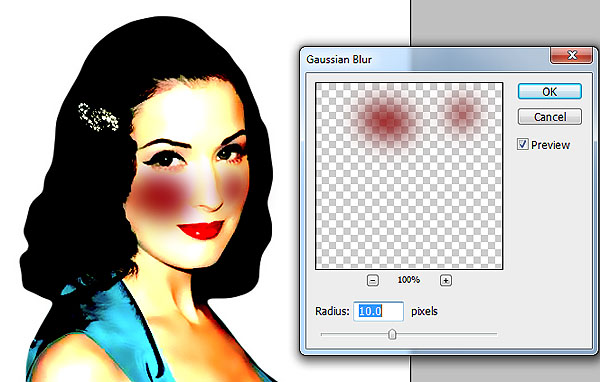
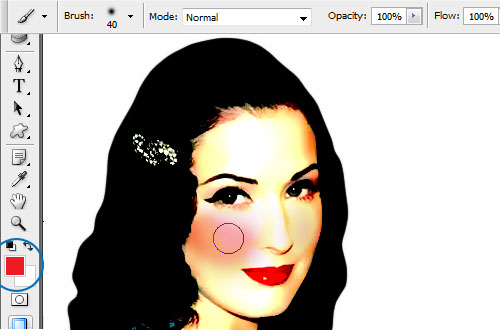
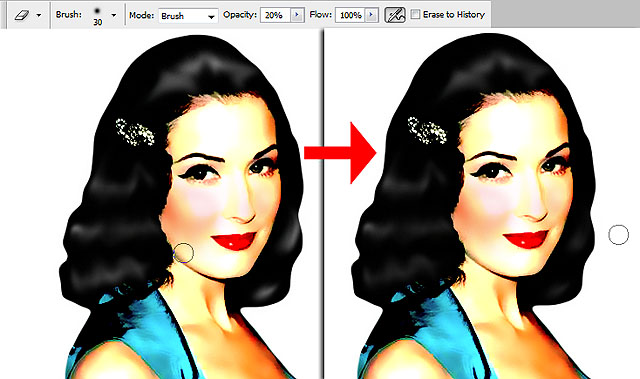
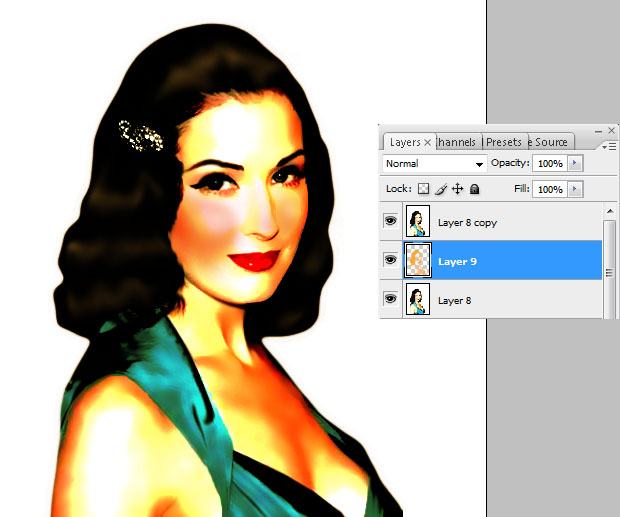
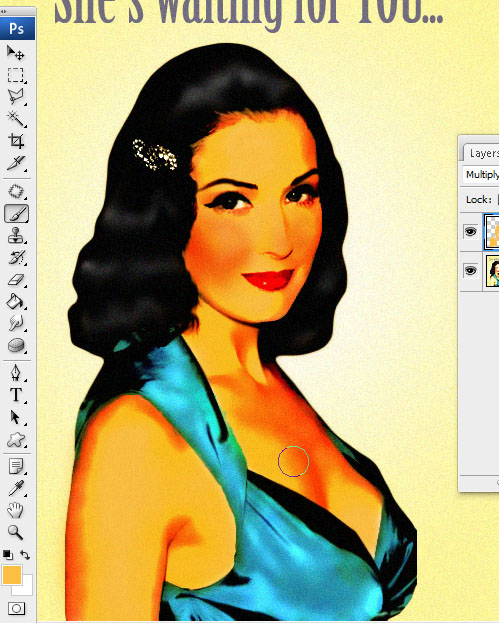
Let’s put on a bit of rouge. Add a NEW LAYER and change the BLENDING OPTIONS to MULTIPLY. Choose a DARK RED color and using a SOFT BRUSH, put the rouge on her cheeks within the new layer.

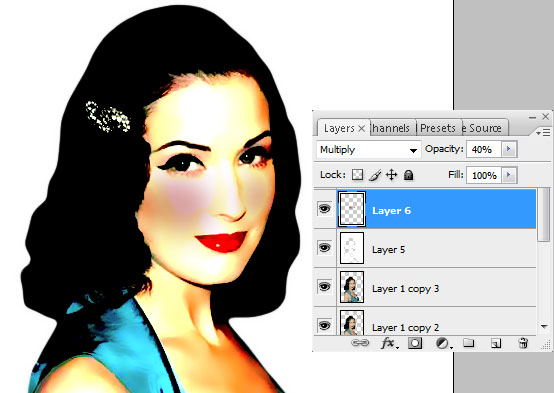
Still on the rouge layer, go to BLUR> GAUSSIAN BLUR and set it at 10. Then, change the OPACITY of this layer to 40.
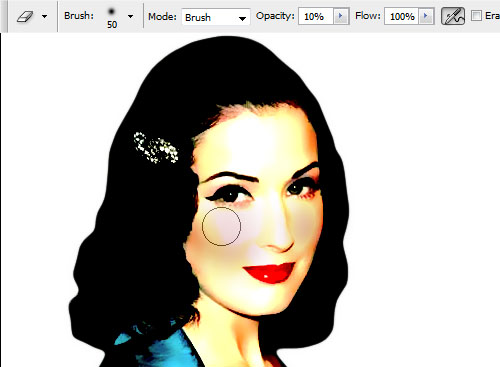
Pick the ERASER TOOL, set it at SOFT BRUSH with 10% OPACITY and begin to gently remove the rouge from her cheeks. Make sure to retain some of the red on her cheekbones for shading purposes.
Pick up the BRUSH TOOL, set it at SOFT BRUSH and choose a brighter red color. Then, apply rouge again on her cheeks.
Using the ERASER TOOL, set at SOFT BRUSH with 10% OPACITY, brush away at the rouge to give it a roundish, healthy look. Take notice of where the lighting should be on the cheeks.
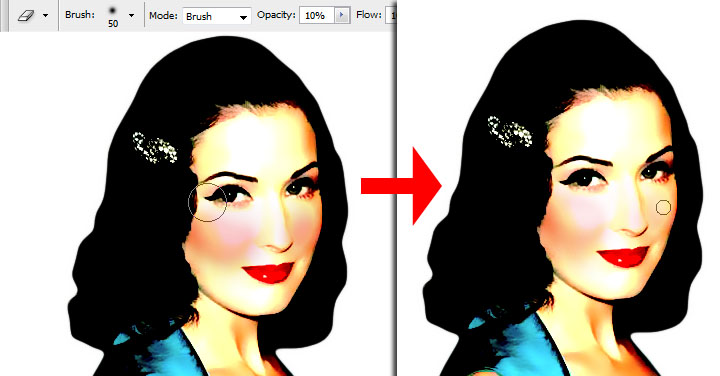
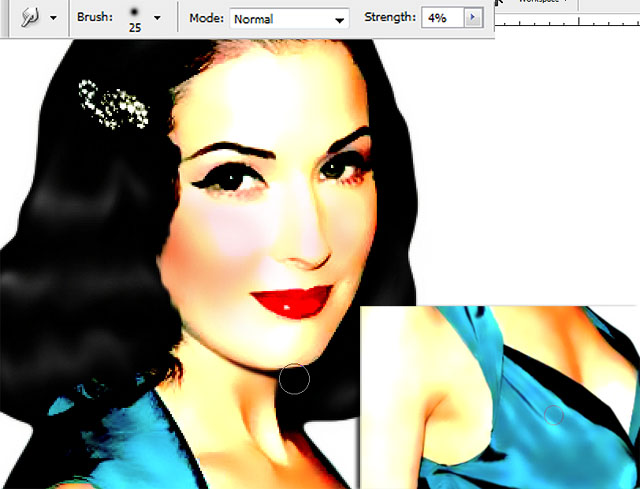
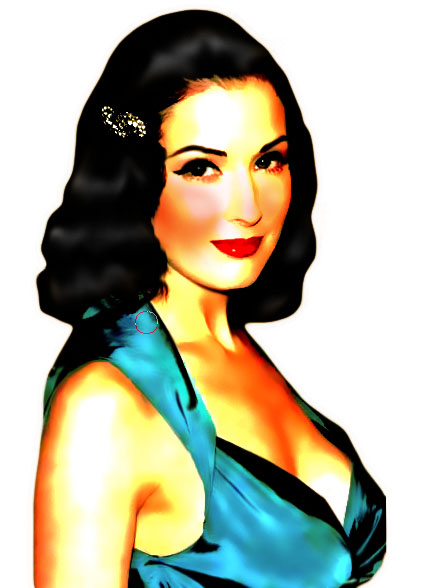
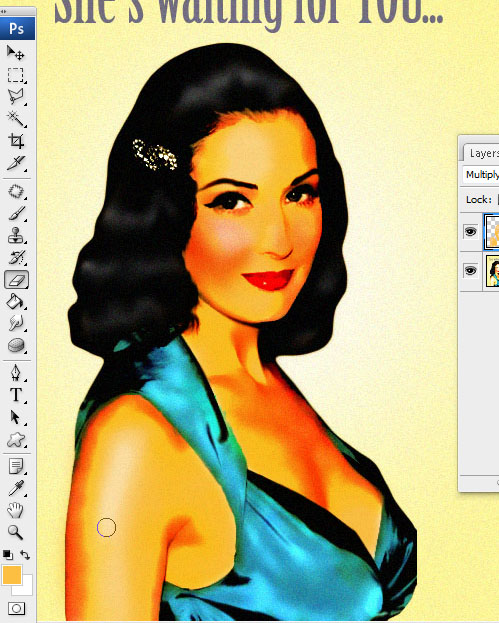
Let’s make the hair shine a bit. Create a NEW LAYER. Use a SMALL SOFT BRUSH to pain streaks of white across the hair.
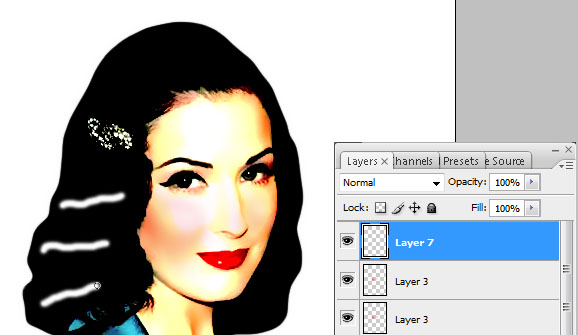
Use the SMUDGE TOOL, set at 50% STRENGTH to spread the sheen on the hair,
Choose the ERASER TOOL set at 20% OPACITY. Brush away at the sheen to give it a more natural look. Take care to still keep some parts of the sheen brighter to give it a gradient feel.
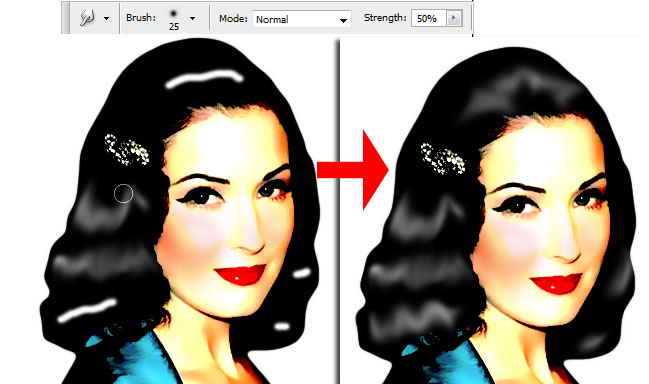
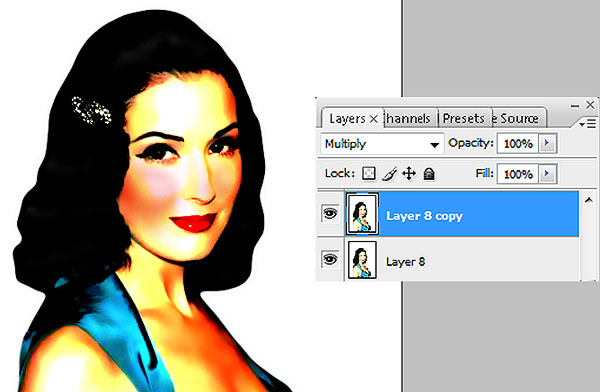
MERGE ALL THE LAYERS and iron out the details. Use the SMUDGE TOOL set at 4% STRENGTH to brush at any hard areas of the image to give it a more painted look.
DUPLICATE THE LAYER and set BLENDING OPTIONS to MULTIPLY at 100% OPACITY.
Create a new layer between the duplicated layer and the original merged layer.
Go to the CHANNELS tab. Hold the CTRL key and click on the RGB layer. Then, press CTRL+SHIFT+I to invert the selection.
Go back to the LAYERS tab. Make sure you’re in the TRANSPARENT LAYER. First, use the EYE DROPPER tool to pick a skin color, preferably the midtones. Then, go to EDIT> FILL and use FOREGROUND COLOR. Result will be the image below.
As you can see, the sheen of the hair also changes to an orange tint. This can easily be fixed by using the BRUSH TOOL set at SOFT BRUSH. Still on the same layer with the orange / skin color tint, pick the color WHITE and begin brushing away. Do the same for the dress.
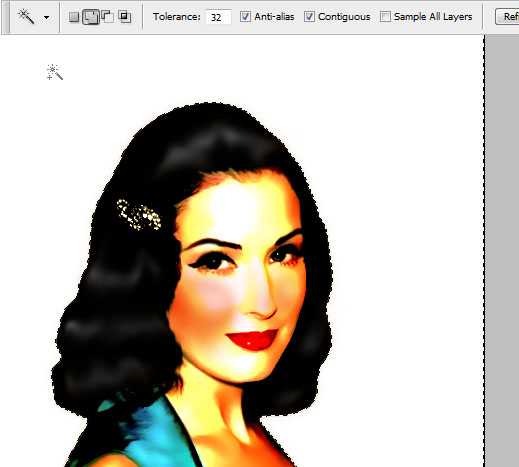
Now it’s time for the background. MERGE THE VISIBLE LAYERS. Then, using the MAGIC WAND TOOL, select the white background.
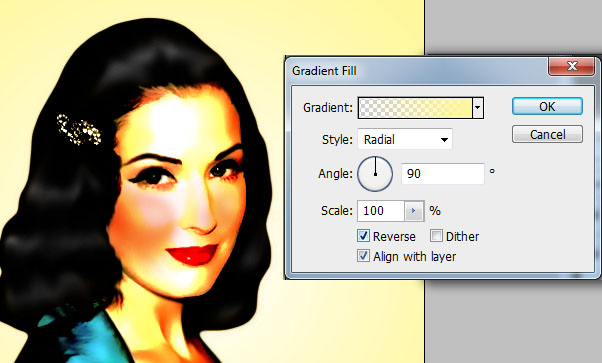
Go to LAYER> NEW FILL LAYER> GRADIENT. Choose a fleshy, yellowish tint and set it at RADIAL. Make sure the center of the RADIAL is WHITE. Reverse if necessary. MERGE THE LAYERS.
Duplicate the recently merged layer. Go to FILTER> NOISE> ADD NOISE and set it at UNIFORM, with 15% for the AMOUNT. Then, reduce the OPACITY of this NOISE LAYER to 40%.

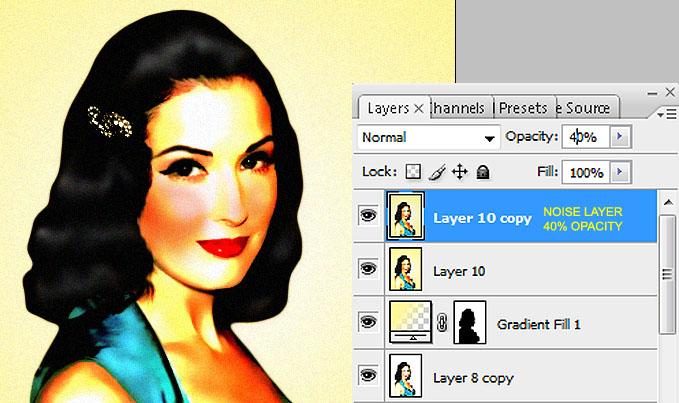
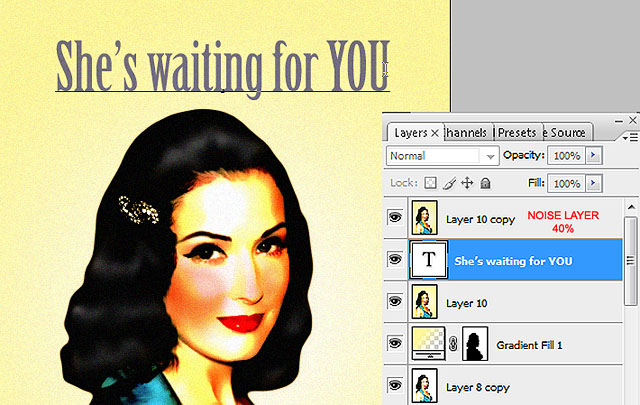
Add your text below the NOISE LAYER. Choose a DARK BLUE color. This will be the result.
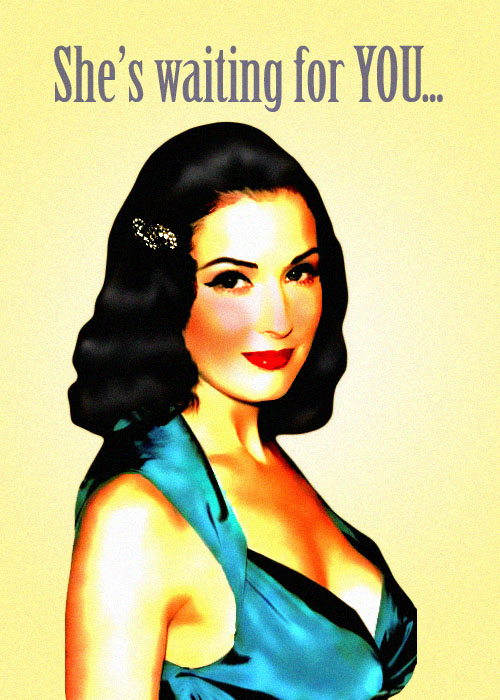
You can stop at this point in time. However, if you think she’s a bit too pale, there are still some last few tricks we can do.
FLATTEN THE IMAGE by going to LAYERS> FLATTEN IMAGE. Add a NEW LAYER and set the BLENDING OPTIONS to MULTIPLY. Then, use the EYE DROPPER tool to pick a MIDTONE color of her skin and begin brushing over the skin with a SOFT BRUSH.
Then, using varying size of ERASER TOOL set at SOFT BRUSH with a 20% OPACITY, begin erasing the areas where it should be lighter until you achieve the results below.
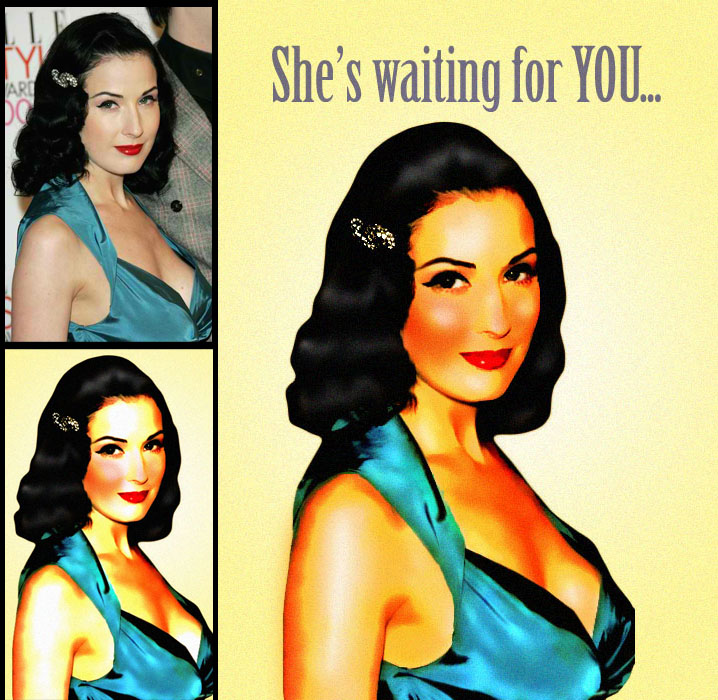
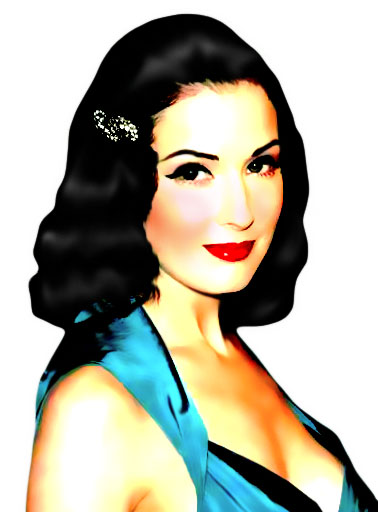
So there you have it, a 1950s Pin-up girl. Please share your creations in the comments. Now go find a lonely soldier to send it to.
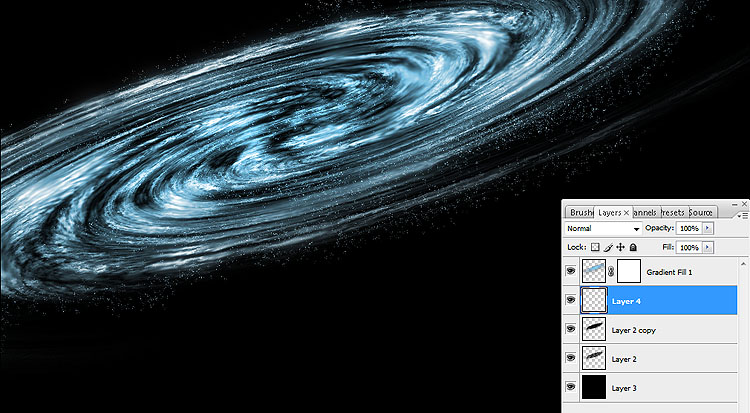
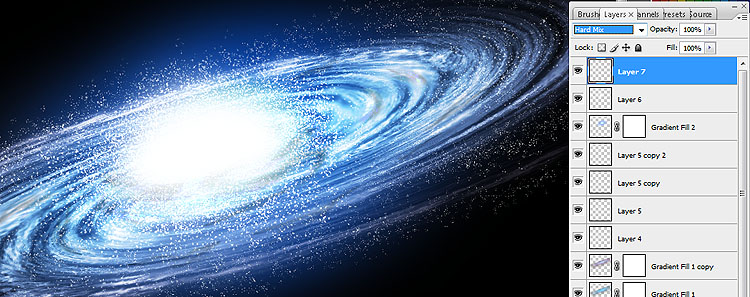
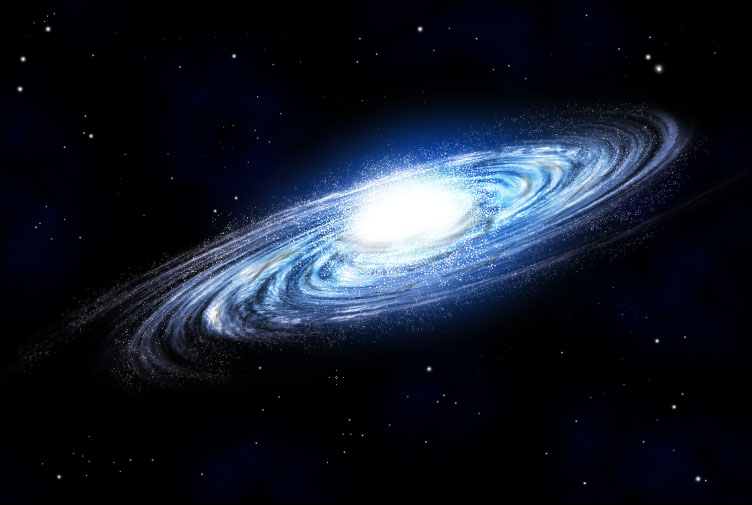
Visit a Galaxy Far, Far Away In This New Photoshop Tutorial
Take a trip through the cosmos. Using a few nifty tricks in Photoshop, you can get as close as possible to a spiral galaxy without having to travel several light years.
To start, open a new document. Dimensions should be 3000 x 3000 pixels, transparent background.

Fill up the document with black.
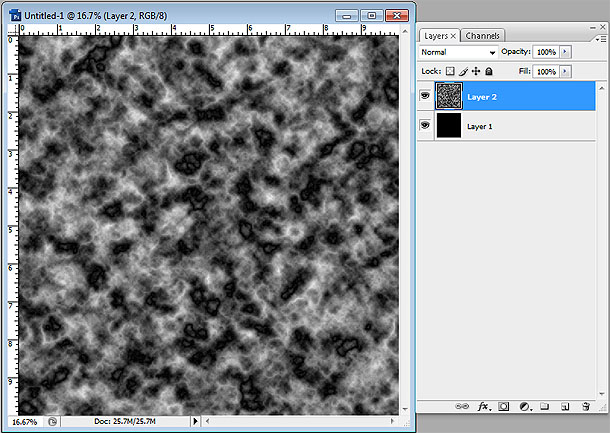
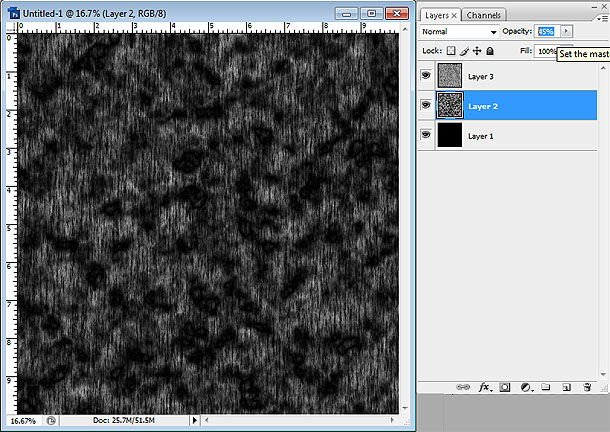
Add a new layer and go to Filter> Render> Clouds.
On the same layer, go to Filter> Render> Difference Clouds
Repeat the process. Filter> Render> Difference Clouds
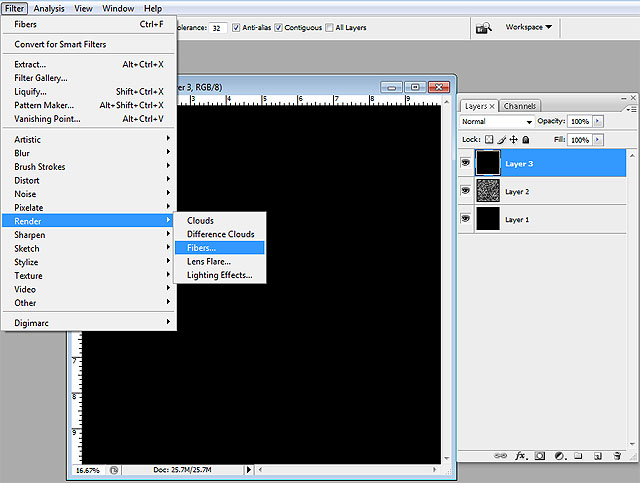
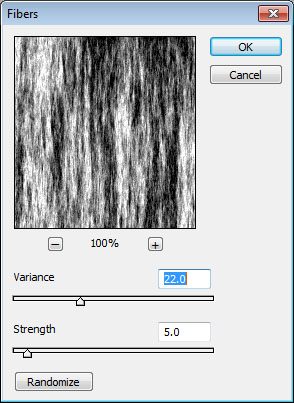
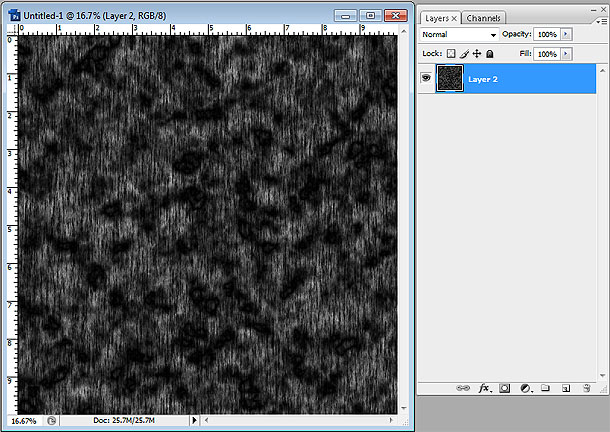
Add a new layer on top of the clouds layer and fill it with black. Then, go to Filter> Render> Fibers. Put the Variance at 22 and the Strength at 5.
Change the Blending Options of the fibers layer to Overlay.
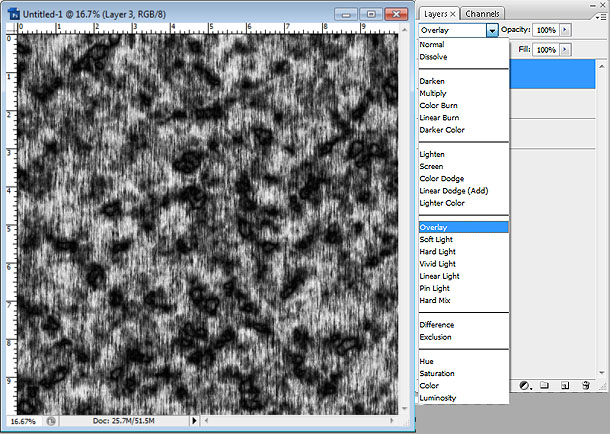
Go to the layer below (clouds) and change the Opacity to 45%.
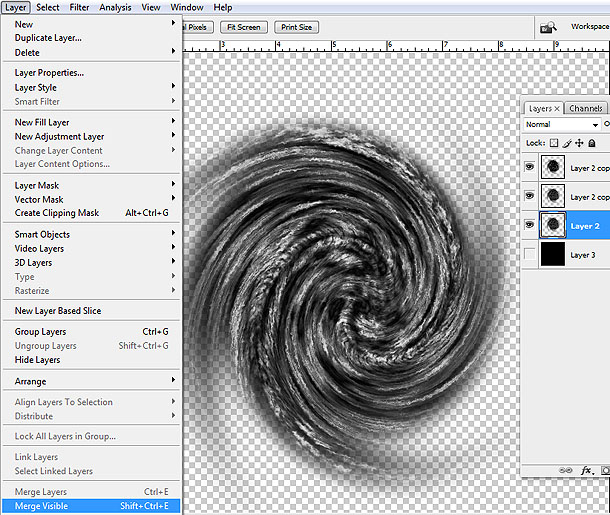
Merge the layers.
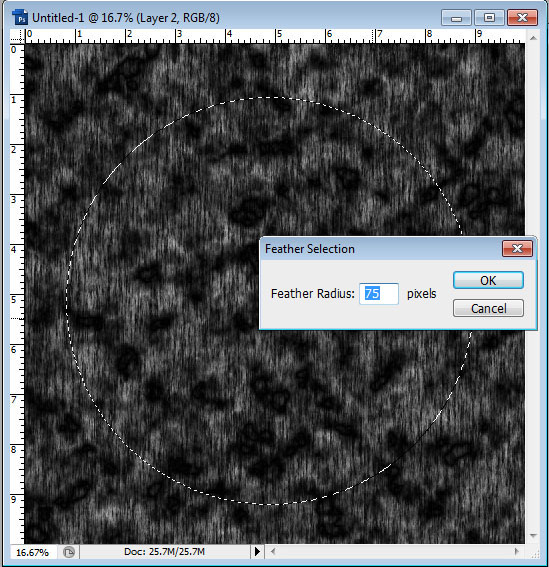
Choose the Elliptical Marquee Tool and create a Circular Marquee. For a perfect Circle, hold Shift and drag the Elliptical Marquee Tool. Once you have the Circular Marquee, go to Select> Modify> Feather. Feather should be at 75.
Invert the Circular Marquee. Do this by pressing Ctrl + Shift + I. Press Delete so that only a soft circle will remain of the layer.

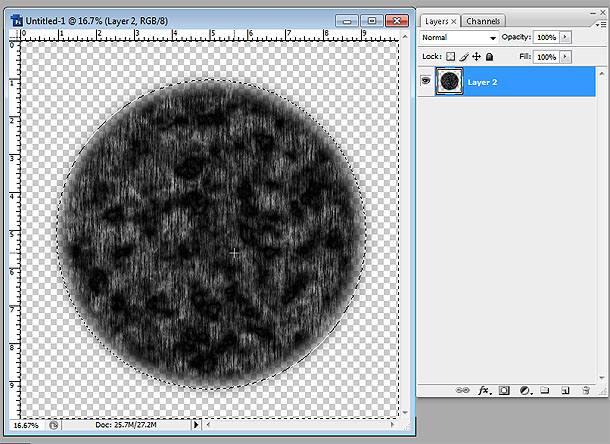
So you can see your progress, add a new layer beneath the Circle and fill it with black.

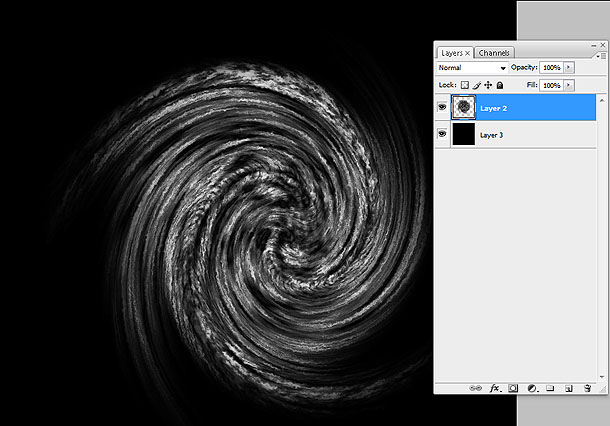
Go back to the layer with the circle. Go to Edit>Transform>Warp. Then, drop down the Custom dropdown menu and choose Twist. Bend should be at 100. Repeat the process.
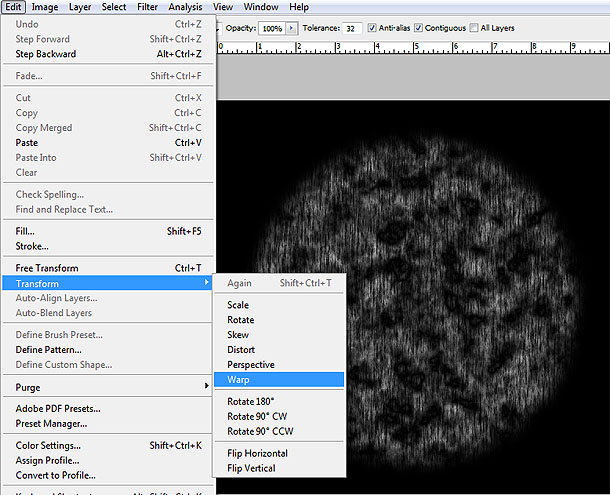
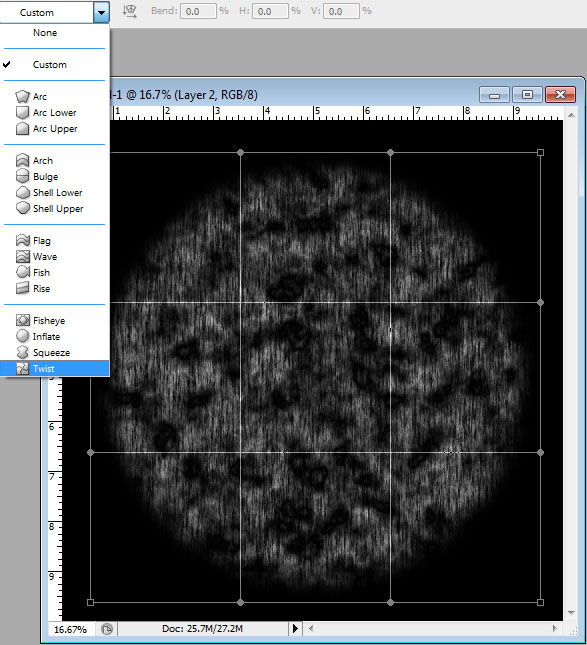
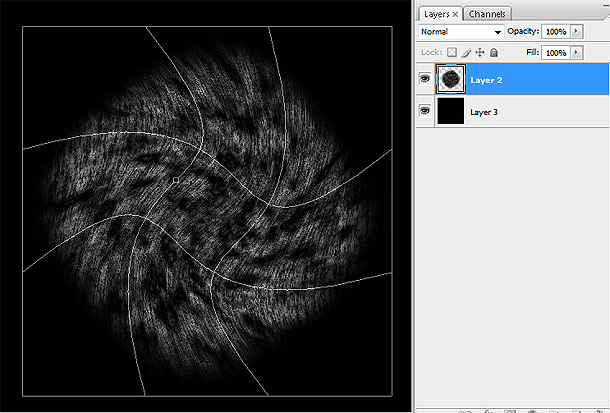
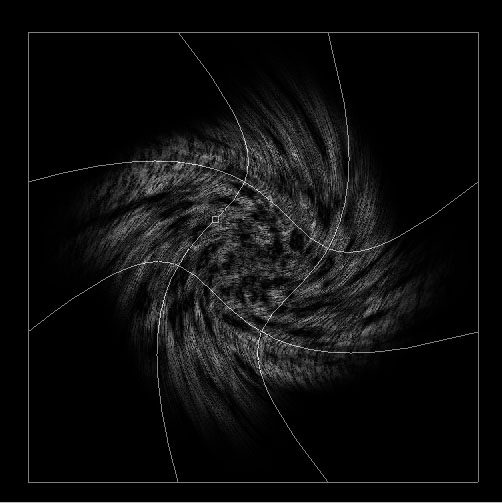
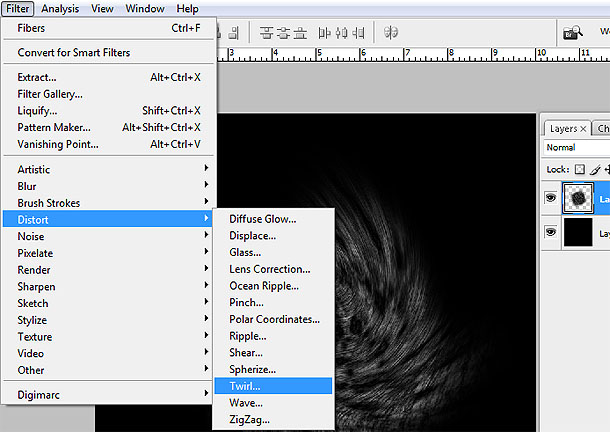
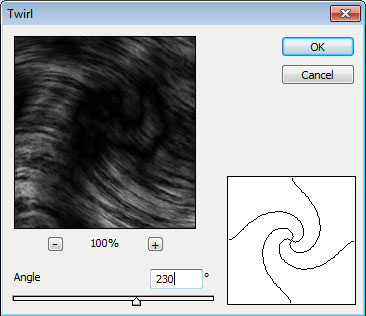
Go to Filter>Distort>Twirl. Twirl should be at 230 to get the right results.
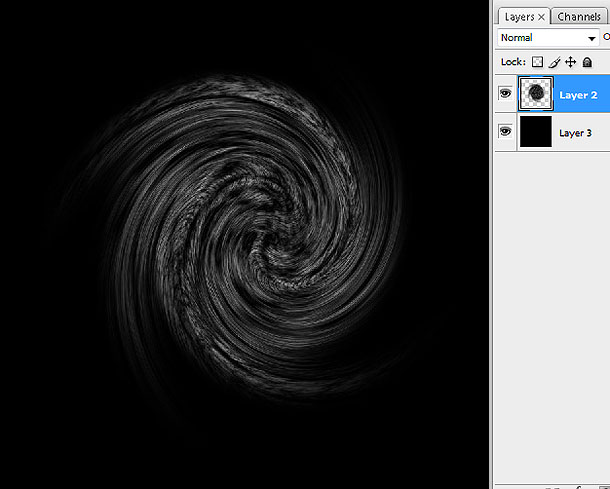
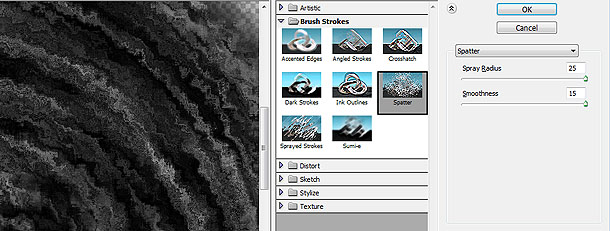
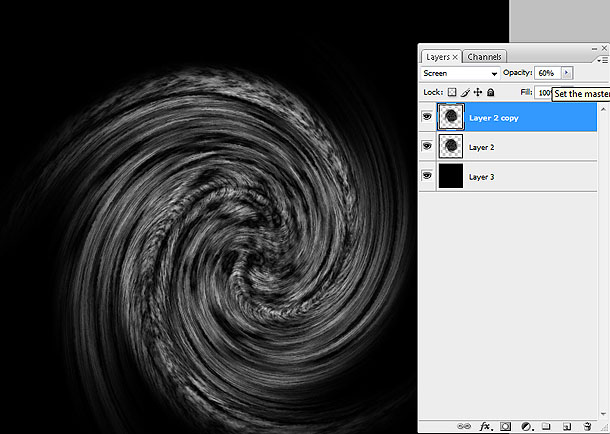
Duplicate the swirl layer and go to Filter> Brush Strokes> Spatter. Spray Radius should be 25, and Smoothness at 15.
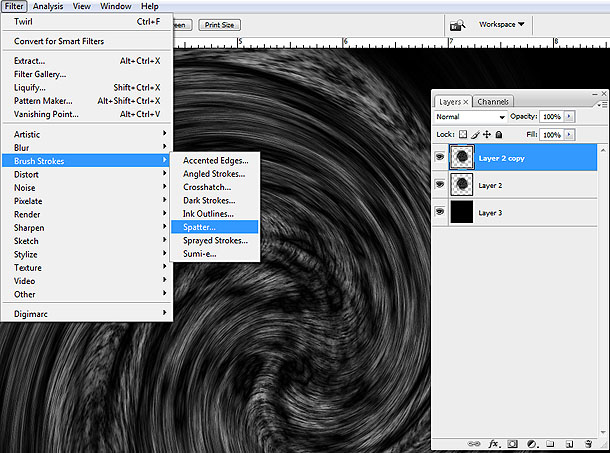
On that same layer, change the Blending Options to Screen and Opacity to 60%.
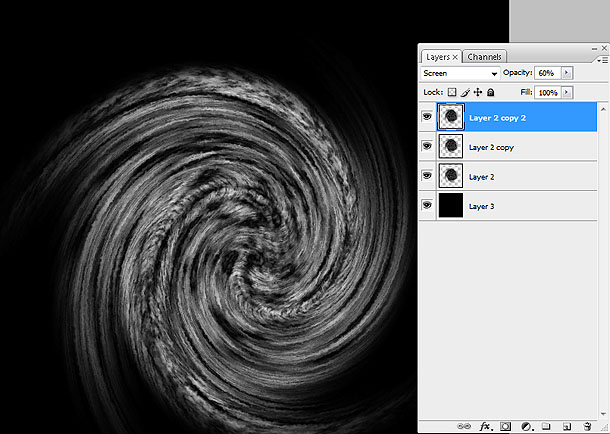
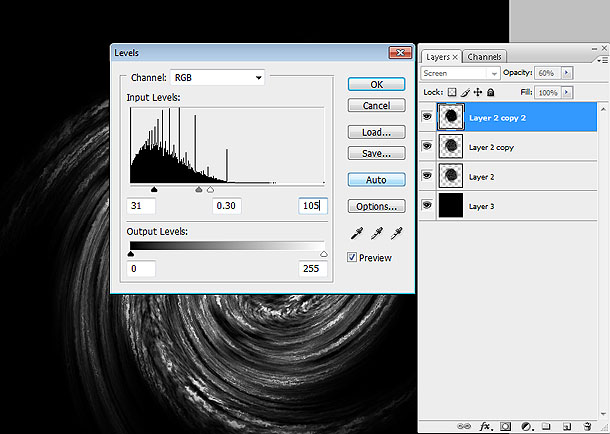
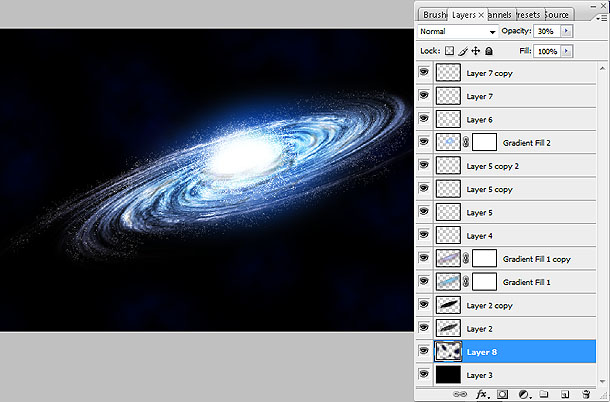
Duplicate the layer. On the new layer, go to Levels and change input the following: 31, 0.30, 105.
Temporarily hide the layer with the black background and go to Layer>Merge Visible Layer. Then make the black background visible again.
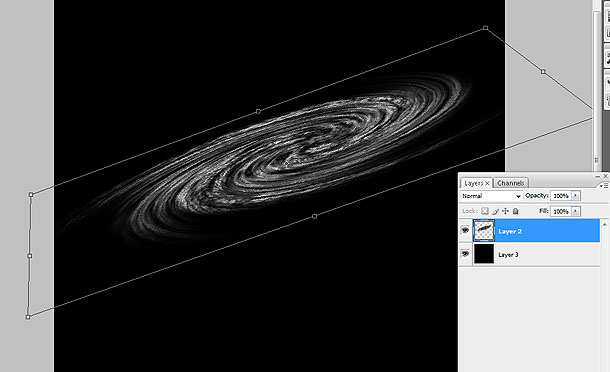
Go to Edit> Transform> Distort. Change the angle to something similar to the picture below.
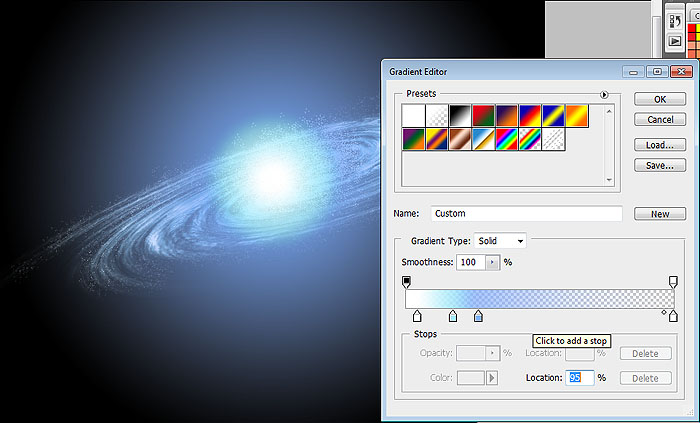
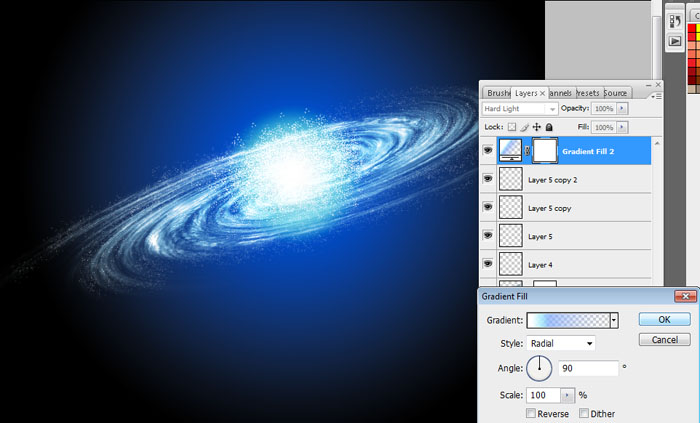
Go to Layer> New Fill Layer> Gradient. Change the color to a lighter blue color, heading towards transparent. Make sure the Gradient Style is Radial, the angle set to 28.5, and the Scale at 125. Rasterize that layer (Layer> Rasterize> Layer).
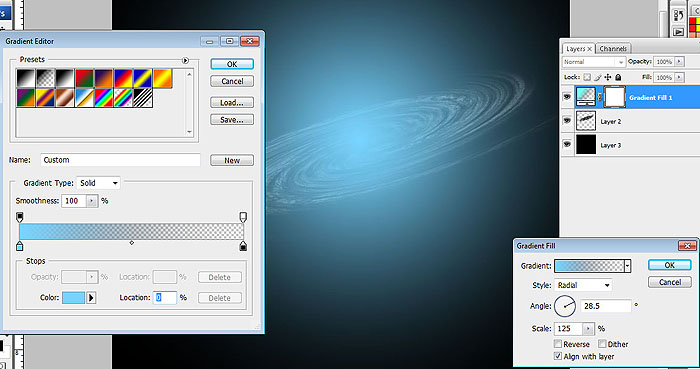
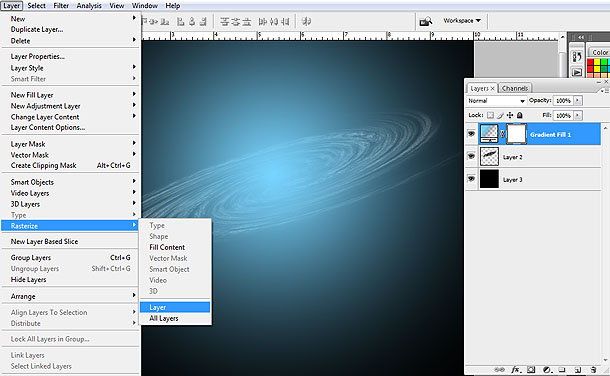
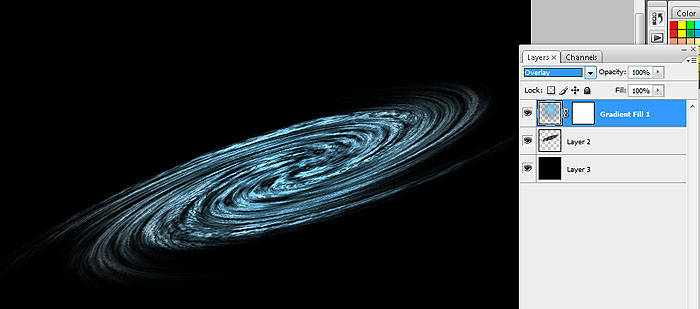
Change the Blending Options of your Rasterized Gradient Layer to Overlay. Then, go to Edit> Transform> Transform again so it’ll blend well with the spiral.
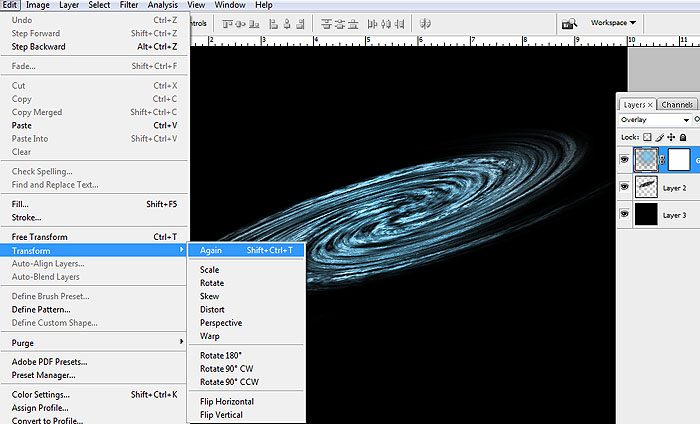
Go back to your spiral layer and use the smear tool to add movement to the spiral. Make sure to flow with the spiral’s direction.
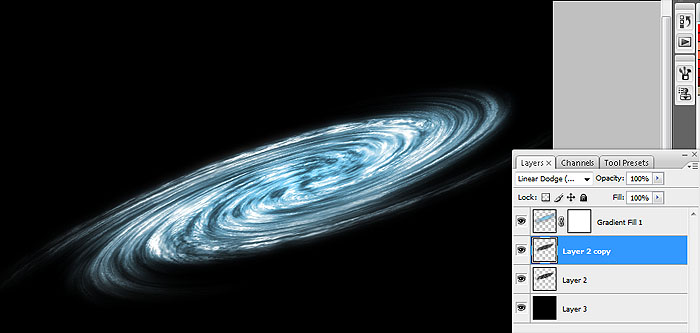
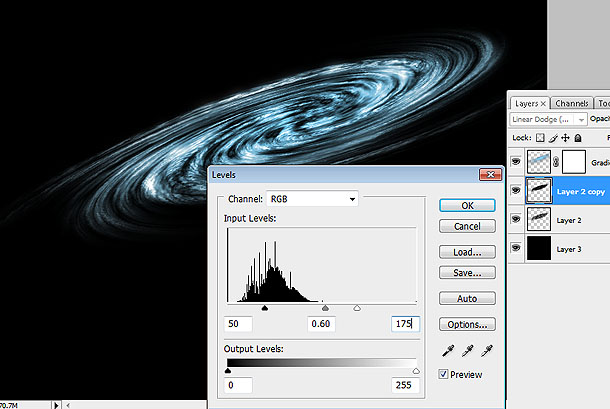
Duplicate the spiral layer. On the new spiral layer, go to Filter> Blur> Gaussian Blur. Set it to 25.
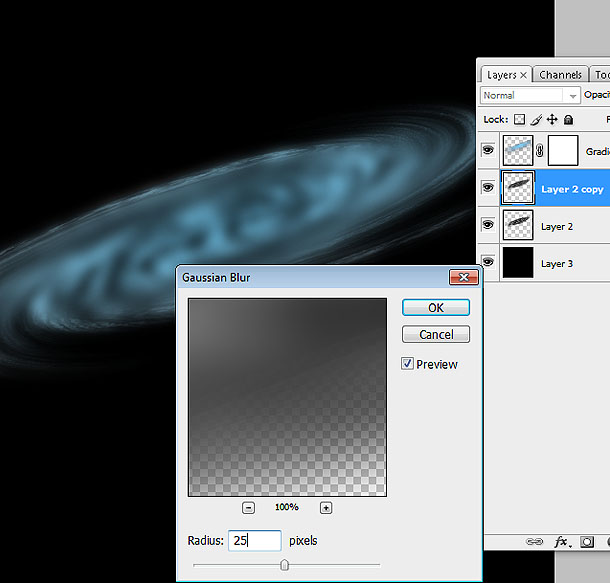
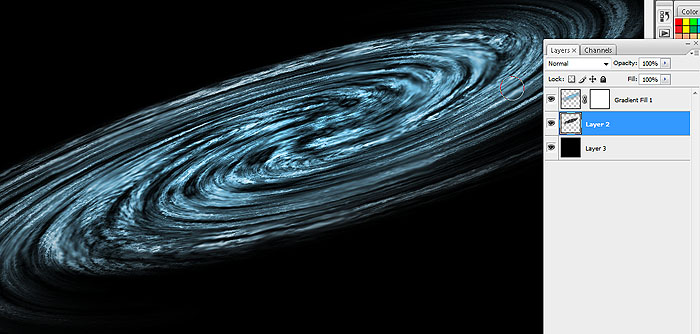
Change the Blending Option of the Blurred layer to Linear Dodge (Add). Then, go to Levels and input the figures: 50, 0.60, 175.
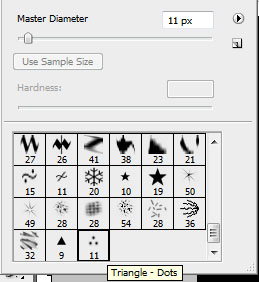
Now it’s time to create some stars. Choose from the Assorted Brushes and pick Triangle Dots.
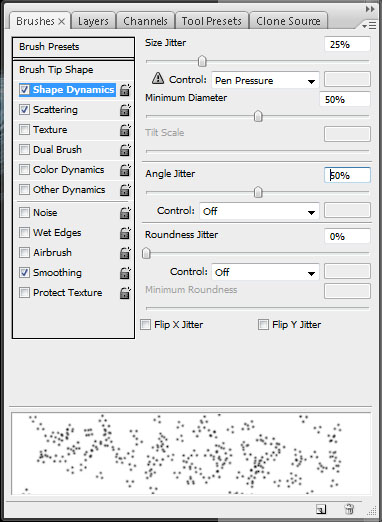
Change the Brush Options. Go to Shape Dynamics. Set Size Jitter to 25%, Minimum Diameter to 50%, and Angle Jitter to 50%.
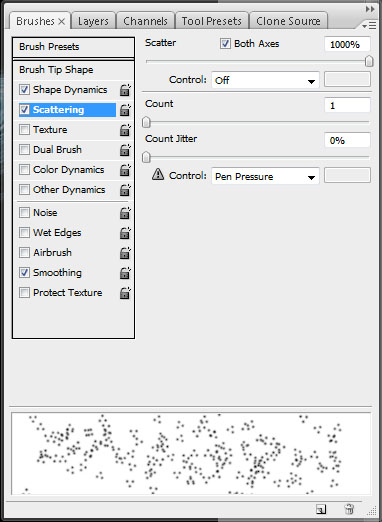
Next, go to Scattering. Set Scatter to 1000%.
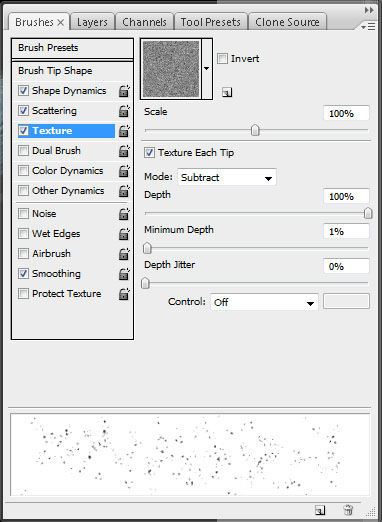
Then, go to Texture. The default options will do.
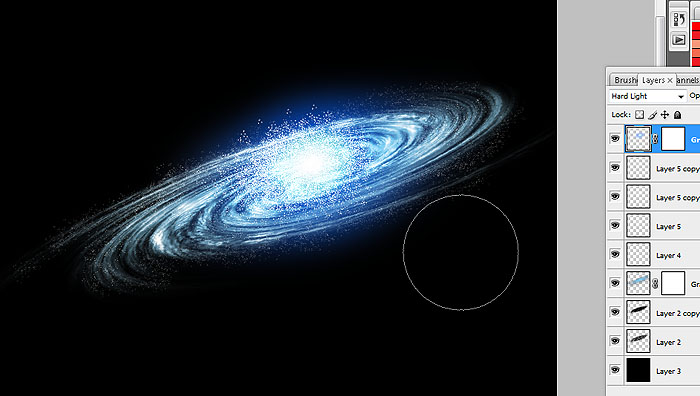
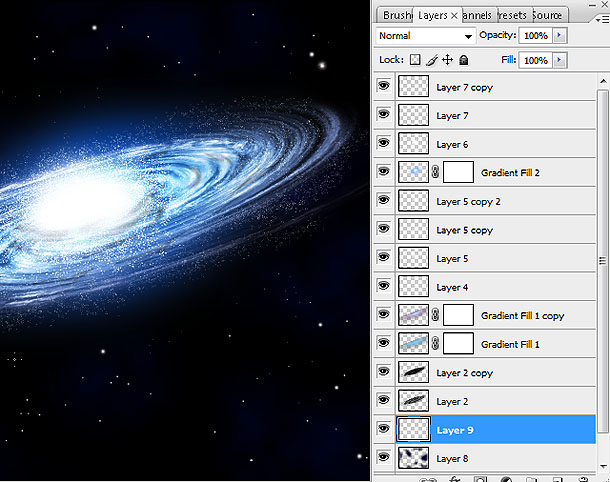
Add a new layer. Using the new brush, paint the “stars” over the spiral. It would be recommended you move the new layer at the top of all other layers.
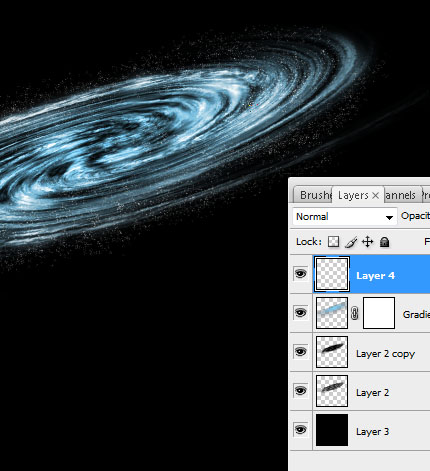
Create another layer and add a concentration of “stars”. Duplicate this “concentrated star” layer 2 times.
Go to Layer> New Fill Layer> Gradient. Change the Gradient Style to radial and change the gradient colors to ones similar to the picture below.
Change the Blending Options of the new gradient layer to Hard Light.
Rasterize that new gradient layer. Then, using an Eraser Tool set at 200 pixels, erase a bit more of the gradient to make the glow concentrated to the center.
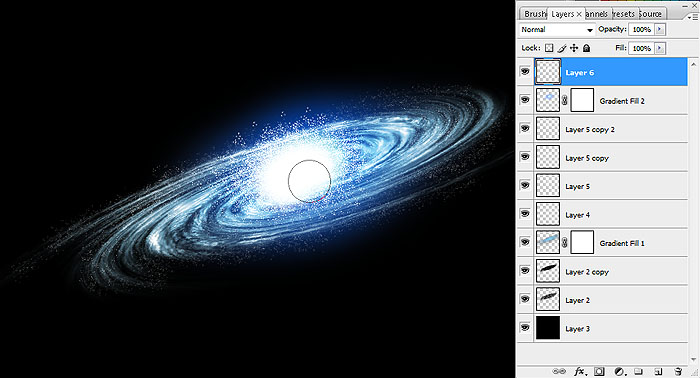
Add a new layer on top of the gradient. Using a Soft Brush Tool set at 100-200 pixels to paint a White glow at the center of the spiral. Afterwards, set the Blending Options to Screen.
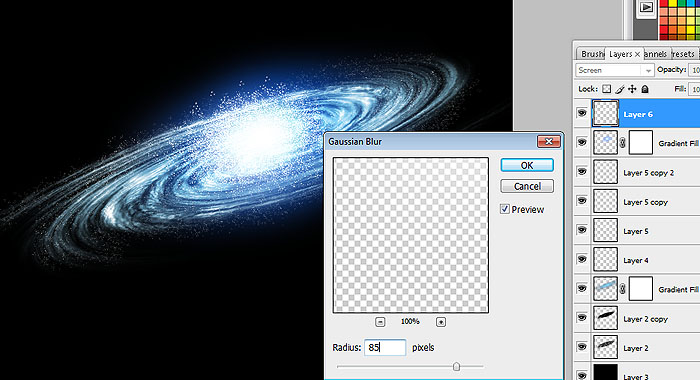
Blur that same layer by going to Filter> Blur> Gaussian Blur and set it to 85 pixels.
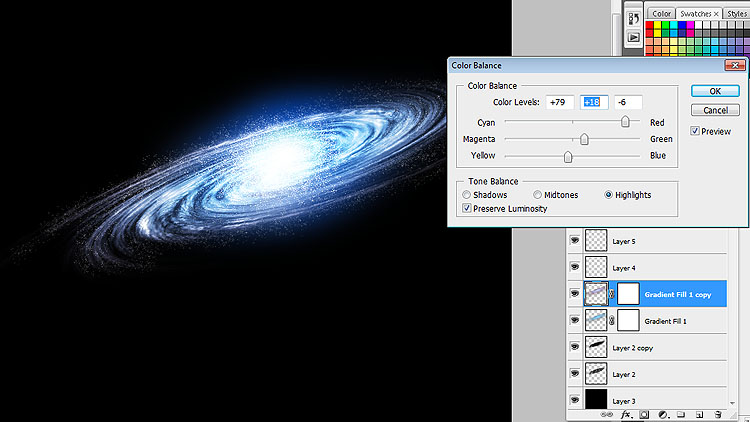
Go back to your first Gradient Fill Layer at the bottom and Duplicate it. Then, go to Edit> Color Balance and input the following: Shadows 68, 13, -19 / Midtones 1, 58, 21 / Highlights 79, 18, -6.
Go back to the layer with the central glow of the spiral. Again, using a Soft Brush Tool with the Color White, brighten up the spiral’s core.
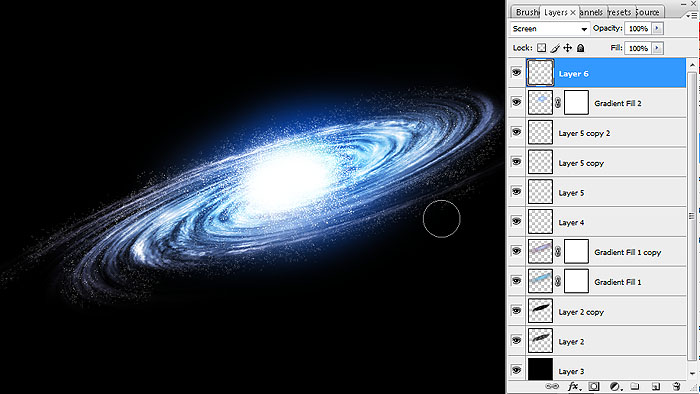
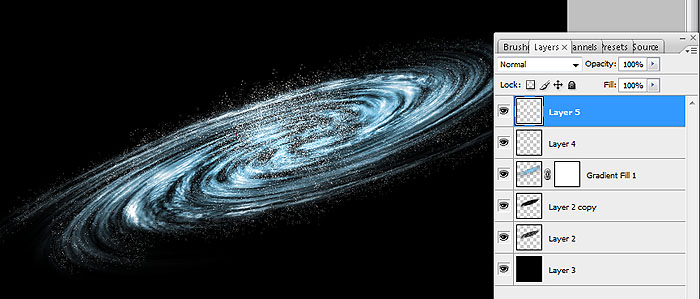
Add a new layer. Using a Hard Round Brush set at 3 pixels with the Color Black, draw squiggly lines around the glowing core of the spiral, as well as certain portions of the spiral itself.
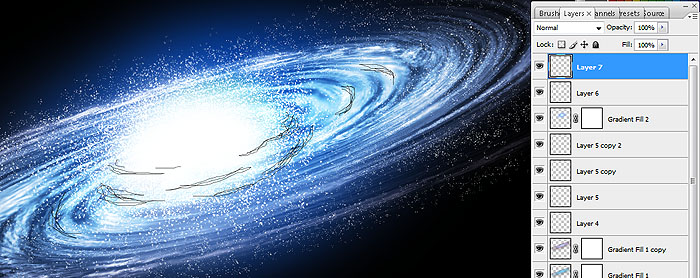
Use the Smear Tool to make the lines blend in with the spiral.
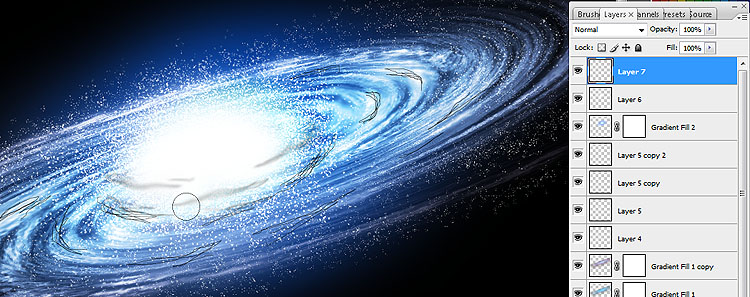
Still in the same layer, change the Blending Options to Hard Mix.
Duplicate the layer but instead of Hard Mix, change the Blending Options back to Normal and change the Opacity to 50%.

It’s time to do the background. Create a new layer over the bottom most layer (black background) and using the Lasso Tool, create patches of where you want the “cosmic cloud” to be. Make sure the tool is set to Add To Selection.
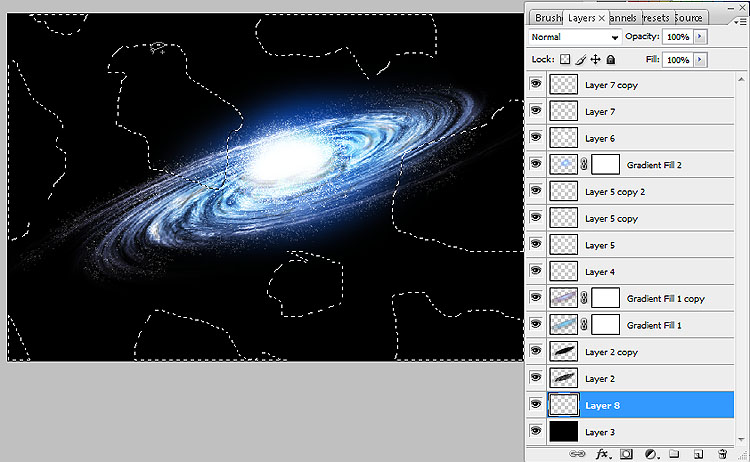
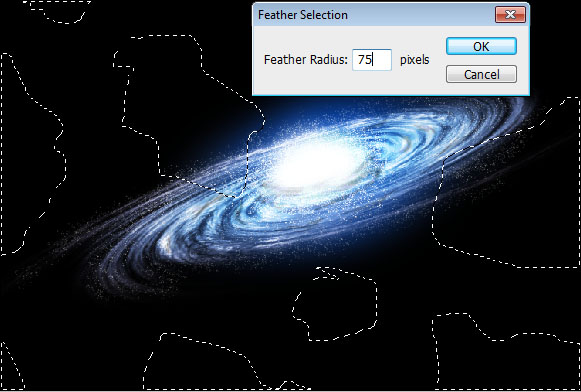
Go to Select> Modify> Feather. Set at 75.
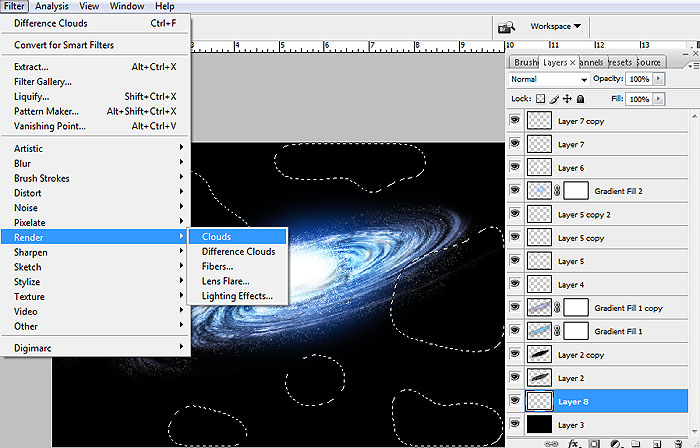
Make sure to choose a Dark Blue Foreground Color and a Black Background Color. Then, go to Filter> Render> Clouds
Add a new layer on top of the “cosmic clouds”. Here, using varying sizes of Hard Brush and Soft Brush, add in your distant stars.
And here you go! You’re very own spiral galaxy, brought to you in barely a day instead of light years.
Feel free to ask questions and/or share your creations with us in the comments. Have fun!
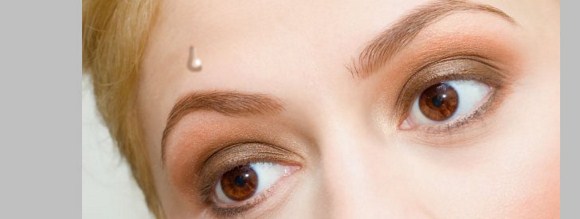
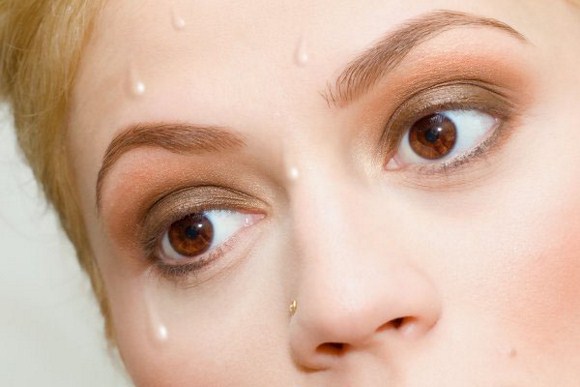
Time to Sweat a Little in this Water Droplet Photoshop Tutorial
This tutorial will teach you how to add water droplets on your photo. While this can be used on other images like soda cans, bottles, leaves and whatnot, in today’s tutorial, we will be using this image of a woman’s face.
The tools you will need for this tutorial is the Hard Round Brush, Soft Round Brush, Smear Tool, Eraser Tool and the Eye Dropper Tool. No need for fancy digital pens; a steady hand and a mouse will do. You will also need to have a good eye for lighting and pinpointing light sources.
This effect will actually look great on cartoons and anime drawings, so don’t limit yourself to actual photographs. Also, if you’re more on the “fun-loving” side, you can even use this trick to create zits, blemishes, and skin imperfections.
And as mentioned earlier, you can also use this on inanimate objects. If not a water droplet, you can use this trick to convey a slow melting of an object…like a candle for example.
Now that you got your image opened and ready, let’s continue with the tutorial.
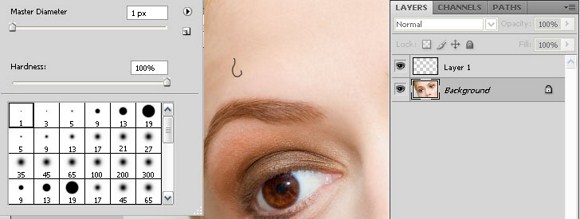
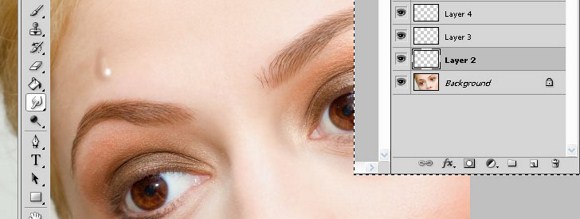
#1 In a new layer, draw a partial outline of a water drop. In this case, we will think of it as a sweat drop. Use a Hard Round Brush, 1 pixel, with 100% hardness.
#2 In a new layer below the outline, choose a darker skin tone color using the eyedropper and follow the outline. This will serve as the sweat drop’s shadow. Use a Soft Round Brush, 8 pixels, with 0% hardness.
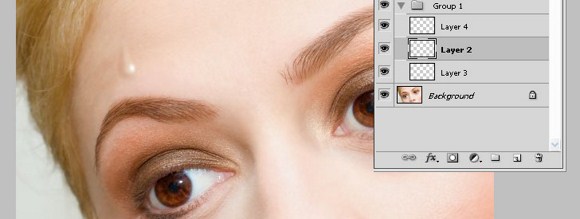
#3 Still below the outline, create a new layer over the darker skin tone layer. Use a Soft Round Brush, 8 pixels, with 0% hardness. Choose the color white and draw an actual sweat drop, using the outline and the sweat drop’s shadow as your guide.
#4 Once done, change the layer opacity to 20%. This will show the transparency of the sweat drop.
#5 Create another layer above the transparent sweat drop. Using a Hard Round Brush, 1 pixel, with 100% hardness, just dab a circle to indicate the source of light. Take note of the light source in your image. In this case, refer to the woman’s eyes.
#6 Now it’s time to make the sweat drop look more realistic. Delete the layer with the sweat drop outline.
#7 Go to the layer with the sweat drop’s shadow and use the Smear Tool to smear it into the contours of a sweat drop. Do the same with the other layers until you are satisfied. However, make sure to only apply minute changes in the light source layer.
Note: You may also use the eraser tool at Soft Round Brush to lessen the darkness of the shadow.
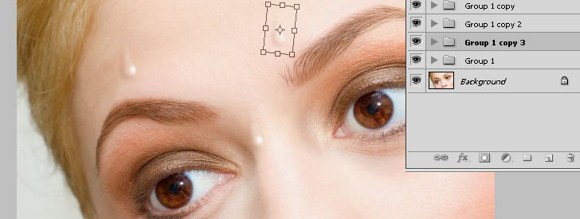
#8 Group the layers of the sweat drop together. Duplicate the groups and put as many sweat drops as you wish. You may also distort it and change the opacity to your liking.
And here it is! Sweat drops, water droplets, or tear drops on your image. Hope you have fun with this trick!
Go ahead an play around with this technique and share your creations with us in the comments.
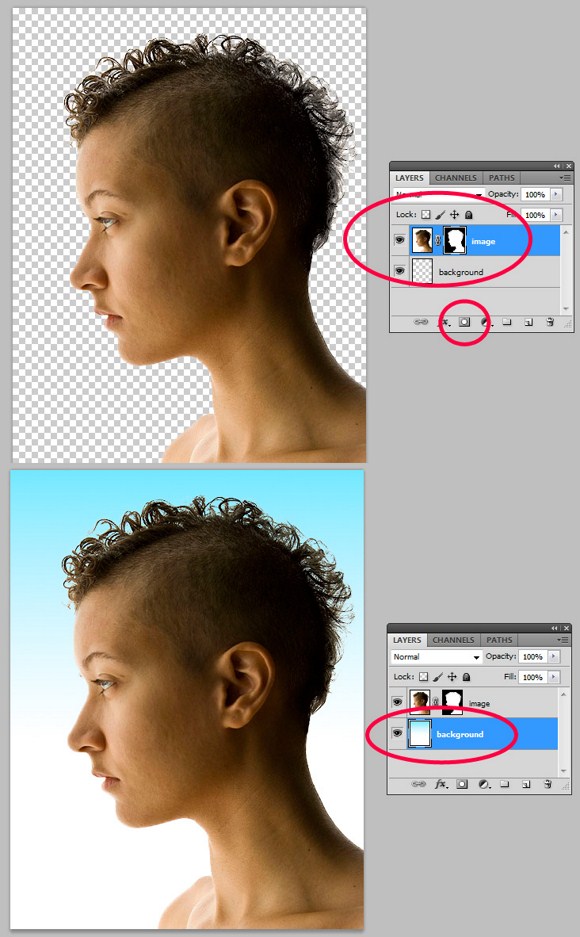
The Power of Photoshop’s Refine Edge Tool
One of the most difficult and frustrating tasks in Photoshop is making a clean and decent selection on photos that involve super fine hair, fur, leaves, and any fiber like elements. When using the standard selection tool or the masking process, you may able to accurately select smooth edges. We may use the color range tool and the tweaking of levels and channels to select much difficult areas but that would also take too much time on manipulation and very complicated to follow.
The good news is that, PS5 or Photoshop CS5 has a tool called the QUICK SELECTION tool. This tool also includes a very powerful sub tool called the REFINE EDGES tool, using the refine edges tool will greatly help and speed up editing tasks especially when you need to select out the hair or fur on subjects.
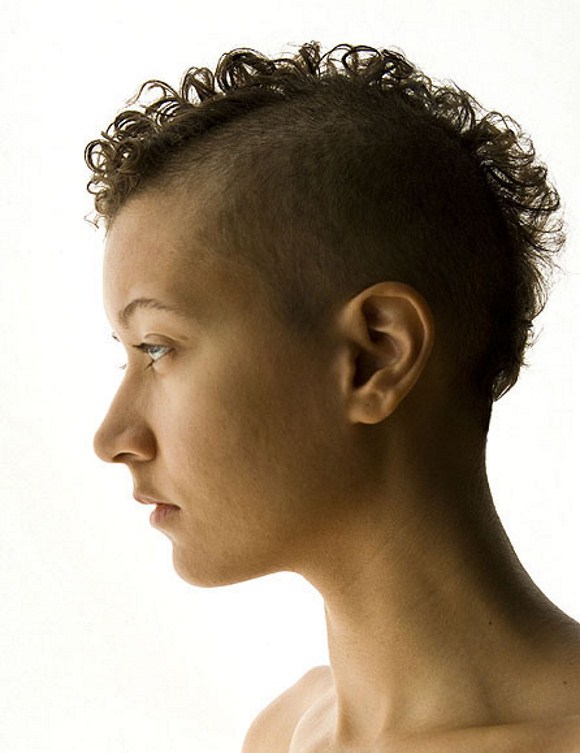
For example, we have here a wonderful haircut. And then you want to cut out the background so that you could use another image as background or import the image to another document without having the white parts included.
Normally we would start at the marquee tool. If that proves too tedious to do, we then proceed to using the magic wand, masking, and other selection techniques and so on. However we can use the QUICK SELECTION tool which can be accessed by right clicking the Magic Wand tool. In using the quick selection tool, it is just simple as LEFT clicking + Drag. You may take time to learn how to handle this tool. Basically it is just simple as using a normal brush.
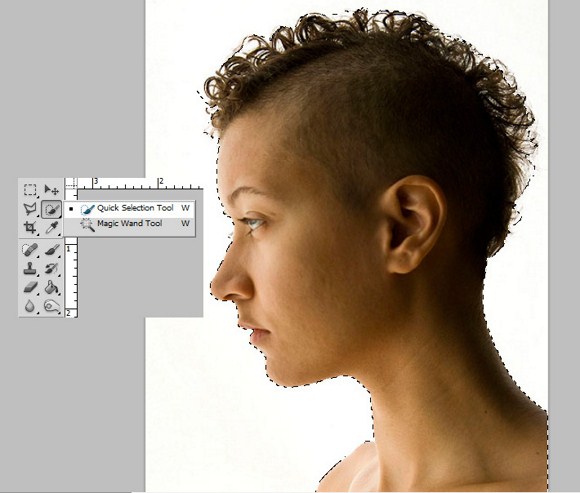
Now when you have selected the necessary parts, find the Refine Edges option found at the right top area. Click it and then a panel for options will appear. Here you find that the panel offers options to view the selection in marquee or running-ants appearance, in overlay or masking mode, on black or white background, on black and white or silhouette, and etc. to check the selection, you may want to choose the on black background for now.
On the strip image below, you can that I am using the black and white as the view mode, because we can clearly see the effectiveness of the tool. Now, apply 1 radius to Edge Detection, enable or check the Smart Radius. Apply on the hair to further improve the selection. Click OK to apply, and check by changing the view mode.

After that, we can now remove or apply a masking layer to remove the background. Choose masking layer to prevent accidental deletion. Once the background is removed, apply a gradient background or anything you like to see if the technique really works. If not satisfied with the result you can always try using the other options such as changing the smooth, feather, contrast, and shift edge under the adjust edge on the refine edge options.