Mac vs PC – What to do after you have made the switch

So you have made that move, switched from a Windows machine to a new Mac. Maybe not you, but I did make that switch, and so far I have loved it. Loved it so much from an operating system and hardware standpoint I will not be going back. Making that switch though, you look for your familiar applications, what you use on a daily basis. Anymore a lot of items are universal, they make a version for Windows and a version for your Mac. There are a few out there still though that you need to find something similar. Some of them you may end up liking more. We’ll go over a few of those apps that are different, and a few similar or the same. But I will share that switch experience with you all and give you some direction on where to point your browser.
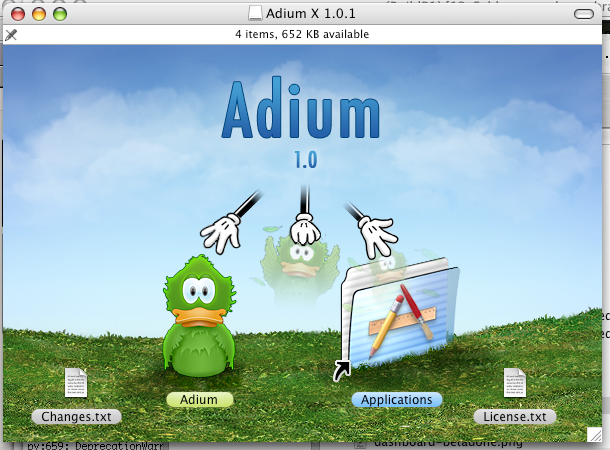
I’ll start by telling you I was a Pidgin enthusiast. I never got into the Trillian thing way back when, paying for a chat application is just freaking stupid to me. Having five or more different clients open at the same time is just a waste of resources when you can use Pidgin. I started back in the Gaim days and have not looked back. When I bought my Mac and spoke to my Mac buddy he told me Adium is the only way to roll, and no doubt he was right. It looks great, runs perfect, and does everything you need in a multiple protocol chat client.
Twitter has become a guilty pleasure of mine. I used to be against it on all fronts. I saw no use in it until I figured out I can get all of my NFL news for my fantasy teams. I now follow all my sports news and my comic book news on a near constant basis. The iOS app for Twitter is perfect. That is where I got my start. I downloaded Tweetdeck on my Windows machine because everyone seemed to love it and carry on. It is a horrible pile of garbage in comparison to the app on the iPhone and same thing goes for the native Twitter app for OSX. Twitter on OSX is fantastic. Very similar to the version on the iPhone. Tweetdeck just did not look good and ran slowly. The Twitter app on OSX runs quickly and looks great.
A freeware burning program I was told to use on the Mac was the program Burn. Personally I was a recent convert to the Imgburn software. I cannot say entirely one way or the other which is better. But everything I did with Imgburn works just as well and is just as easy with Burn. And it’s free of course. I hate paying for software.
That hate brings me to which torrent application you like. I have been using utorrent on my Windows machine since the times before they had an installer. Just an exe you ran from a folder. The utorrent version for Mac runs just as well as it did on Windows. I continue to use it. Fantastic program on either operating system. I have heard some good things about the Transmission torrent program for the Mac, but I have not used it at this time, cannot give you my opinion.
I still have multiple Windows machines at my house and I do need to do things on them from time to time. Control my file server or work on my girlfriends laptop. But I will be damned if I will get up and actually work on them. Screw that when VNC is out there. I have used Ultravnc extensively at home and at work for years. I checked around and found the best named VNC client of all time and one that works perfectly with the Ultravnc servers running on my network. Chicken of the VNC. It runs great, does all I need, and does not screw up.
A couple of standout programs on the Mac are iPhoto and iMovie. Windows does not have a central built in photo program. All it does is let you import them to a folder. iPhoto has been fantastic for organizing my pictures. I love it. Same goes for iMovie. Although there is the built in Windows Movie Maker on Windows 7, it’s not good. iMovie is just polished as is everything with the OSX.
I will say again I love that I made the change. It has been super smooth and fantastic. Never going back. Thanks for reading about this software that I have enjoyed in my transmission.
The Ol’ Switcharoo – PC User Switches to Mac
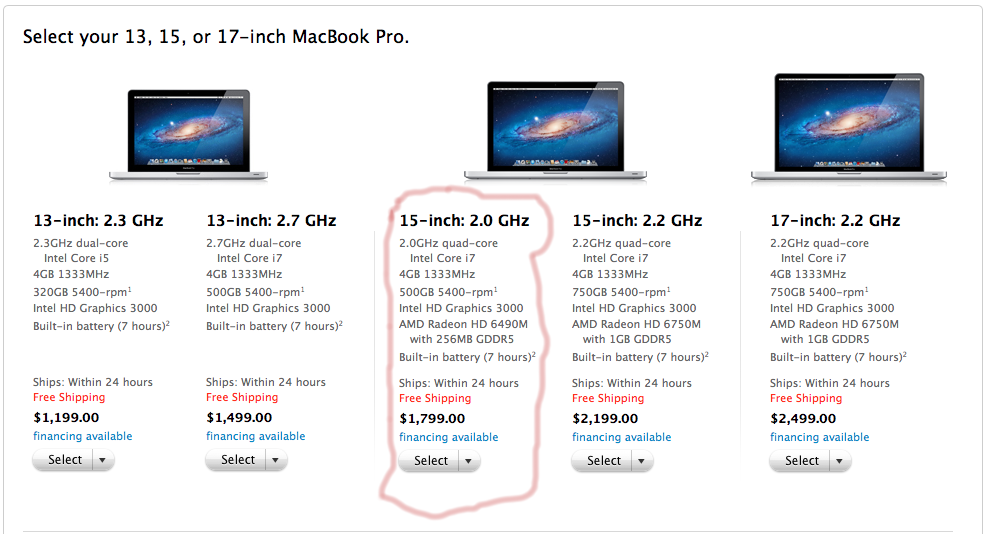
Having expendable income is a rarity in my life, so rare that it never happens. Having expendable income, a coupon for 20% off all laptops at Amazon.com, and the need to upgrade my four year old laptop is a sign from Odin, Zeus, or maybe Cthulhu that it is time to buy. In my search for what laptop I would like to own I narrowed it down to a mega gaming rig and a Macbook Pro. I have been an avid PC gamer for many years but as I have aged and since abandoning MMORPGs the need for a gaming rig has decreased a lot. I have been a fanboy of my iPhone and an envious iPad wanter for some time but to take the plunge into buying a true Apple computer. That is a big choice. I haven not used a Mac since high school. They were pretty freaking terrible back then too. Jumping from Windows 7 to OSX Snow Leopard, how hard would that be? I would categorize myself as an advanced to very advanced PC user. I’ve also used Linux frequently in the past so I am not opposed to differences, but taking that plunge and going full time OSX would be a bit different. I spoke to friends on both sides of the fence and went ahead and pulled the trigger. Getting 20% off of a Mac is insane, makes it a great price. I ended up with the Macbook Pro 15 inch, 2.0ghz i7. I chose this because it has the Radeon card alongside the Intel 3000, that way I can get a fix of some gaming and not have to play on the lowest settings. Shout out to Amazon Prime, I ordered on a Friday at 1:45PM and had the laptop at 11:30AM Saturday. That’s when the real fun began.
My girlfriend recorded the unboxing event and my idiotic face, I will not be showing that here. Ever. But just like my iPhone the amount of care and attention Apple puts into packaging their products is mind blowing. The actual device is just shockingly beautiful. The aluminum body, the weight of it, just the elegance of the entire thing is hard to put into words until you use one. The Magsafe power cable is just a freaking fantastic design I am clumsy, my girlfriend is also, and the cat, so not yanking my expensive laptop onto the floor is a great thing. Opened the shell and the touchpad is gigantic in comparison to my old laptop and the keyboard is very different. Flick my hands across and I think to myself that this might be ok to type on, not sure though. It’s plugged in, I am ready, I’ve put all my personal data onto Dropbox ready to go, no looking back, I bang the power button and that old time Mac “bahng” chime sounds. I have converted.

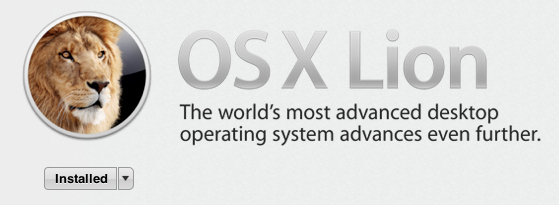
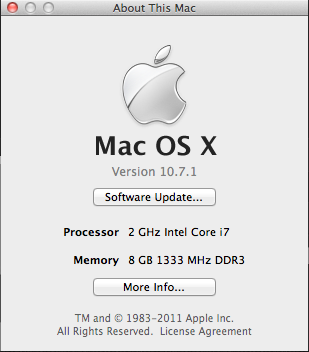
Setting up the operating system on first boot was pretty easy. Just follow the onscreen guide. Fun parts of that were it snapping a picture with the built in Facetime camera for your profile photo. Now my computer has my ugly mug on it for my profile login, and it also displays it on Adium for all to see (I’ll get into Adium later). The whole thing is just pretty, I don’t have the “high resolution” screen, but the 1440×900 screen is the same on a 15 inch as my old 17 inch laptop. The glossy glass looking screen is just beautiful. You really get to see the magnitude of Apple’s design from that setup part into getting to your desktop. The fonts the colors, everything pops, it’s just pretty. I know that sounds stupid. But when you get your first Apple device, iPhone 3G was my first, I was blown away. Moved to an iPhone 4 and was blown away again. Played with an iPad and then an iPad 2, my envy is 10 feet tall, such pretty devices. Moving from a Windows 7 Ultimate to basically just turning on my Macbook Pro and I am blown away. The first thing I do, since I purchased within time to get a free Lion upgrade is to get onto the Mac App Store and start my upgrade. I followed directions online to make a backup DVD of Lion, since you have to pay Apple for that now. After installing the update I was ready for my full Mac adventure to begin.
Finding equivalent apps and must haves were a matter of using Google and speaking to my Mac enthusiast friend. The first app I went for was Chrome, I’d recently dropped Firefox finally for Chrome on Windows and loved it. I need a good browser with plenty of plugins (Ad Block, etc.) so I picked up Chrome. Installing apps on a Mac could not be more simple, download the .dmg file, double click to open the disk image, and drag the program to the Applications folder, to uninstall, you drag the program from Applications to the trash. Straight forward, easy, no control panel need, no broken uninstallers. That out of the way I went on with finding other apps.One I picked up was the official Twitter app for Mac, it is fantastic, great clone of the one on my iPhone. I grabbed a copy of uTorrent Mac. I was told Transmission is also a good torrent app but I went with uTorrent for nostalgia’s sake. On PC I am a big fan of Pidgin, I’ve used it for years, back into the old GAIM days. I picked up Adium as I spoke about a bit earlier. It is fantastic. Multi-chat client that works perfectly for everything from Gtalk through Facebook messenger. It does import your profile photo automatically so all of my friends get to see my horrific visage when speaking to me. That’s not quite the greatest thing. Those items were the biggest to me for making “the switch” smooth.
![]()
It has been about a month and I can’t say I’ve had a need to go back or really a want to return to Windows. I know I can bootcamp and install a copy of Windows 7, but I really have 0 desire to do so. Everything runs perfectly. Smooth as silk, and fast as I can imagine. There’s not been a reason for me to return. Nor do I think there ever will be. Apple has it’s hooks in me deep with the simplicity and beauty of their interfaces. They are experts with the user interface and experience and that’s why they are the most valuable company in the world. I may be back at a later time to go over the experiences I’ve had with other Apps and the wonderful track pad. We’ll see. I guess I can now don the Apple fanboy tights. That will not be pretty.
Summer is Approaching, Time to Find an Internship or Job
 It’s that time of year again. Temperature on the rise, pants getting pleasingly shorter, free time increasing, money situation low. Well “Snoop Doggy Dogg”, it’s time you got yourself a “jobby job”. It’s not the best of times out there, especially for youngins on the come up. Unemployment for teens and young folk, students, is something like three times the national rate. Which is hovering in the crapper as is, something like 8-9%. Options are few and there are a lot of people out there aiming to take the jobs that you would normally be able to get during the summer to help pay for your long break from reality. Hopefully I can drop some knowledge on you with a few tips on how you might be able to land a summer job or internship to get you through til the shroud of school blankets you from the real world that us folks get to deal with all year full time.
Where to look?
Finding a job/internship to apply for can be pretty tough at times, especially in smaller areas. There are a million options out there other than the olden standard of picking up a newspaper. There are a few sites that come to mind, some huge, that you can look around on and drop some keywords in the search to find. Social media sites like Facebook and Twitter can be used to look for potential openings (TweetAJob.com as an example for Twitter searching). And more traditional classified sites like Craigslist and Indeed.com. Indeed is a favorite of mine because it indexes other sites for data. Once you have something that has caught your eye, it’s time for applying.
Make an impression.
 A good one, no gangsta wear at an interview or Starfleet uniforms. Once you have picked your destination apply for that job, and stay on top of it. Online or in person it’s your duty to hound the employer into remembering you when they make their choice. You can do some interweb stalking to try and find who is in charge of hiring from Googling or checking things like LinkedIn and getting that name to direct your questions to. If you are lucky and have passed that hurdle and get to the interview step it is time to calm down and make them like you, sell yourself like rocks. Dress nice, not too nice, no tux, look as good as you can, slap on that smile, and be positive. One tip I’ve heard and used it to never answer any question negatively in an interview. Always spin your answer into something positive. Keep that eye contact, smile, all that good stuff. Be grateful and thank everyone involved a lot. Once you are done with the interview follow up I cannot say that enough. Friends complain about not hearing about a job, but they put no effort into communicating that you want that job. Call on a Tuesday or Wednesday, leave them alone on busy days. Sending a thank you card to all involved in your interview is an outstanding tip and landed me my current job. Things out of the norm will keep your resume on top of that pile, trust me.
Keep your chin up, and ear to the ground.
Do not put all your eggs in one basket and so on and so on. Cliches aside you need to put yourself out there as much as possible, you are a product to be sold. Keep looking, keep applying. Do not get down. That is very important for your sanity, rejection letters and phone calls suck major. Keep your chin up and keep on keepin on. Call in favors, use connections, do what you must. Don’t lie of course, but do what you must within the confines of the law to land that gig. It is the perfect time of year for short term or possibly long term employment. You just have to butt your way to the front of the line and take it, make that cake, things aren’t getting any cheaper. Good luck.
Online Help
The following are some sites to help you out in your travels:
- TwitAJob
- Indeed
- Careerbuilder
- Craigslist
- USAjobs
- Snagajob
Use them in your search and best of luck to you. If you have any tips for getting a summer internship or job please share them in the comments.
How to Rip a CD Like a Pro – Part 7
Here we are, the 7th and final part of the ‘How to Rip a CD Like a Pro’ series. It has been a long road but I think it is a road that is well worth traveling. You can now rip your CDs and enjoy a great sounding file. So lets finish up the rest of the ripping guide and the settings for MP3 rips. I’ll stop talking and we’ll get this over with!
We move on to the CUE sheet settings.
The cue sheet is a needed item if you would like to burn a perfect copy of your original disk from your ripped files. It is used for showing a CD burner how to structure the files in the same way as they were on the original disk (also for other metadata properties).
- Click on Create CUE Sheet… Multiple WAV Files With Gaps… (Noncompliant) under the Action menu.
If you have set a directory for extraction in the EAC Options/Directories tab, you will not be asked where you want to save the cue file. EAC will save it to this directory without confirmation.
It is really important that you select the noncompliant option – the other versions of cue sheets would not be of much use for the kind of rip you are about to make.
- While you are looking at this menu: make sure “Append Gaps To Previous Track (default)” is checked. Do not touch it. The noncompliant cue sheet you creating is designed to go with this kind of gap handling.
Onto the Test & Copy
Now it is time to start EAC ripping those wave files and compressing them into FLAC files.
You can do this in different ways, all with the same result:
- Select all the tracks, click Test & Copy Selected Tracks – Compressed… in the Action menu:
or
- Select all the tracks, right-click and click Test & Copy Selected Tracks – Compressed
Make sure that you select Compressed, or EAC will only rip the files to wave, and will not start flac.exe to compress the files to FLAC.
Now the ripping process.
It can take anywhere from 15 minutes to several hours to rip a disk, depending on the drive, the length of the CD and how much EAC needs to work with correcting errors. You can follow the process as EAC rips the disk , with estimated information for both the track that EAC is currently testing or copying and the whole CD. If there are imperfections on the disk, EAC tries to correct the errors. The ripping process may go very slow during error correction. That is good thing it means that EAC is doing its job properly.
Do not shut down EAC when EAC says Audio Extraction Complete. Remember that flac.exe compresses the tracks to FLAC after EAC has ripped them to .wav, so do not to shut down EAC when you can see that compression is still taking place:
- When the Audio Extraction is finished and the compression has also finished, click OK.
And now the Status Report
If you checked Show status dialog after extraction, you will get a status report when you click OK to the Audio Extraction Complete message.
The phrase you are looking for is “No errors occurred”.
- If there are no errors, click OK. If there are errors, you might want to read the information about them before clicking OK.
Do not click on Create Log. The log file is created automatically if you have followed the Setup Guide correctly.
If you do get errors, you cannot do anything except rip the CD again. Occasionally errors happen because your disk is stained or scratched, so it is a good plan to take the CD out and clean or repair it before ripping it again. Then start from step 3 again. EAC will remember edited CD information, but you need to detect the gaps again.
A disk that will not be properly ripped with one drive might rip without a problem with another one, so if you have access to more than one drive, try with the other one. Of course the other drive must be properly set up, too.
Lastly we look at your files.
In Explorer, you will find your newly ripped CD in the default save directory.
- Depending on the settings, the cue sheet may be found directly under the save directory instead of being saved in the album folder. Move them into the album folder.
The album folder should now contain all the tracks, plus log file, cue sheet, and possibly also a .m3u playlist.
MP3 rip settings.
First off you need to get LAME: download the latest stable/final version. Your download will be a .zip file. You can either extract it to a folder on the desktop and then move lame.exe to your EAC folder, or create a new folder (for example C:\Program Files\LAME), and extract all the files in the .zip archive to that folder.
As mentioned in the introduction, all the settings will be the same as shown in the (for FLAC), except for the compression settings. In order to change them, hit F11 or click the EAC menu – Compression Options. Choose the “External Compression” tab.
Settings:
- Use external program for compression: Checked.
- Parameter passing scheme: Select “User Defined Encoder” in the dropdown menu.
- Use file extension: .mp3 – remember the dot before “mp3”, and do not type “MP3”, or “Mp3”. The program will copy what you type here exactly the way you typed it!
- Program, including path, used for compression: browse to lame.exe, which will of course be in the EAC folder if you put it there, or in the LAME folder if you created one. The picture shows the latter alternative.
- Additional Command Line Options:
Select, then copy one of these lines (depending on which preset you are creating a profile for), and paste into the box in EAC:
a) For V0 rips:
-V 0 –vbr-new –add-id3v2 –ignore-tag-errors –ta “%a” –tt “%t” –tg “%m” –tl “%g” –ty “%y” –tn “%n” %s %d
b) For V2 rips:
-V 2 –vbr-new –add-id3v2 –ignore-tag-errors –ta “%a” –tt “%t” –tg “%m” –tl “%g” –ty “%y” –tn “%n” %s %d
c) For 320 CBR rips:
-b 320 -h –add-id3v2 –ignore-tag-errors –ta “%a” –tt “%t” –tg “%m” –tl “%g” –ty “%y” –tn “%n” %s %d
- Bitrate: Will be ignored, so it does not matter what it says.
- Delete WAV after compression: Checked (unless, for some reason, you want to keep the wave files).
- Use CRC check: Unchecked.
- Add ID3 tag: Unchecked.
- Check for external programs return code: Checked.
- High/Low quality: Leave this at “High” – it will have no influence on a rip made with these command lines anyway.
When you are done with the settings, save the profile as described previously. Give the profile a descriptive name, such as “[Drive name] mp3 V0” or “[Drive name] mp3 320 CBR”, or whatever you want.
The LAME DLL Tab
If you add lame_enc.dll to your EAC folder, a new tab will appear in Compression options.
It works in combination with selecting the LAME DLL encoder in the Waveform tab.
However, if you set an external compressor for LAME as described above, the LAME DLL settings will be overwritten. In other words, they will not affect how EAC performs the compression to mp3. I recommend sticking to the external compression method with lame.exe, at least for now.
That will do it for the stupid long guide on how to properly rip a CD at the highest quality possible. Thank you for reading and now enjoy all those old disks in proper fashion on your PC or MP3 player.
How to Rip a CD Like a Pro – Part 6
Part Six
Holy crap, this CD ripping guide is going on forever! It seems like a while ago I started this guide and were getting to the actual ripping part! We’ve gone over setting everything up in the settings to rip your disk to FLAC files and form this point we’re going to let you know how to save those settings to a profile and the starting steps in ripping the files. So let’s get to it!
Here is your method on how you will save the settings:
- Click on the New button along the bottom bar of EAC .
- A window will pop up, go ahead and type in the name you want to use for your profile, something like “Farty Pants FLAC”.
- Select All EAC Options – this means all of the settings that you’ve selected creating your profile will be saved, you want all of them, right?
- Then select OK. EAC will then create your profile name to make sure that it is complete, it will contain your FreeDB Options, EAC Options, Compression Options, and Drive Options.
If you need to make changes to a profile, incase you find that you’ve saved an incorrect setting, load the incorrect profile profile (this is done by clicking on the Load button at the bottom bar of EAC ), make your correction, then click the Save button.
You are now ready to start ripping your CD and saving those FLAC files!
Now we are on to ripping, first up, loading the profile.
- If there is more than one profile that you have saved, load the profile you would like to use by clicking on the drop down menu and selecting your desired profile from the list, then click load. EAC will choose the drive associated to your profile.
Next we move to gathering the right info on your disk
- In nearly every situation, EAC will download the proper information from Freedb when you place the disk in your drive. Track names, CD name, disk artist, all will show up on the EAC main window.
But, if you do not supply Freedb with an email address, connecting to the server will not work. Also, if you do not check “On unknown CDs: automatically access online freedb database” in the EAC options, general tab, the correct disk information will not appear automatically.
- Once you do give an e-mail address, you can force EAC to manually gather the information about your disk by clicking “Get CD Information From…Remote freedb” in the Database menu .
If there is not any information due to EAC failing to contact freedb severs, click “freedb/Database Options” in the menu. In the popup window, click “Get active freedb server list”:
Now it you are really unlucky and there is no information because your CD is not in the Freedb database, add that information manually, see below.
- If you are about to rip a CD with various artists, check the “Various Artists” checkbox.
A special setup is used for the track titles on various artist disks: first is the artist name, then a space, then a forward slash and then another space, and then the title of the track. When you check the “Various Artists” box, EAC will interpret this as you have intended: the first section, before the forward slash, that is used as the “Artist” in the file name fields according to the various artist file naming scheme you set up in EAC.
Check your CD information against the artwork. If your artwork and the CD information shown in EAC are not the same, you will need to edit the CD information in EAC.
Some Information On Manually Editing CD Information
If you can’t get CD information from the database or the CD text, or if the information you got from freedb does not match the album artwork, you have to edit the CD information.
- Type the correct information into the boxes for Title, Artist, Year, and Genre. If you rip an album covering multiple CD’s, be sure and label CD’s #1 and #2 but keep the rest of the information the same. If you want to edit the Title of the track left click and hit the F2 key:
Please do not put the track numbers in the title fields. The track numbers will be added in proper fashion if you have set up EAC to do so in the file name tab.
- If all the titles are missing in EAC, you can type out the entire track list, one song title per line, in notepad or really any text editing program, then just select all and copy, then paste it into EAC. This is a much easier method and saves you from clicking F2 for each track, you will still need to add Artist and Album Title, Year, and Genre manually. You can copy a track list found online. Be sure that the list correct for the right release, so you do not end up with incorrect track titles. Also, the track titles in the list must be in the correct order and not contain track numbers.
- Select your track list and right click and copy, or select all and hit Ctrl+C to copy the track list to the clipboard. Go to the main EAC window and click Get CD Information From Clipboard in the Database menu:
- “Various Artists” song titles are sometimes submitted to Freedb in a format common for file names (Artist – Title) instead of the Artist / Title format that EAC needs in proper order to be able to tell the difference in artists from track titles. EAC contains a tool that saves you the trouble of having to type correct titles in such cases.
3. Detect Gaps
Once you load your profile and correct CD information is stored, you are finally ready to actually freaking rip something!
- The first step of that process is to hit F4 or click on Detect Gaps in the Action menu.
This makes EAC figure out the length of the (normally silent) gaps between the tracks. This normally does take a minute or two, depending on the number of tracks. You need to detect gaps this way before ripping the CD, or else the gaps will not show in the log file.
If it goes very slow, or if EAC freezes, cancel the operation and hit F10 (or click “Drive Options” in the EAC menu), then choose the Gap Detection tab and change the detection method. If neither A, B nor C works, try changing the accuracy (too). Also, if you have more than one drive, changing to another drive may do the trick. If you do not have another drive, and the problem persists, changing the ASPI layer might help..
- Check that the gap lengths look reasonable before proceeding with the rip. If there is a problem, change detection method.
That is it for part seven of the ongoing guide to ripping CD’s like a pro. In the next guide we will finish up the ripping process and hopefully move onto configuring EAC for MP3 ripping.
How to Rip a CD Like a Pro – Part 5
Welcome back to part five of my series on ripping CD’s like a professional. We’re going over all of the options for setting up your CD drive. This is a fairly odd thing to have to do you would think, but it is important to do so to ensure the quality of your rips.
- First thing, press the F10 key or click on Drive Options in the menu.
If you have more than one drive that you want to setup for ripping, you will have to save the settings for your first drive, and then change the drive settings for your next drive, and save that configuration under a different name. Select the drive you would like to setup by selecting it in the drop-down menu in the main window.
If you change the firmware on your disk drive (aka. flash the firmware) you will have to set up the drive options again.
You will need to insert a disk into the drive to run some of the tests. It has to be a disk found in the database, so break out all your possibly known disksand have them ready at your PC.
- Place a disk that is in the AccurateRip key disc database. There is a popup that will come up giving you the chance to take advantage of the opportunity to have your drive features automatically set by AccurateRip:

- Click on setup. You will be see a success message after a few seconds:

If AccurateRip does not come up automatically, and there is a CD in the AccurateRip key disc database in your drive that you are about to setup, be sure that the Use AccurateRip with this drive option in the Offset/Speed tab is selected. If that option is greyed out, and AccurateRip is not there for you to see it will be greyed out until you find a CD that is in the database in the drive. Be ready that you may have to try out a number of disks until you find one that is in the database.
- Leave the disk in your drive, it will be needed for some of the testing below.
Now we move onto Extraction Method:
- Secure Mode: Checked.
Since this is a radio button selection, it follows that “Paranoid Mode”, “Synchronized Modes” and “Burst Modes” need to all be left unchecked.
- Then you click Detect Read Features so that EAC will check if your drive caches audio data, also if it has Accurate Stream (then case EAC has no need to perform additional synchronization). It will also check for C2 error info, but we will leave this option unchecked no matter what EAC says about it.
We will trust what EAC says about the Accurate Stream feature. We will also trust EAC if it says that the drive caches audio data, like this:

- After the detection is done, click on Apply and have the detected features automatically applied as settings. In most cases you will change the settings that were detected so do not leave it like this.
- Uncheck Drive is capable of retrieving C2 error information- if you were to leave this enabled, some errors may not be found and go undetected.
EAC may show that your drive does not cache audio data, like this:

You can still choose to have Drive caches audio data checked as shown below. It will not screw up your rip quality, but the rip may take quite awhile longer, so:
- Check Drive caches audio data if it did not get automatically checked after detecting drive features.
It is very important that Drive caches audio data is checked if your drive does cache the data. EAC needs to read from the disc, not from a cache, each and every time. This is the basis for error detection and correction, and thus for establishing that the rip is a (near) perfect copy of the disc: it is almost impossible that the data would read the same more than once if the drive did not read it correctly from the disc. However, if the data is cached it is no surprise that it reads the same the next time it is accessed.
This is how your settings should be, if it doesn’t look this way, fix it!

If you wish, you can return and read the following sections about testing the cache, and perhaps ripping in burst mode, some other time…
So, a drive that caches audio data defeats the purpose of making secure rips, unless you tell EAC that the drive caches audio data. If EAC “knows” that a drive caches audio data, it will flush the drive’s cache in order to be able to read from the disc again.
There are doubts about whether EAC really detects drive caching properly. This is why many guides recommend (or even demand) that you always disable/defeat cache (that is, check Drive caches audio data). As far as rip quality is concerned, it is never wrong to have “Drive caches audio data” checked.
The Gap Detection tab:

- Gap/Index retrieval method: Try method A, change to B or C if detection is slow, or is not working at all. You will also need to change method if the gap lengths are obviously wrong.
- Detection accuracy: Secure.
That concludes the fifth part of our crazy long guide for ripping CD’s at a near professional level. You’ve got them laying around, digitize them now, and do so at the quality they deserve! The next portion we will be covering how to save the profile that you have been working on setting up. You surely want to save it to not have to read through all this stuff again and do it over, don’t you? Then we’ll move into the actual ripping portion. After that we’ll get you hooked up on a profile to rip to MP3 also. Til next time.
How to Rip a CD Like a Pro – Part 4
Welcome to part four of the insanely long and drawn out series on ripping your old CD’s at a near professional level. You can go back to part three if you’re missing where we’re starting off here. The steps are very long and the whole process is insanely long, but we are getting closer and closer to that finish. I will say again, it is well worth the wait and effort.
The Catalog tab we will not be doing anything on, it has no impact on ripping quality.
Moving on to the Directories tab next:
While not making any difference to your ripping quality, as a privacy concern, I would suggest you do not save to a path containing your username or any personal details. The log the is created contains the path and directory location where you are saving your rips. To boil that down, don’t save any rips to “Documents”.
If you are using a single partition on your hard drive, you can make a folder for your EAC rips directly on your C:\ partition, and set it as the default directory. It helps you in keeping the path to your files short. It is a well known problem in Windows operations systems that path lengths over 255 characters in length will not work.

If you do set a default directory, this is the location where the cue sheet for your rips will be saved automagically. If you do check “Ask every time”, a dialogue box will pop up for picking the location you want to save items to as you create the cue sheet.
The Write tab we will not be doing anything on, it has no impact on ripping quality.
Irrelevant for ripping quality.
We will move on to the Interface tab next:
- I would suggest going with the native interface:

But, if your CD drive doesn’t show up in the main EAC window:
If EAC has issues detecting features when you work on the drive configuration, you will need to add an ASPI layer to the EAC folder..
You can one from Nero if you have it installed (just copy it out of Nero’s directory, or break out your Google Fu and find/download one).
- After you download it, right click the file wnaspi32.dll and copy it, browse to the EAC directory and paste it in that very folder.
The last option is to use something like ForceASPI (Google and find a copy to download).
- If you do go ahead and use an external ASPI layer, pick “Installed external ASPI interface” instead:

We are moving on into the settings for Compression Options For Flac
We will go over MP3 settings later in the series, for now it’s all about Flac.
A lot of the settings here do not make any difference in setting up EAC to use flac.exe as an external compression system after the files are ripped to .wav. There is a lot of important information here and advice over what to do and not do.
- Press F11 or click Compression Options on the menu in EAC.
We go to the Waveform tab from here, and ignore it, as it does nothing with FLAC rips.
We’ll bypass that and move onto External Compression:

Setup:
- Use external program for compression: Checked.
- Parameter passing scheme: Select User Defined Encoder from the menu.
- Use file extension: .flac – be sure and put the period before typing flac, nothing else, EAC literally copies this line.
- Program, including path, used for compression: Click on Browse and find the flac.exe program select it and click Open. FLAC comes with your installation of EAC. You can find flac.exe in the installation folder for EAC.
- Additional Command Line Options: Select, then copy this line, and paste into the box in EAC:
-V -8 -T “artist=%a” -T “title=%t” -T “album=%g” -T “date=%y” -T “tracknumber=%n” -T “genre=%m” %s
I won’t go into the gory details of what this line means, but it is needed.
- Bitrate: This option is ignored, it makes no difference for a flac file.
- Delete WAV after compression: Checked, you might want these files for some reason, probably not.
- Use CRC check: Unchecked.
- Add ID3 tag: Unchecked.
- Check for external programs return code: Checked.
- High/Low quality: Leave this at “High” – it will have no influence on the rip anyway.
Moving on to the Offset tab:
Here is another tab you can ignore, do not make any changes here. That means that the “Use Offset Correction” option needs to be left unchecked. If you do enable this setting, even with “0” as the sample offset value, would alter your ripped files permanently (by adding a bunch of samples), so if you did do that you would not be making an exact copy of your CD.

We move onto the last tab, ID3 Tag:

Important: Do not check anything here! Tags are added by using the command line in the “Compression Options” tab. It is very important to leave this option unchecked for FLAC files since mp3 headers would make the files unplayable on some systems.
That does it for part 4 of our insanely massive guide on ripping your CD’s at near professional levels. You will be so happy when we get to the end of this, as will I, I am tired of writing all this information out to you, kidding of course, it’s nice to share this valuable information. Next we will move on to the setup of the drive and how to get it configured and then we will move onto actually running the ripper and saving profiles, then we will go over similar settings to this guide for how to setup everything over again for the lame mp3 settings, then, sometime, we will be finished, I swear! Thanks again everyone!
How to Rip a CD Like a Pro – Part 3
Welcome back to Part 3 of my ongoing series on ripping those old CD’s like a professional, you can view Part 2 here. You are probably surprised at the number of steps it takes to get a good audio rip of your CDs, I was too when I first did this, but I am very glad that I took the time to learn. The end result is 100% worth it.
We’re covering the configuration of EAC options in this section.
First thing, you need to make sure you have got access to all the options required for properly configuring EAC for fantastic copying.
- Press the F9 key or click on the EAC menu and click EAC options. Click the tab labeled Tools and confirm that “Activate beginner mode, disable all advanced features” is unchecked. If it had been checked and you needed to uncheck it, click OK to make the advanced settings take effect, close and then open EAC Options again.
Now it is time to begin configuring the EAC options:
- Click on the Extraction tab:

Important Extraction settings:
- Fill up missing offset samples with silence: Checked.
- No use of null samples for CRC calculations: Unchecked.
- Synchronize between tracks: Checked.
- Delete leading and trailing silent blocks: Unchecked.
- Error recovery: High.
- Skip track extraction on read or sync errors: Your decision.
It is probably a good idea to check this if your goal is perfect rips. Your rip will not be perfect if there are read or sync errors on the tracks, so you will save time by just getting the error reports without EAC having to spend time slowly ripping the tracks. If errors are present, clean or repair your CD and try again.
- Skip track extraction after duration longer than: Your decision.
- After each: XX mins of extraction, cool down the drive for YY mins: Use only if necessary.
- Lock drive tray during extraction: Your decision. Check it if you are prone to accidentally open drives in use.
- Extraction and compression priority: Normal for most situations; Idle for old and slow computers; High for computers with multi-core processors or multiple CPUs.
We move to the General tab now:
These settings do not have any influence on the ripped quality of your CD’s, so these settings are totally up to you. I would suggest you use this one:
- On unknown CDs: automatically access online freedb database. Checked.
If the CD you are going to rip is in the Freedb database, it will automatically add the data in EAC.

- Checking “Show status dialog after extraction” will make the pop-up status report mentioned in show up. If you leave this unchecked, you will not get that pop-up.
- If you do not uncheck “Beep after extraction finished”, you will have an annoying beep (using the computer’s internal speaker) after each track is finished.
- Also, this is where you choose the language for the EAC interface.
Now we move onto the Tools tab:

Important settings:
- Automatically write status report after extraction: Checked. This automatically creates and saves log files for your rip.
- Do not open external compressor window: Unchecked – this is useful if you want to see that the external compressor is running after EAC has completed ripping to .wav.
- Activate beginner mode, disable all advanced features: Unchecked we already went over this.
The rest of the settings:
- Retrieve UPC/ISRC codes in CUE sheet generation: Your decision – this does not change rip quality in any way. But, these codes in your cue sheet may cause issues when you try using the cue sheet to burn a CD-R.
- Use CD-Text information in CUE sheet generation: Your decision.
- Create ‘.m3u’ playlist on extraction: Your decision. If you do select it, you might want to check the option “Write .m3u playlist with extended information”.
- On extraction, start external compressors queued in the background: Checked unless you have problems
- Submit drive features after detection: Your decision.
Now we move onto the Normalization tab:

Important: Do not check this unless you do not want a perfect rip of your disk, this alters the song quality.
Now we move onto the Filename tab:
Naming your files and folder structure is totally up to you, the following will be simple examples of how this function works.

- Naming convention example #1: %D – %Y – %C\%N – %T
Setting it up like this will create a directory (the part before the backslash) and file names (the part after the backslash) looking like this:
Slayer – 1986 – Reign In Blood1 – Angel of Death.flac
If this is one you like, you can add the format you ripped into the folder name. Do remember that changing the naming convention is required if you create different profiles for ripping and compressing to different formats, like FLAC and mp3 V0.
- Naming convention example #2: %D – %Y – %C [FLAC]\%N – %T
It will look something like this: Slayer – 1986 – Reign In Blood [FLAC]1 – Angel of Death.flac
- Naming convention example #3: %D – %Y – %C (V0)\%N – %T
It will look something like this: Slayer – 1986 – Reign In Blood (V0)1 – Angel of Death.mp3
- Various Artists naming convention example #1: %C (%Y)\%N – %A – %T
This naming scheme will make EAC create a directory and file names looking like this:
Office Space (1999)1 – Cannibus/Biz Markie – Shove This Jay-Oh-Bee
- Various Artists naming convention example #2: %D – %Y – %C\%N – %A – %T
This naming scheme will make EAC create a directory and file names looking like this:
Various – 1999 – Office Space1 – Cannibus/Biz Markie – Shove This Jay-Oh-Bee
If you prefer “Various artists” to “Various”, use “Various artists” instead of “%D” in the naming convention, like this:
- Various Artists example 3: Various Artists – %Y – %C\%N – %A – %T
The resulting folder name would be “Various Artists – 1999 – Office Space”.
- Please do not ever check “Replace spaces by underscores”. It_looks_freaking_terribad.
This concludes our part 3 of the guide for ultimately awesome CD ripping for this week, we’re closing in on the good part, nearly there til we get to ripping some disks. The wait is worth it!
Thanks!
How to Rip a CD Like a Pro – Part 2
Welcome back to Part 2 of my ongoing series on ripping those old CD’s like a professional, you can view Part 1 here. You may think this process may seem way too long to get to the end product, and really I don’t blame you, because it is. But in the end it is worth it, and you will be very happy with the results of these rips vs. a crappy iTunes standard rip. Thank you for returning to read my guide and stay tuned for the whole thing!
This guide is to configure EAC properly to make you rips perfect lossless rips, which allows you to be able to create perfect copies of your old disks. The settings that are suggested are chosen to accomplish that perfect rip goal we all have. I have commented on many of the settings below to be able to explain how these settings will help us reach those perfect rip goals.
The compression method we’ve detailed in the guide is to produce FLAC files, you can set EAC up to produce different file types, such as, mp3 and Ogg Vorbis files instead. To make sure, it is OK to convert lossless files, like FLAC, into lossy formats, like mp3 or Ogg Vorbis. You do not need to rip the CD again if you want smaller file to take up less space or to have mp3s for an iOS device. Use the FLAC files from EAC to produce those smaller mp3 files, with an audio converter program, anything should work for that.
The following is a step-by-step guide. It is tedious and in depth, there are a ton of settings, so please do pay close attention to the guide while you are going through all these steps. Do not get discouraged if you do screw up and get it wrong on the first or second attempt. When you do get it correct, and have saved your profile, you are then all set to begin making your perfect rips and not having to reconfigure EAC over and over again.
To say “rip to FLAC” can be a tad bit misleading. EAC rips your music tracks from CD and turns them into wave files (they then have the .wav extension) and stores them on your computer. EAC only has the ability to rip to .wav. It does not rip to FLAC or rip to mp3. But, EAC is able to be configured to start external encoders like flac.exe. If you configure EAC to start flac.exe as an external encoder, the .wav files are compressed into FLAC right when they are ripped. But from your view it does look like EAC does in fact rip to FLAC.
The wave files usually are deleted when they are compressed into FLAC; they are only kept as temporary files until the compression is finished. Since FLAC is a lossless audio format, audio information is not lost in any way by saving the rips as FLAC files. The advantages of these files are the fact that FLAC files are smaller than .wav files, they take up less space on your computer, and easier to transfer over a network. FLAC files can be decompressed back to wave with no loss of audio information.
Rripping to FLAC is actually a two step operation. The first step is to rip to wave files, then compress those files to FLAC. That means that you need to setup two sets of features to properly rip and compress files into FLAC. That is actually not enough though: you do need to configure a third set of features, also. The features that have to do with the optical drive you use. Different optical drives have different properties, and you have to make sure that EAC know and take proper advantage of the properties that your drive does have.
There are three sets of features EAC, Compression, and Drive that can be saved as separate profiles. I would suggest you save an overall complete FLAC profile that contains all the three sets of features in one single profile. With that you will only need to load the complete profile in EAC when you want to rip another CD, then all the settings will be correct. If there is more than one drive to choose from, you need to set up different complete FLAC profiles for each of them. More about that in when we have gone through all the settings for EAC, Compression, and Drive.
Configuring EAC Manually
- Start the EAC program. If the Configuration Wizard comes up as you run EAC, just cancel that. We are going to configure EAC the old fashioned manual way.
Free DB and Database Options
One part of the preliminary configuration step needs to be made:
- Press the F12 key or click on “freedb/Database Options” in the EAC menu.
FreeDB is a database filled with information on nearly every CD ever created. The database is made of only user contributions all data on the CD that you get off of freedb is there because someone other there sent it to the database. You can also contribute if you find that a CD you have ripped is not in the database yet, or if you want to correct information for a certain CD. You can find that option by clicking “Submit CD Information To freedb” in the Database menu.

- Type any e-mail address in the box. You do not need to use a real one just something other than the default.
- Tick the box for “Get active freedb servers”, then select any of them.
If there are any problems accessing freedb later on, do this step over again.
I would also suggest checking “On a connection error, retry query using a different server from the server list”.
Using MusicBrainz
Along with the freedb servers that come with EAC, you can also add MusicBrainz to that list. It is possible it may work to simply type it into the text box, or you might have to add it to the Windows registry.
- If you want to try using MusicBrainz with EAC, first try typing “http://freedb.musicbrainz.org:80/~cddb/cddb.cgi” without the quotes into the Freedb server box.
- Click OK, toss a CD into the drive, and see if it works.
The mb2freedb URL can also be included by adding a registry key:
HKEY_CURRENT_USER\Software\AWSoftware\EAC\Internet Options\Hosts\http://freedb.musicbrainz.org:80/~cddb/cddb.cgi
If you add that registry key, the mb2freedb URL will be selectable from the drop-down list the next time EAC is started.
How to Rip a CD Like a Pro – Part 1
The guides I will present may seem a bit over the top for simply ripping a CD, but for perfection, you will need to work for it.
To get EAC set up the correct way, make sure you follow along closely, be sure to:
- Follow the instruction bullets.
- Compare what you’re seeing to the screenshots provided.
The excess information is there you want to understand exactly what you are doing and why you are doing it, it is also there for trouble shooting if things do not go exactly as expected.
Installing EAC
1. What You Will Need For Installation
- To be able to rip your disk to FLAC with EAC, you will need to install Exact Audio Copy (EAC). Get the latest version from the EAC homepage.
Currently the latest version is EAC 1.0 beta 1; this is the version I suggest you use. (Note it may or may not create .m3u files running Windows Vista or Windows 7. Use another application for creating .m3u files, or create them manually.)
There are some differences you will see between the old EAC and EAC 1.0. Firstly is flac.exe being included with the EAC 1.0 installer. The second difference being that EAC 1.0 has support for Accurate Rip built in: it will automatically grab setup information about your drive, and also it can automatically grab information from other users’ CD ripping results, making it possible to compare the CRC values of many different rips. Also, the log for 1.0 rips shows crucial settings the old EAC log had left out.
- The ASPI driver/layer
Another file that you will need is the ASPI driver or “ASPI layer”. It is an interface for accessing drives EAC needs in order to properly see your optical disk drive. Windows 2000 and Windows XP both have ASPI installed already, if EAC works or sees your drives with the installed ASPI layer, there is no need to install another.
- Other codecs
If you are wanting to convert those FLAC files to a compressed/lossy format such as .mp3 or .ogg when you rip your CD, you will also need to install those codecs, see latter portions of this guide on how to do so.
- Double-click the file “eac-1.0beta1.exe”. This starts the installation wizard:
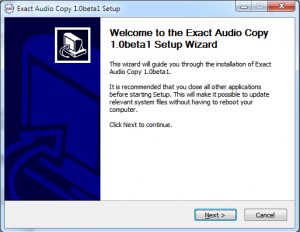
- Click next to continue.

- Accept the license agreement to continue.
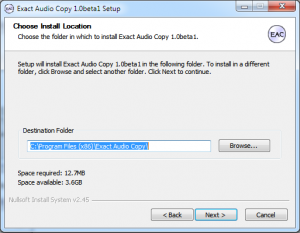
- Accept the installation location, or navigate where you would like to install EAC and click next to continue.
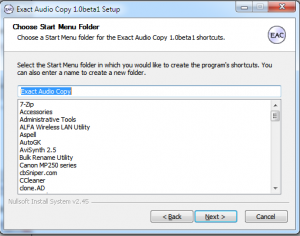
- Accept the Start menu group, and then click Next.
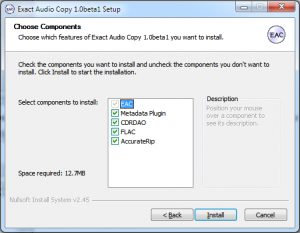
- Check all five selections for installation. Then click on the Install button.
The installation normally takes less than a minute. Not a big deal in the length of getting you to your perfect rips.
- When the installation is finished, uncheck the option to immediately run EAC:

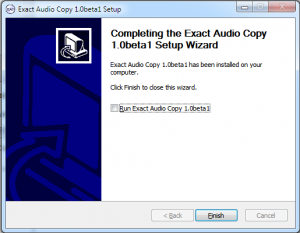
- Go ahead and click Finish. Now you have a shortcut to EAC on your desktop you can also start EAC from your Start menu.
Now you are set to configure EAC, proceed through the guide.
If you have any problems that might be solved with a reinstall of EAC, you will want to do a clean reinstall. This is also a good idea for when you upgrade to a newer version. If you uninstall EAC in the normal manner using Programs and Features or running uninst.exe manually, the configuration files are left on your PC.
Perform the uninstall as you normally would then remove the Exact Audio Copy folder where you installed EAC(probably at C:\Program Files\ or C:\Program Files(x86)) before you install EAC again.
The registry files are removed when running the uninstall for EAC (or can be found by searching in the registry), so after you remove the Exact Audio Copy folder you should be ready to roll. You will of course have to set up EAC over again by going through steps one and two above.
Next time we will move onto setting up EAC for usage in ripping your CD’s to FLAC. This is a six part process that takes you into the meat of the information. Trust me when I say in the long run once you have the process down, you’ll be more than happy ripping your disks to the best format humanly possible at the moment. Take care til next time and thank you for reading.
Everything You Should Know About Computer Vision Syndrome
 Working in the IT field, often I come across coworkers who have no eye problems but complain about headaches, fatigue, eye strain and dryness. What all of my coworkers have in common is- spending large amounts of time working on a computer. Sounds strange but computer related eye issues are recognized as “Computer Vision Syndrome” or CVS. In this era of technology, life without a computer is unimaginable for anyone. Some users occasionally just check their email, and others, such as myself whose lives and professions revolve around the use of a computer. Kids are often hooked on the fun of gaming online or offline and teens mostly are addicted to social networking and sharing. The IT industry is very large and everything under the sun is now computerized now. As much as they make our lives easier, computer usage, whether it be minimal or large can cause health problems.
While working on computer screens, our eyes and muscles undergo physical and physiological changes. The blink rate- a body mechanic used to keep our eyes properly wet is reduced dramatically reduced. It is like we are so engrossed in what we are reading or viewing on the screen we seem to forget to blink. This lack of blinking will cause the film from our tears on our eyes to crack and dry sooner. This induces burning and a gritty feeling that eventually leads to swelling and redness. Because of the distance between our eyes and our computer screens is normally very small, our eyes make up by exerting extra effort to accommodate, this allows us to focus properly on the screen. Doing this for long periods of time without breaking does lead to fatigue, headaches, and eyestrain. Our eyes are not the only problem, the ergonomics of our workplace does determine our posture and can lead to the onset of problems like back and neck pains. Uncomfortable chairs or a table that is low to the ground can cause slouching and bending, this affects the your backbones health over time. You may wonder why we can read for hours and ours with a book and never get tired, what is different about reading on a computer? The distance that we read a book is a lot less than the distance we put our computer monitor. Second is that the image on a monitor consists of many pixels, they are the brightest at the center and fade to the edges where the black color of the print offers a contrast of black and white, our brains find this easier to read. The problems that come from the items we have mentioned above are all together given the term of “Computer Vision Syndrome”.
Computer Vision Syndrome is charted by eye-strain, blurring vision, dryness and burning in your eyes, increased light sensitivity, head, neck, shoulder, or back pain. Computer users face a lot of these problems to a greater degree based on your frequency of use. Often times, these are symptoms are dismissed as being related to stress or sleep deprivation. CVS is not technically a disease, but it is a cause of concern, it is affecting more people daily. Discomfort in your eyes and the other symptoms related to CVS impact an person’s performance and well-being, this then affects your efficiency at work.
Even though Computer Vision Syndrome gaining momentum rapidly, especially with the increased usage of the young and middle-aged, there are some methods that you can be employ to ensure the health of your eyes.
- Ensure that your workspace is comfortable, if possible pick a chair that can support your spine properly and is adjusted properly to your height so your feet rest comfortably flat on the floor. Awkward height of the chair or the table can cause strain on the neck, backbone and eyes.
- If your have a child that frequents a computer, be sure that computer time is limited to a couple of hours, too much eye muscle work during a child’s growth period can interfere in the normal development and growth in your kid’s vision.
- Your monitor should be placed at a height that is lower than your face so your eyes are partially covered by your eyelids while reading and do not dry out too easily. Adjust the height level so the screen is at a level slightly lower than your eyes and that you sit upright and erect.
- Time breaks regularly and in these intervals spend 10-15 minutes sitting with your eyes closed or that you focus on an object like a tree outside your window. Doing this process will help you stretch out your eye muscles and reduce the chance of strain. Use an alarm on your phone or a calendar reminder on your PC that notifies you to take a break every so often.
- Do not place your monitor in a place where it will reflect too much light (such as near a window or a lamp). Use an anti-reflective coating on your screen to minimize glare. Researchers have shown that the symptoms of CVS can be significantly reduced in people that use anti-reflective coatings on their glasses.
- Tilt your screen at a downward angle so it does not reflect light directly into your eyes. It is amazing how effective this simple idea turns out to be!
- Another easy and helpful tip is to use reverse contrast on your screen. Having white letters on a black background reduces the glare from the screen to provide a better contrast. Adjust the font to a size that is comfortable and correctly leveled so you do not have to squint your eyes while reading.
- Keep some preservative free eye drops handy to use either at bed time or at your work-place.
- For user that are above forty, or anyone with vision trouble, it is important that you wear the proper vision correction. Older users be sure to speak to your eye care professional about the demands of your jobs and ask for an intermediate distance correction along with your reading glasses. Special glasses for computer use are now available and can be custom made per your needs.
Computer Vision Syndrome is another addition to the list of ailments induced by your lifestyle, except the solution is pretty simple. Paying attention to details is worth the trouble, it promises better health, and eye comfort. Work on your computer for as long as you want to, but do take care to not stress yourself out. Little things do go far in maintaining the health of your eyes and back. Always keep your health in mind and at the front of your priorities!