Create a Killer Document Template in OpenOffice

As you probably already know from my article on Windows vs Linux, I’m a Linux guy. I simply love the kind of things I can do on my Linux box using all free and open applications such as Firefox, Thunderbird, GnuCash, Rhythmbox, and most importantly, OpenOffice.org .
I have always had a special affinity for Office applications because of the beautiful documents, spreadsheets, and presentations they allowed me to create. My first job was in a BPO, and if you don’t know that already, these organizations thrive on productivity apps such as MS Word, Excel, and PowerPoint. I daresay that if for some reason all spreadsheet apps stopped working, most of these organizations would end up in utter chaos.
So when I switched from Windows to Linux, I took this love for documentation to OpenOffice.org. While it was a bit difficult at first, I see now that I can do nearly everything here that I could on MS Office. I agree that MS Office 2010 has a number of inbuilt features that let you do a number of things faster; however, OpenOffice.org can do just as good a job when it comes to creating beautiful documents if you know your way around it . And it’s not hard to do that at all.
To illustrate this point, I’ll show you how to create a simple yet elegant document template that can be used to create documents with consistent styling and visual elements. Even if you don’t like the particular colors and fonts I have used here, that’s OK. My main intent is to show you how to customize your page elements to suit your needs. Beyond that, let your creativity guide you in terms of other details.
Inserting Dummy Text
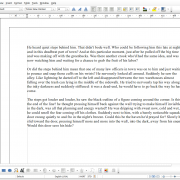
Nothing about formatting starts without dummy data. In OpenOffice.org, it’s very simple to generate it. Simply type “dt” and hit F3. It will populate your page with a bunch of text that you can break down into a few paragraphs.
Defining Your Styles
Every Document should have style definitions for a minimum of four elements:
Heading 1
Heading 2
Heading 3
Default Paragraph
These are the most highly used elements in any document, and therefore, it makes sense for us to define them before we do anything else.
Go to “Format” and click on “Styles and Formatting”. As a result, the following window pops up.
At the bottom of this window, there’s a dropdown list. In this list, select “All Styles” in order to see all the paragraph styles available to you.
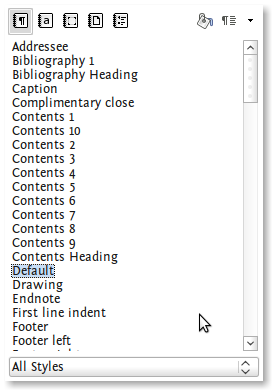
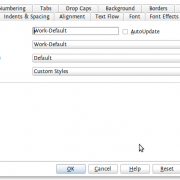
Creating Custom Paragraph Style
Scroll down to “Default” and right click on it. On the menu that shows up, select “New” as shown in the image below.
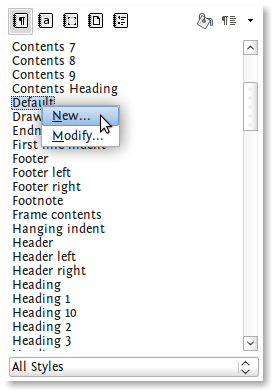
Once you click that, a new window shows up on which you can create your new style based on the “Default” style already present in the default document template. The reason why I right-clicked on “Default” is because this style is associated with paragraph text and has many settings such as font details, alignment, etc already set to what we want. That makes our job of defining a new style that much easier.
In the image below, I’ve named the new style as “Work-Default”. Feel free to give it whatever name you want. In the dropdown list for “Next Style”, I’ve chosen the same name “Work-Default”. What this means is that when I hit “Enter” after completing a paragraph in the style “Work-Default”, it will start my new paragraph with the same style — “Work-Default”. If I had chosen “Heading 1”, it would start the new paragraph as a Heading 1.
Here are the other definitions I have used for this style:
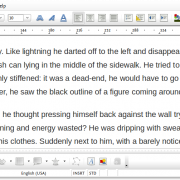
Font: Liberation Sans 10 point
Font Color (in the Font Effects tab): Gray 80%
Spacing: 6 pt above and below paragraph
Line Spacing: 1.5 lines
Here’s how my default font looks now:
Creating Custom Headings
We do this in a similar way as we did for the default paragraph text. You just need to keep a couple of things in mind though:
- Start with a new heading by right clicking on the corresponding default heading style already present in the document. Therefore, for creating a new style “Work-Heading 1”, you should start by clicking on “Heading 1”. This will also save you a lot of trouble when creating a table of contents automatically.
- For “Next Style”, always choose your newly-created style “Work-Default”. This will ensure that the moment you’ve written your heading and hit “Enter”, the new paragraph will automatically have the style “Work-Default” instead of “Work-Heading 1”. This will save you the trouble of manually selecting “Work-Default” every time you start a new paragraph after a heading.
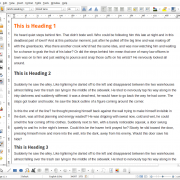
Here are the font definitions I’ve used for my Headings:
Heading 1
Font: Droid Sans, Bold, 16 Point
Font Color: Ubuntu Orange
Heading 2
Font: Droid Sans, Bold, 14 Point
Font Color: Gray 80%
Heading 3
Font: Droid Sans, Bold, 12 Point
Font Color: Gray 80%
Here’s how the page looks with the dummy text and Headings:
Adding Visual Elements
Title Box
Click on “View –> Toolbars –> Drawing”. This will show the toolbar with options to create shapes and other stuff at the bottom of your OOo window. Now go to “Insert –> Header –> Default” and then “Insert –> Footer –> Default”.
This will create sections for adding a Header and Footer to your document. Now choose the rectangle drawing tool and create a rectangle at the top of the page as shown in the picture below:
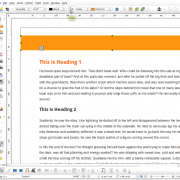
Choose “Invisible” for its outline, and the area color as “Chart 10”. Ensure that the anchor of this box is in the “Header” area. This will ensure that the orange box will appear at the head of every new page you create henceforth.
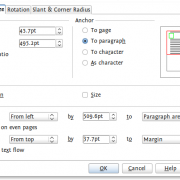
Here are the size and position specs of this box:
Now we can insert our text in this box — which forms the title of the document. Here are the font specs I have used for this:
Font: Droid Sans, Bold, 26 Point
Font Color: White
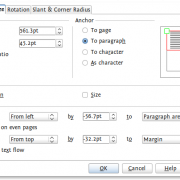
Position: (see image below)
Extra Information Watermark
Using the same rectangle tool, create a box and type “Private and Confidential” in it. Again, ensure that its anchor point is either in the Header or the Footer so that it shows up on every page.
Choose invisible border. For its area, I created a new color with the profile: R-147, G-192, B-255; and I named it “Work-Watermark”. I also chose the transparency of this box area at 50%. In order to access these settings, simply right click on the rectangle and choose “Area”. A window pops up with various tabs, one of which says “Transparency”.
For the text inside the box, I chose the following font specifications:
Font: Liberation Sans, Bold, 26 Point, All Caps
Font Color: Work-Watermark
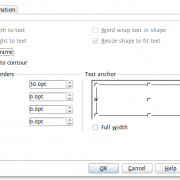
I also changed the text rotation to 90 degrees in the “Position and Size” window. You can do that by right-clicking on the rectangle (not the text inside) and choosing “Positiong and Size”.
Here is some more information about the position and size of the box:
Here’s how the rectangle looks like now:

Page Numbers
Put your cursor at the beginning of the Footer and go to “Insert –> Fields –> Page Number”. This will insert the Page Number field onto your footer. Choose the font specs as follows:
Font: UnDotum, Bold, 24 Point
Font Color: Chart 7
Now create a rectangle using the rectangle tool with the following specifications:

Choose invisible border and “Chart 7” as the area color. Also choose 25% as the transparency setting.
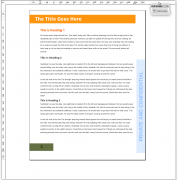
Here’s what the entire page should look like now:
And that’s it. Now save this file as “ODF Text Document Template (.ott)” in the path “.openoffice.org/3/user/template/. I’ve named it as “Work-Template.ott”.
The next time you wish to create a document using this template, all you need to do is start the main OpenOffice.org program, and click on “Templates”. A window opens up with a number of options as below. Choose the second option on the left that says “Templates”. Once you do that, the window shows the following information:
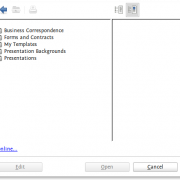
Choose “My Templates –> Work-Template” here and click on “Open”. A new document containing all your styles and visual elements will open up. Now all you need to do is start editing the text and get to work!
So you see, all it takes is a few minutes of tweaking and changing things, and you’re ready to create your unique brand of documents right away. Of course, there are a number of other elements such as tables, captions, etc. Each of these elements can be modified according to your needs using the same process that we’ve described above.
If you are truly interested in creating beautiful documents, take this tutorial as a starting point and play around with some more elements as you move along. Believe me, it will have an amazing impact on your productivity once you choose a good style for your documents and stick to it. This is very important especially if you’re looking to create a consistent brand image in every material that you send to your clients, vendors, or other business associates.
Please ask questions or share your favorite templates with us in the comments.