The Do-It-Yourself Guide to Installing WordPress

It is WordPress week here at the TechKing blog. Check out the site everyday for some great articles on anything to do with WordPress. To celebrate we have a couple of giveaways that you do not want to miss. The first one will be announced today at 12:00 PM CST so check back then and try to win this awesome prize.
It goes without saying WordPress is extremely popular and thanks to applications like Fantastico the installation is practically effortless. Back in my day when we weren’t walking to school up hill both ways in a snow storm without shoes we were manually installing WordPress. While these one-click apps you find in your hosing control panels are nice I think it is a good idea to learn how to install it manually first. Once you are comfortable with the manual installation you can choose to use one of these auto install programs if you wish. So lets get to it!
Step 1: Create the MySQL Database and User
If your hosting company uses cPanel setting up your MySQL database will be very easy. If you use a host that does not use cPanel you will need to consult your hosting companies help documentation on how to setup a database.
First you need to log in to cPanel (yourdomain.com/cpanel). Click on the link that says ‘MySQL Databases’. This is where you will setup your WordPress database and add the user you create to it.
Select a name for your database and enter it into the text field next to ‘New Database:’ then click ‘Create Database’. Once you click the button you should be taken to a page that confirms your database was created. Click ‘Go Back’ and you will be taken to the screen you were just on. You should see the database you just created under ‘Current Databases’. Notice that your cPanel username and an underscore have been prepended to the database name you chose. Make note of this database name, you will need it later.
The next step in setting up your database is to create a username and password. Under ‘Current Users’ enter your desired username and password in their respective text boxes and click ‘Create User’. You should receive a message that the account was created successfully. Take note of your password (we will get the username from the previous page) and click ‘Go Back’. Like your database your username has also been prepended with your cPanel username and an underscore. You should now make note of your username.
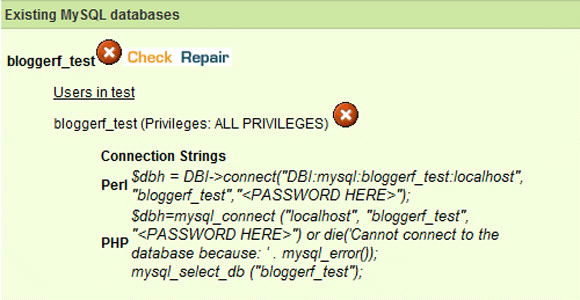
To complete the creation of your database we need to add the user to the database access list. Under ‘Add Users To Your Database’ select the user and database you created in the ‘Username’ and ‘Database’ dropdown boxes, make sure ‘All’ is checked under ‘Privileges’ and click the ‘Add User To Database’ button. Once again you should receive a message telling you that the account was added successfully to the access list. Click ‘Go Back’ and you should have something similar to the image.

Step 2: Download and Extract WordPress
Now that you have your database created it is time to download WordPress. Make sure you save the .zip file in an easy to find location like your desktop.
To extract WordPress, double click on the .zip file you just downloaded and extract the files to your desktop. Windows XP/Vista/7 should have a utility to do this for you but if you need one I recommend downloading 7 Zip. You should now see a folder called ‘WordPress’.
Step 3: Edit wp-config.php
For this step we need to edit wp-config.php so that it has the database information that you setup in Step 1.
In the ‘Wordpress’ folder you extracted in the last step find the file named wp-config-sample.php. Right click on this file and click ‘Rename’ rename the file to ‘wp-config.php’.
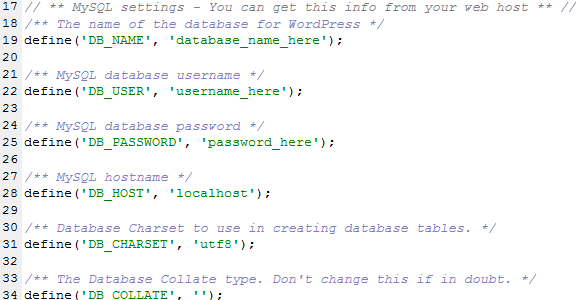
You will now enter the database information in the section labeled:
// ** MySQL Settings – You can get this info from your web host ** //
The three entries we are concerned with are the following:
DB_NAME – This is the name of the database you created in Step 2 .
DB_USER – This is the username you setup in Step 2.
DB_PASSWORD – This is the password you chose for your username in Step 2.
You should be able to use ‘localhost’ for DB_HOST in most setups, however you will need to check with your web host’s technical support documentation to confirm.

Step 4: Upload WordPress to your server
For this step you can either use an FTP program like Filezilla or upload WordPress through your web hosting control panel. If you are serious about the blog building business I urge you to use an FTP application as I am sure you will find it much more user friendly as you gain experience. If you wish to use the upload feature in your hosting control panel please consult the support documents for your webhost for instructions. If you are using Filezilla or another FTP application setup a connection with the information provided for you in your webhosting welcome letter.
Once the account is setup connect to your FTP account. When you are connected you should see either a ‘/public_html’ or ‘www’ folder, go ahead and double click on it to access it.
When installing WordPress I recommend you install into a directory within your root (public_hml) folder, doing this keeps your root directory nice and tidy. This is where you will upload the ‘WordPress’ folder you extracted on your desktop. In order to transfer the files all you have to do is find the ‘WordPress’ folder on your desktop in the left hand pane of your FTP program and drag it over to the right side. Wait for the files to finish uploading then proceed to the next step.
Step 5: Complete the installation
We are going to finish the installation by going to http://www.yourdomain.com/wordpress/wp-admin/install.php.
Enter the following information:
Site Title:
Username: (This will be the admin account)
Password:
Your E-mail: [The e-mail you want to use for this blog]
Make sure ‘Allow my blog to appear in search engines like Google and Technorati’ is checked.
If you want to change this information later it is easily done from the WordPress admin dashboard.
After these details are entered click the ‘Install WordPress’ button. When the installation is complete you should be taken to a page with a message indicating the installation was successful, you should also see the username you chose. Click ‘Login’ to login to your site’s admin panel. Once you have confirmed you are able to login to the admin go to http://www.yoursite.com/wordpress/, you should see the default WordPress theme.
I highly recommend you keep your username and password in a safe place and bookmark your blog’s admin screen for easy access.
Congratulations, the WordPress installation is complete and you are now ready to select a theme and add some plugins.
There you have it, in four easy steps you can install WordPress. One of the reasons I like to do it manually is because I sometimes have issues with the auto-updater if I use a one-click solution. Plus, as the old saying goes “Give a man a fish he eats for a day. Teach a man to fish and you can rob his house while he is out fishing.” I am not sure if I got that exactly right but I know our readers are highly intelligent and understand what I am saying.
If you decide to give the manual WordPress installation a go and have issues please feel free to ask you questions in the comments. I will be happy to help.
