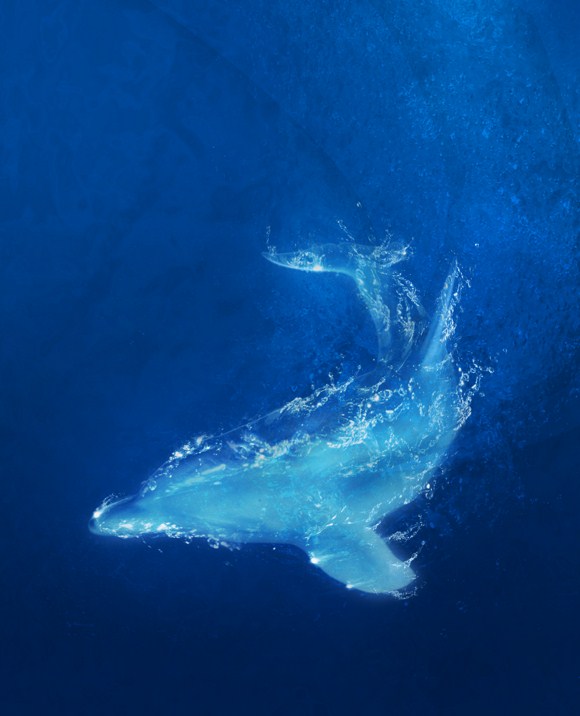
The Making of the Liquid Dolphin
Have you ever imagined of mystical beings with bodies of crystal water? Like water but moving and in the form of animals such as dolphins, sharks and other marine animals. In this tutorial we are going to create a liquid crystal being in the form of a dolphin using Photoshop. This tutorial is useful also when attempting to recreate ice statues. And just like in the process of making the fire horse, this is going to involve several combinations of layers. This liquid effect is also an alternative when creating transparent crystal figures using other 3D rendering programs.
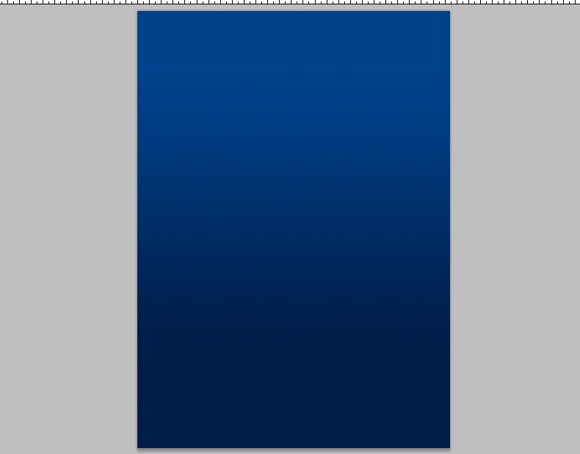
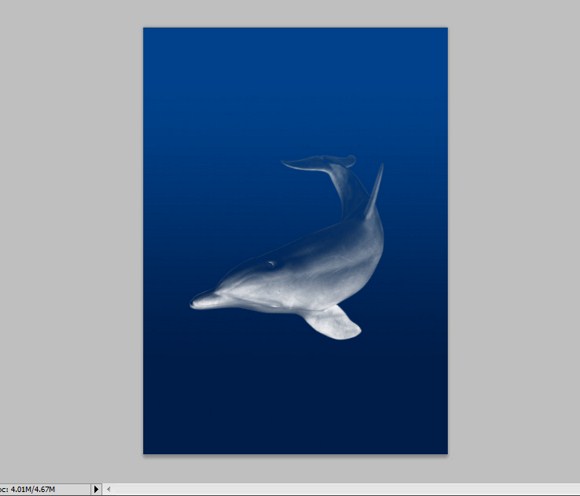
First step is to create a Photoshop document in a portrait size. An image dimension of 1000 x 1400 (height and width respectively) should be good enough.
Next fill the first layer or background with a gradient like this. You do not really need to be very accurate with the gradient colors. Just pick the colors that look like the ocean water.
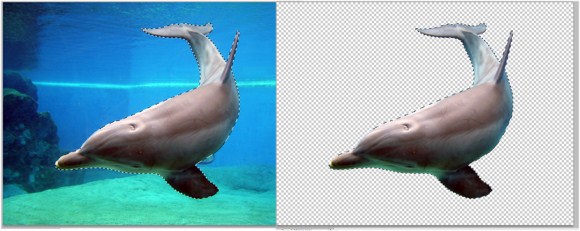
Now find a resource or stock photo of a dolphin. Prepare the main object of the project, which is the dolphin, by removing the background leaving the dolphin only.
You can use the marquee tool, the magic wand tool, or the pen tool to erase the background. You can find and read other guides on how to the selection tools to extract or cut images from a photo. For me, the best tool to use to cut the dolphin is the pen tool or the color range function if you are familiar with it.
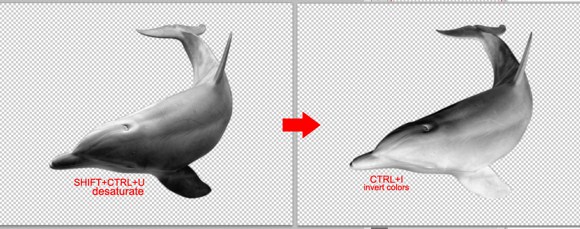
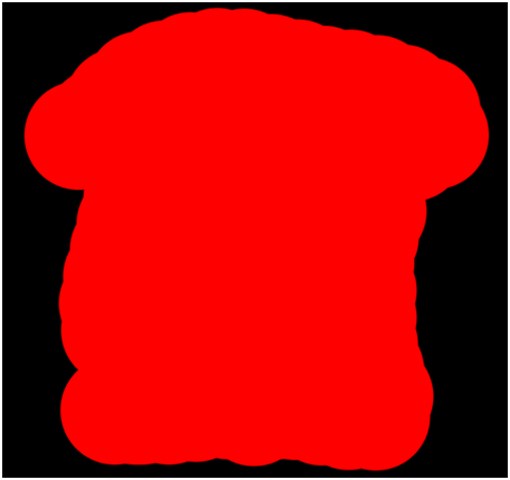
Press SHIFT+CTRL+U to DESATURATE the dolphin picture. After that, press CTRL+I to invert the colors. The result should be a negative or inverted version of a black and white photo of a dolphin.
Next, go to the Channels palette found right beside the Layers palette. PRESS and HOLD CTRL key and LEFT click on the RGB thumbnail. This will select and maintain the transparency/ opacity when you COPY it to the main document/project.
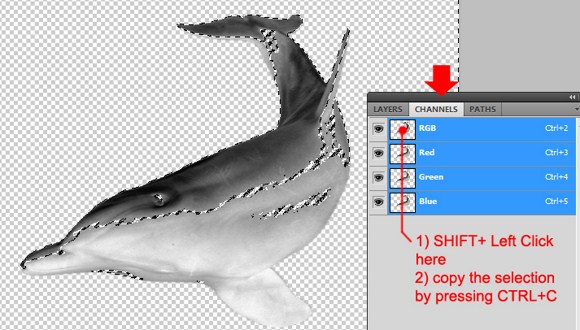
Press CTRL+C to copy the selection and paste it on the main document. Place the copied item on the suggested location. You may have to resize the dolphin if needed since it is possible that you will use a different source of the dolphin having smaller or larger image resolution.
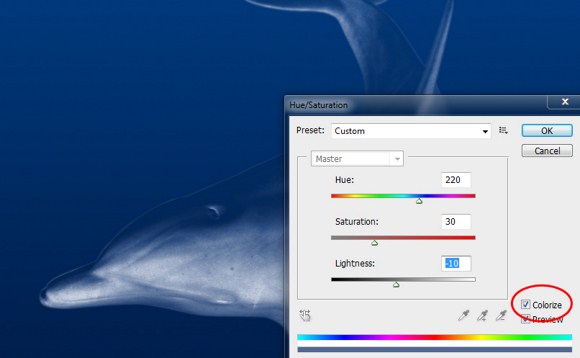
Next, go to Image > Adjustments > Hue/Saturation (CTRL+U) to colorize the dolphin. Be sure to enable the COLORIZE and try to follow the parameters given. Go to Image > adjustments > Levels and adjust to get more contrast however, this step is optional.
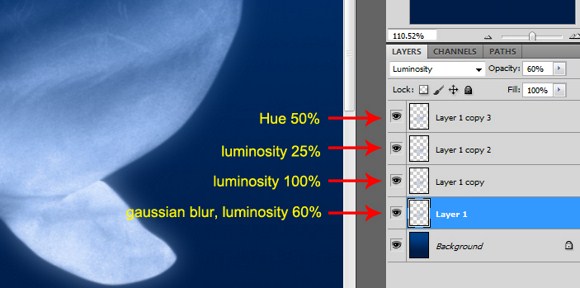
Change the dolphin layer blend mode to LUMINOSITY. Set the opacity to 60 percent. Duplicate this layer 3 times to get a total of 4 layers of the same object. Set the 2nd duplicate to luminosity and 100% opacity, 3rd to 30% or 25% opacity, and the last to HUE blend mode and 50% opacity.
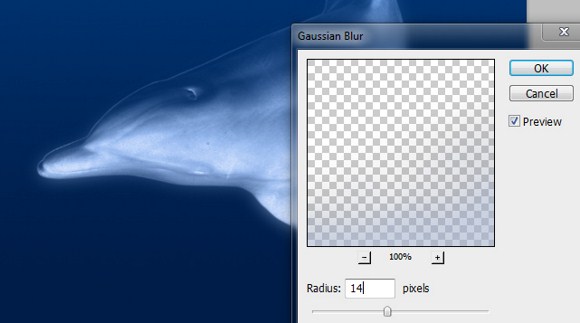
Apply Filter > Gaussian Blur on the first dolphin layer. This serves to be the glowing element of the subject. Be careful to apply blur just right.
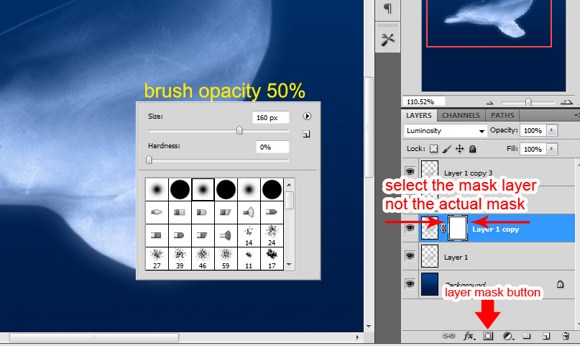
On the second layer (one with 100% opacity), create a mask layer (HIT layer mask button) Choose Pure black paint color, and paint on areas which you wish to hide or lessen visibility. Make sure you have your brush opacity at 50% at least using a soft brush.

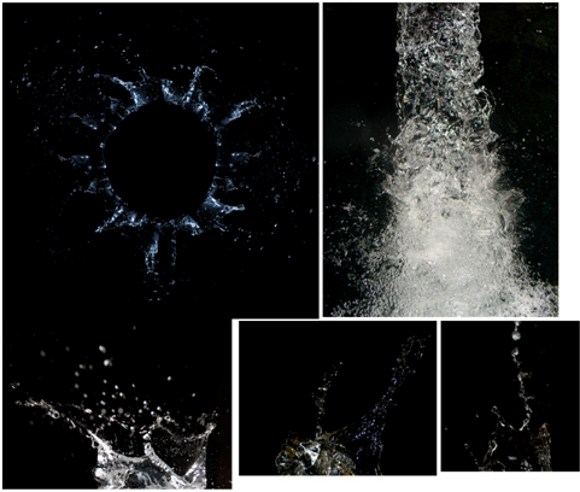
Now before you move to the next steps search the web and download royalty free stock photos of water splashes and flowing water.
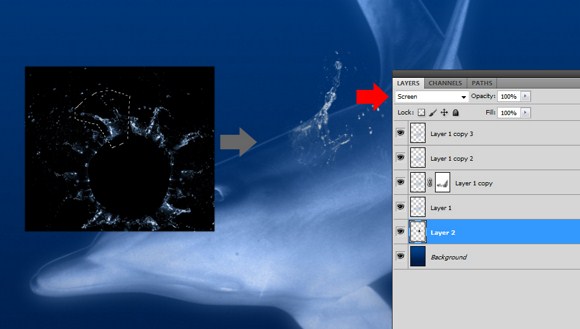
Start transferring the splashes by CUT+COPY method. Make sure you place the SPLASHES layers behind the dolphin layers. Do not forget to CHANGE the blend mode to SCREEN. Every splash you place must be DESATURATED first then COLORIZED to match the dolphin’s color.
(You can also repeat the steps where you CTRL+CLICK on the RGB layer on the CHANNELS PALETTE)
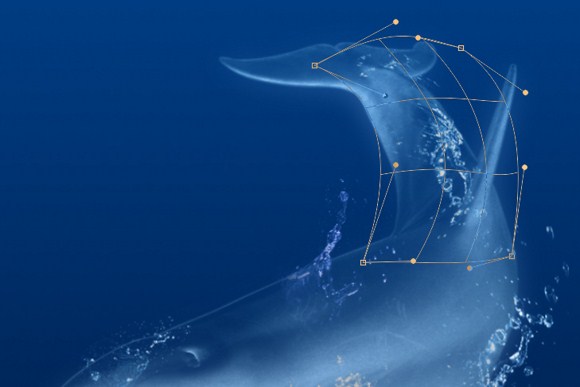
You will also need to use the warp tool to manipulate the shapes of the water splashes according to the dolphin’s body.
Fill the dolphin figure with splash! Use your imagination and creativity in this procedure.
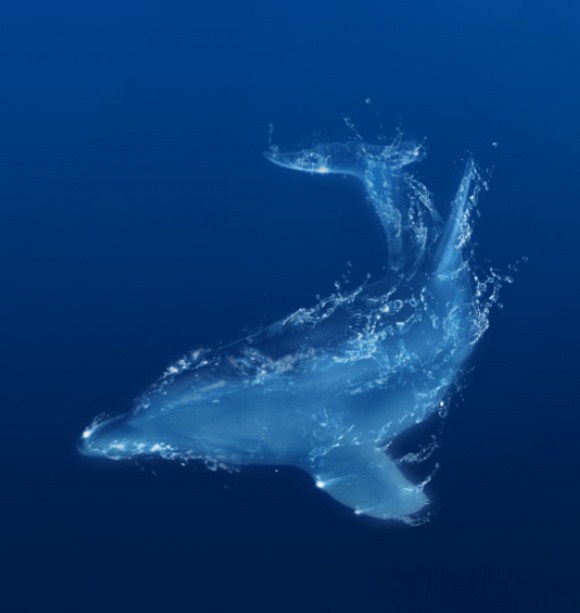
By adding some more lights and layer overlays, along with background enhancements such as bubbles, waves, and lights, we can achieve effects just like these.
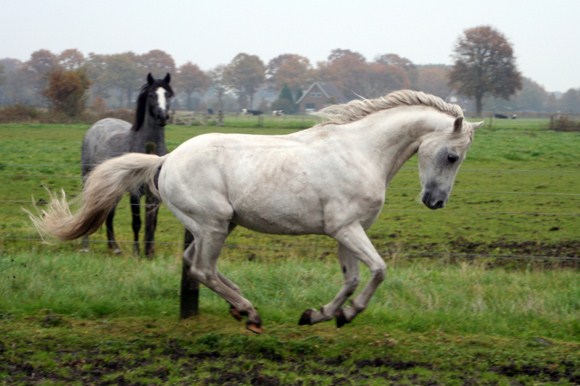
Creating a Fire Horse
This tutorial will show you how to create a horse made of fire. Lets use Photoshop to recreate Rapidash of Pokemon fame. This technique involves the use of filters, transformation tools and layer blend modes. This technique can also be used to recreate the effect in the movie Ghost Rider.
First we need a good picture of a stallion or a horse. It is also effective when you use a photo of a horse running or in motion to maximize the use of the fiery effect of the horse’s hair and flames.
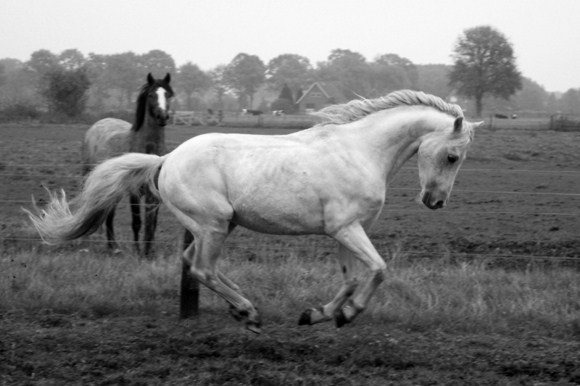
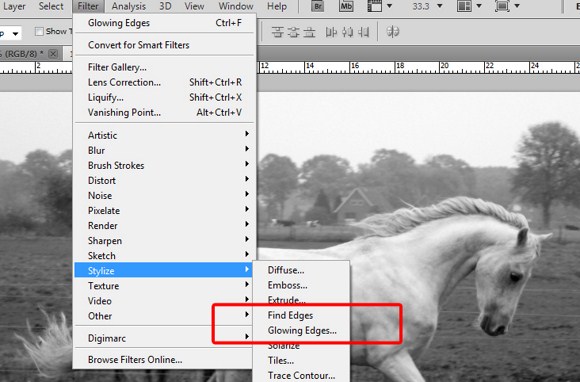
Prepare the photo by opening in Photoshop, and then creating a duplicate layer for backup purposes. Once you have created a duplicate image, DESATURATE the image by pressing SHIFT+CTRL+U to make the photo in black and white.
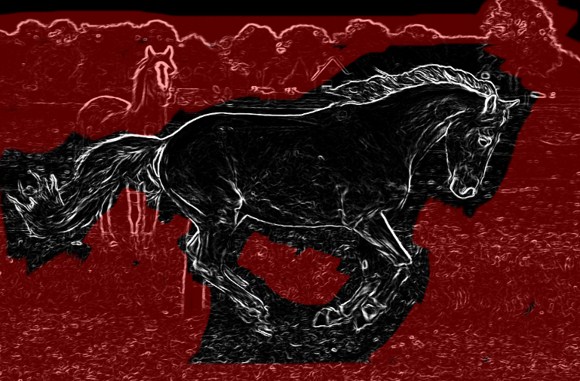
Next, apply a filter – Find Edges. Although you can also choose glowing edges which has more control over the intensity of the lines, nevertheless, both filters have almost the same function and effect on black and white photos. For now choose find edges. But if you really want detailed results, try experimenting with glowing edges.
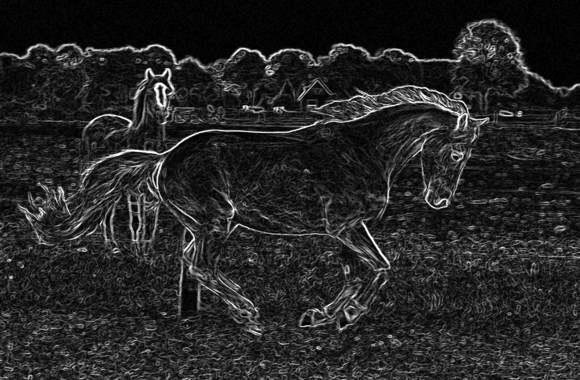
After applying the filter you should get a result just like below.
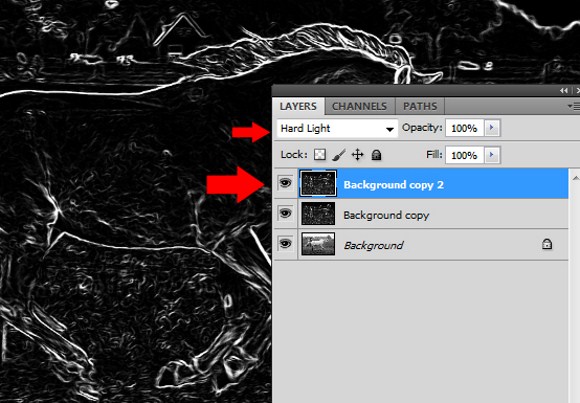
Duplicate this layer and set the layer blend mode of the duplicate into hard light.
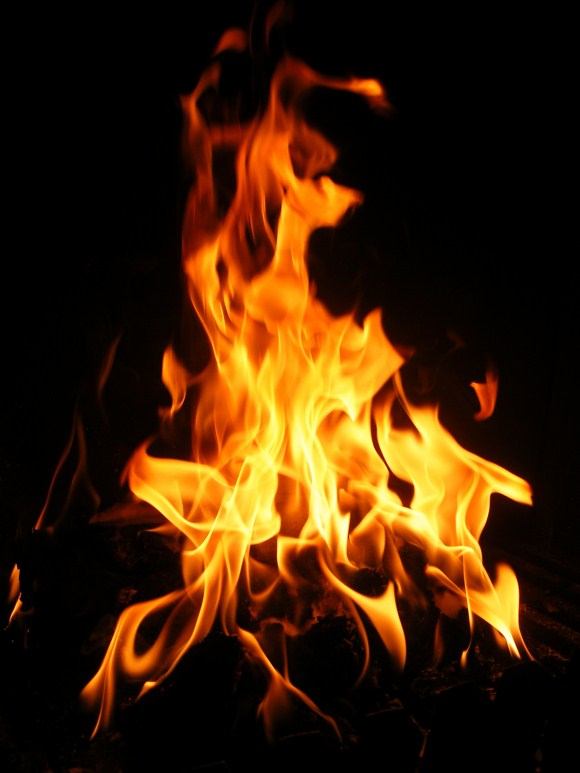
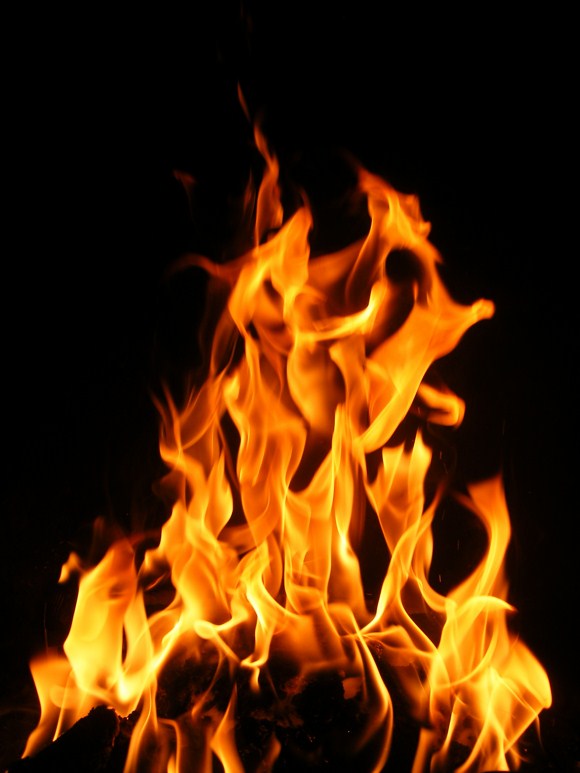
Before you move on, you need to have stock pictures of flames. We got these fire images from the royalty free stock images site and downloaded the items. Do not worry. It is free to download as long as you have registered for membership. Visit here to see the images – http://www.sxc.hu/profile/huibidos.

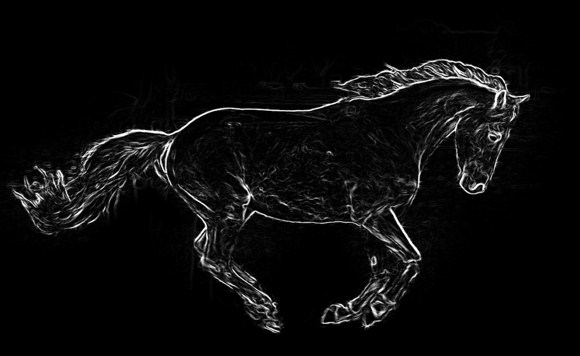
You see that the image has lots of white areas that are not parts of the horse. We need to remove these parts using the brush tool. Using black color, paint over the areas on the topmost layer. The red areas are the suggested parts which need to be covered with black.
After omitting those unwanted areas the result should be like this.
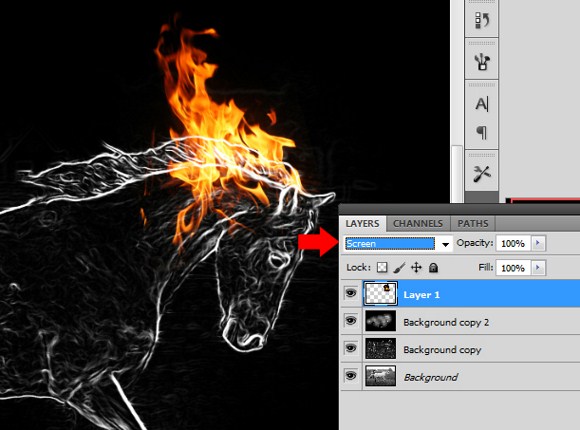
Now drag the flames which you have downloaded into the main image. Open each downloaded file in Photoshop so that you will be able to bring and drag it to the main project. Resize and rotate the flame and bring it on top of the horse’ head.
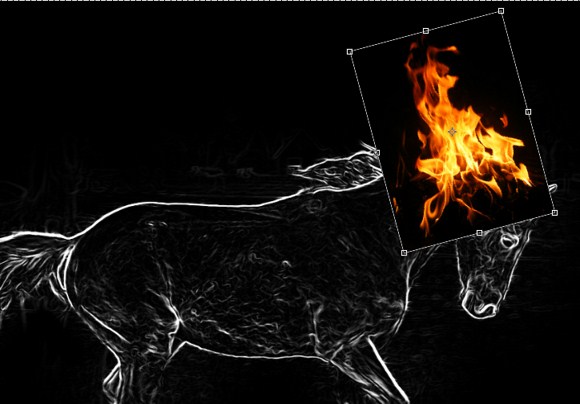
Now set the layer blend mode to screen.
Press CTRL+T (transform tool) and select WARP TOOL. Drag the frames to warp the image according to the shape desired.
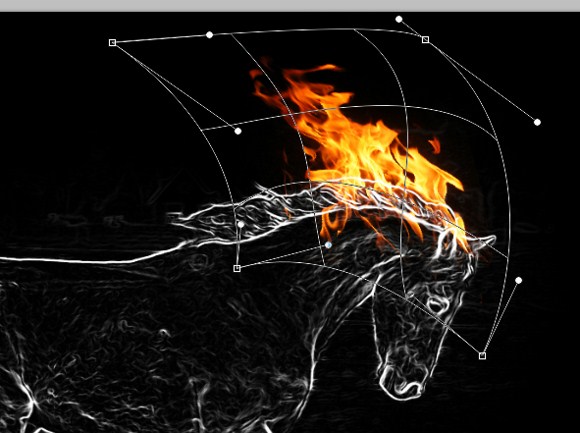
In the following steps, you are going to create multiple duplicates of flames. Each with different sizes, warp transformations and positions to create something just like the example below. Use your creativeness to position the flames on the horse. Flames on the hoofs are quite simple however the flames on the tail will be quite complicated to warp transform. It will take a few attempts to get it right. Do not forget to SET EACH and EVERY FLAME layer to SCREEN blend mode.
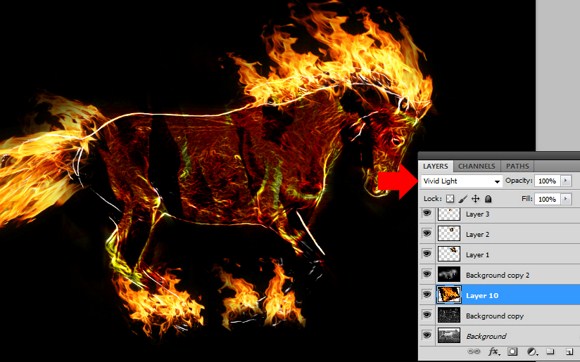
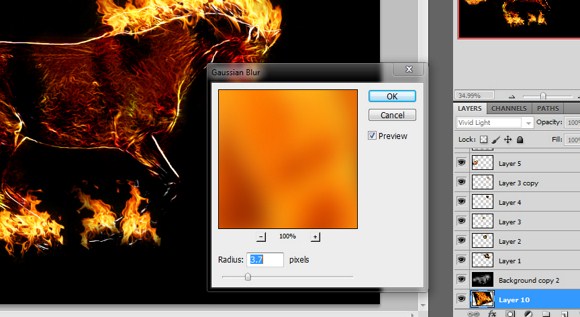
Insert a LARGE flame into the image. Rotate the flame slight towards the left and change the layer blend mode to vivid light. Make sure you place this layer as the SECOND or third layer from the last.
Apply a GAUSSIAN BLUR on the layer. It is up to you to set the amount of radius.
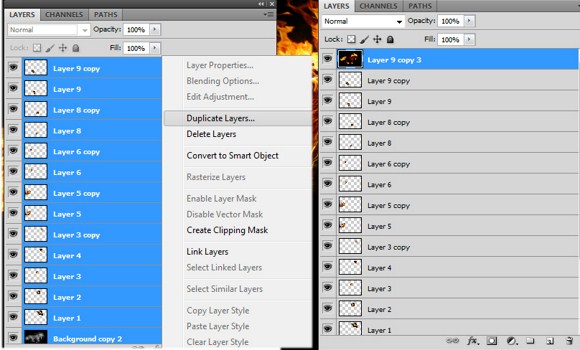
Select ALL layers, DUPLICATE all the selected layers, and then MERGE (CTRL+E) the duplicates.
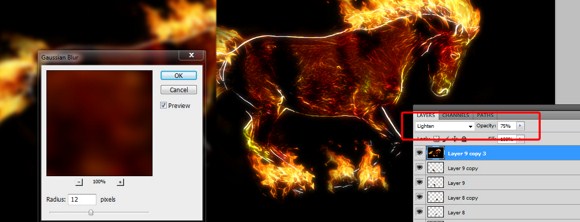
Apply a guassian blur, the set the blend mode to lighten and adjust the opacity to 75%.
Select the BRUSH TOOL, and then press F5.
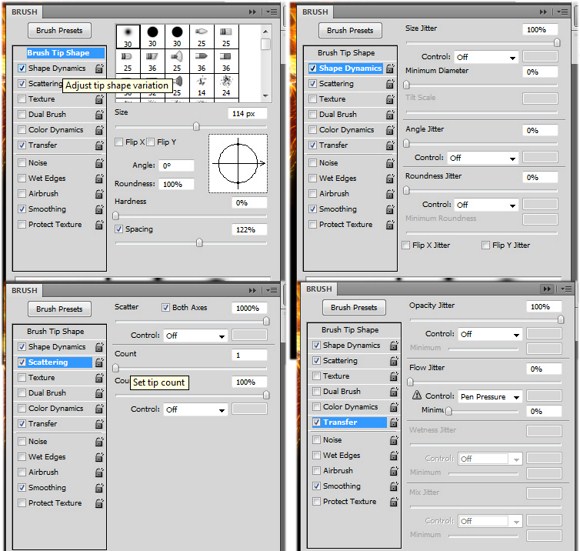
- Select a soft brush, set the SPACING to about 120 percent.
- Enable SHAPE DYNAMICS, set the size jitter to 100% and turn the control off.
- Enable SCATTERING and max out scatter to 1000%, set count to 1%.
- Enable transfer/OTHER DYNAMICS, max out opacity jitter to 100%.
- Then use the brush you just modified.
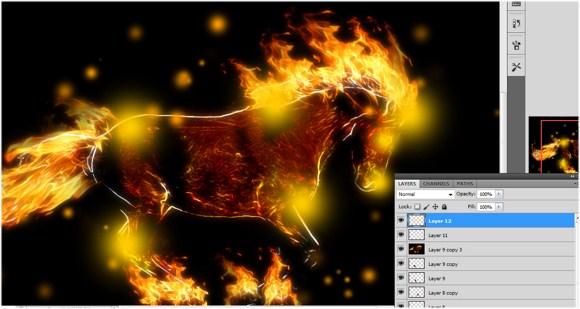
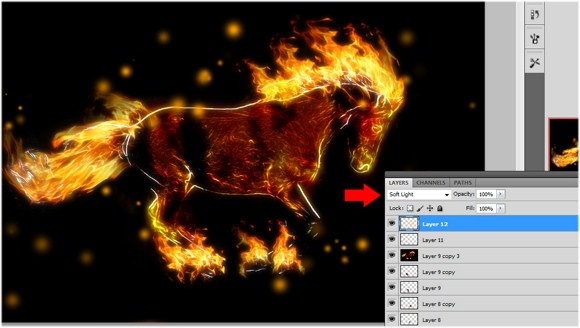
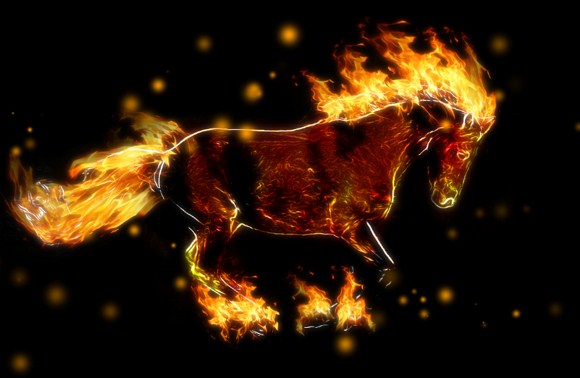 Create a new layer on the topmost. Choose a hot color such as light orange. Use a soft brush to paint some parts you like glow such as the head and the legs. After that, change the blend mode to soft light.
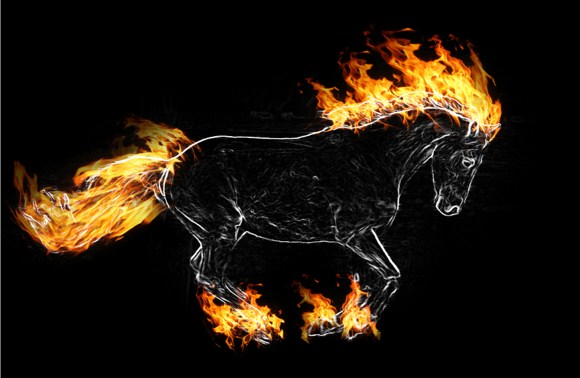
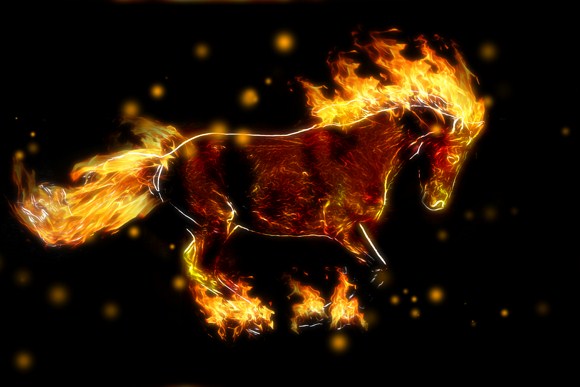
 And you are done with the making of the fire horse.
We hope you had fun with this one. Please feel free to ask any questions or show off your work in the comments.
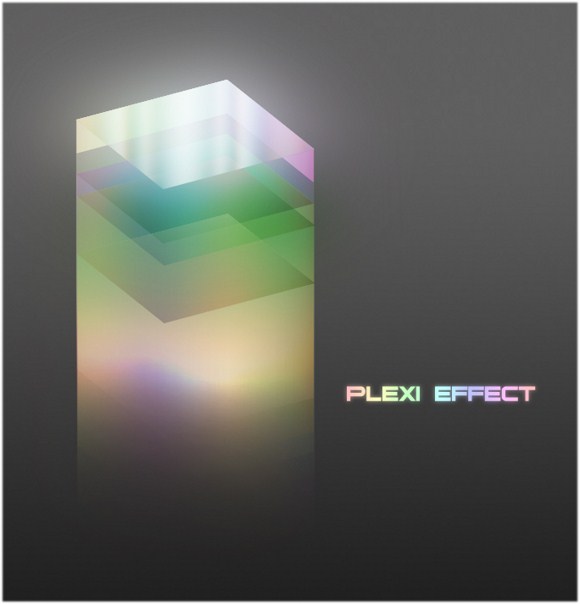
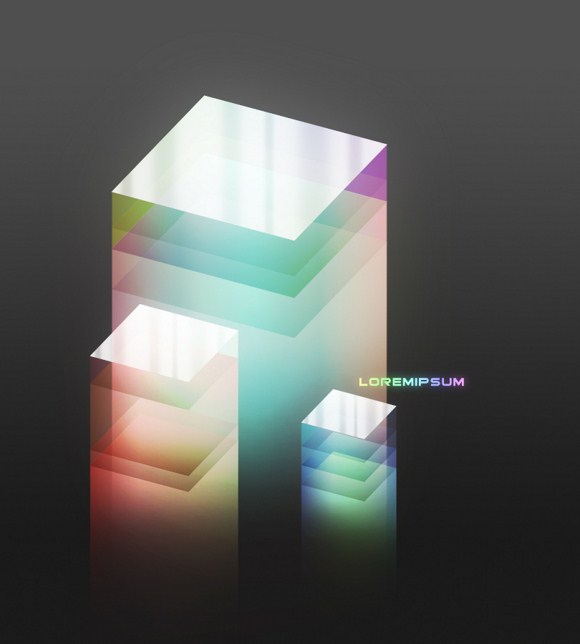
Create a Cool Abstract 3D Plexi Glass Effect in Photoshop
This tutorial will show how to create cool looking abstract shapes, 3D text and objects with the Plexi Glass effects and many different colors. This effect can be applied on text as well as objects or symbols. The activity will involve a lot layers and layer manipulations such as blend modes and layers styles.
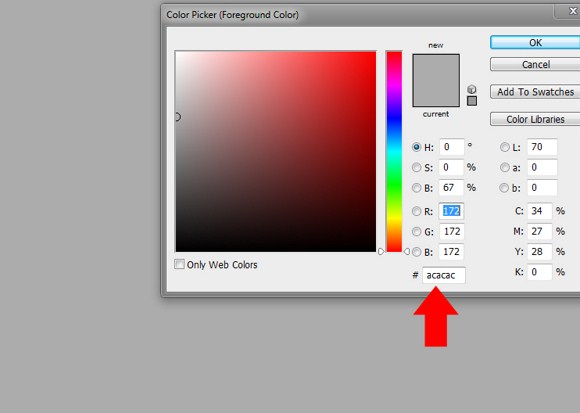
First prepare your document or image. Both landscape and portrait sizes will do for this project. Now fill the background with gray using the FILL tool found in the tools palette. If you are not sure what color to choose, you can put #ACACAC in the color picker.
For now use simpler shapes first like circles and squares. Later on as you master this technique you will able to work and apply this on more complicated shapes, symbols, and text.
Create a square or rectangle by selecting the Rectangle Tool from the tools palette or pressing the shortcut key “U”. Before you actually create the shape, do not forget to change the color to something LIGHTER than the background so that you be able to see the shape as you create it.

After creating the shape, rotate it slightly in whatever direction by using the Transform tool (CTRL+T), and then shrink the shape using the transform tool again.
Apply a layer style: Gradient Overlay. Make sure that the colors you are using are darker than the background color and the other one is lighter than the background color. Also, you must make sure that the color is arranged properly with darker color on the bottom side.

Follow these steps carefully:
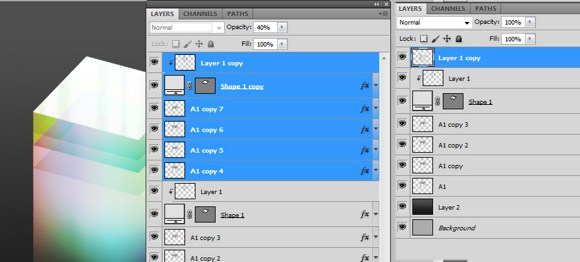
DUPLICATE the shape 1 layer and RENAME it to “A1”
Create a NEW blank layer
Merge the 2 layers, by right clicking on the blank layer and clicking the “merge layers” function.
Rename it to A1 again.
Duplicate that layer and drag it on the top most position on the layers palette.
Rename the duplicate as A2. Then UNCHECK the visibility box of the original shape 1 layer to make it temporarily invisible.
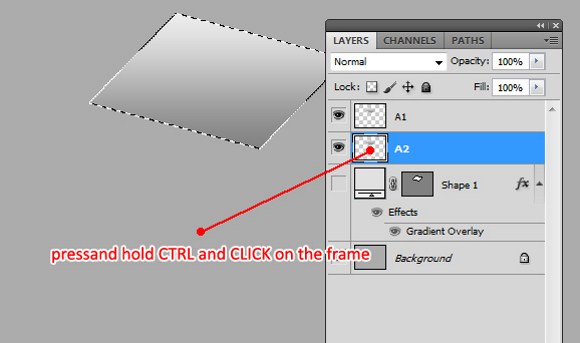
Drag the A2 layer to the position after the A1. PRESS and Hold CTRL key then left click on the layer (area indicated). You will be able to see that only the object, not the entire layer is selected.
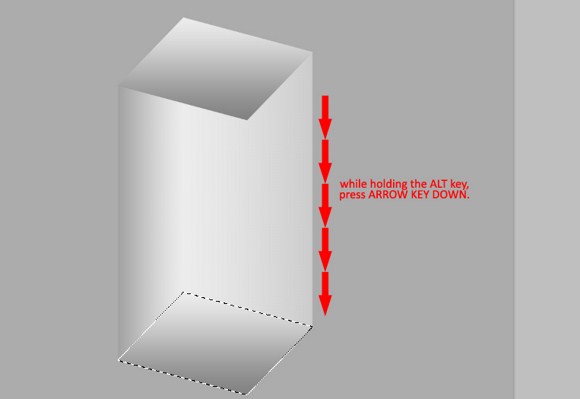
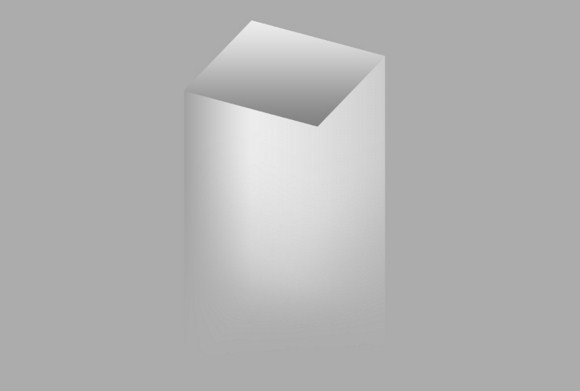
Press and hold the ALT key then press arrow key DOWN. This is the process called extrusion. After that make sure you DESELECT or press CTRL+D.
Now grab the eraser tool. Use a Soft brush tip to erase parts of the extrusion.
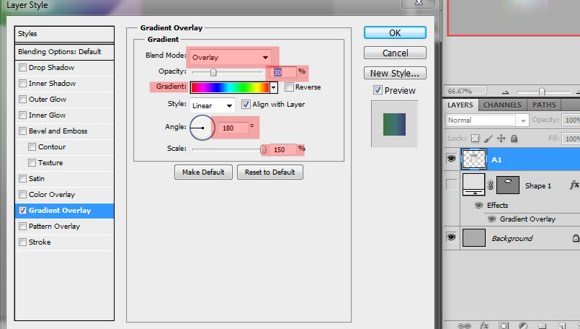
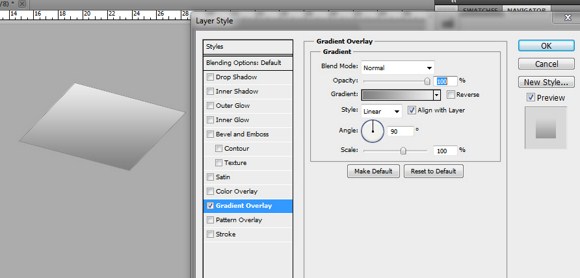
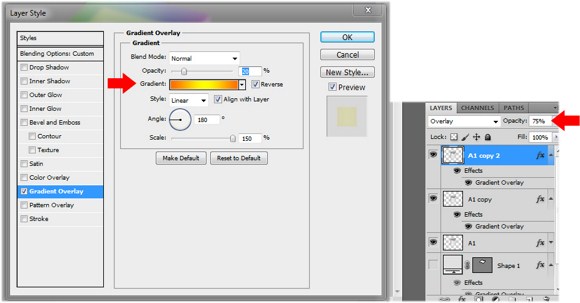
Apply a layer style gradient overlay on A1 layer.
Set the blend mode to Overlay.
Set the opacity to 30%.
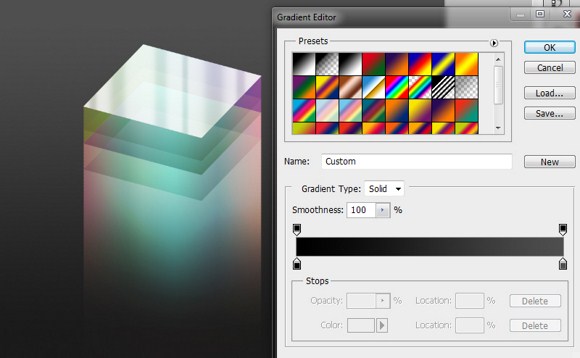
Choose the spectrum gradient preset.
Set the angle to 180 degrees and max out the scale to 150 percent.
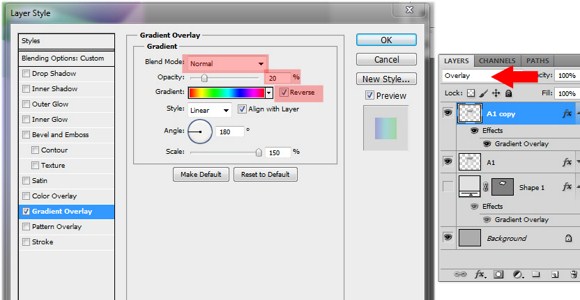
Duplicate A1 layer then open the layer styles tab.
Under the gradient overlay, change the blend mode back to NORMAL.
Lower the opacity to 20 percent.
Enable REVERSE and set the Layer Blend Mode to OVERLAY. Add another duplicate then change the gradient type and lower the opacity of that particular layer.
This next step is optional. As long as the results are desirable, you can add more layers with descending amount of opacity (example: 50% , 30%, 15%)and with different gradient colors.
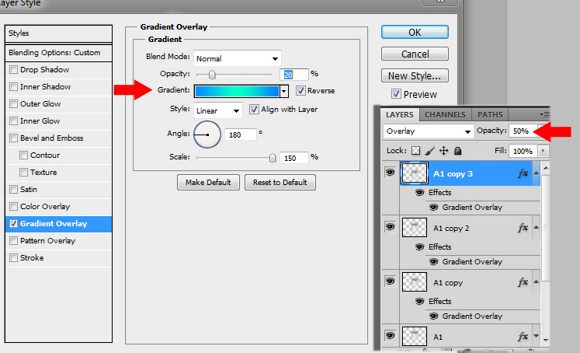
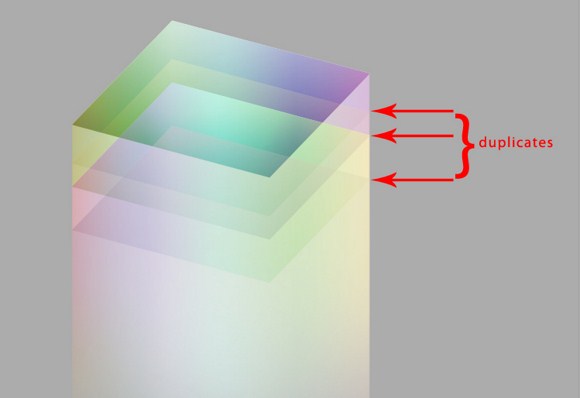
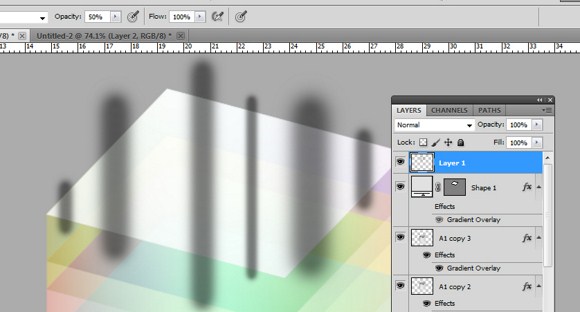
NOTE: with every duplicate of “A1” try to MOVE or ARRANGE them HORIZONTALY so that you may get an appearance just like this.
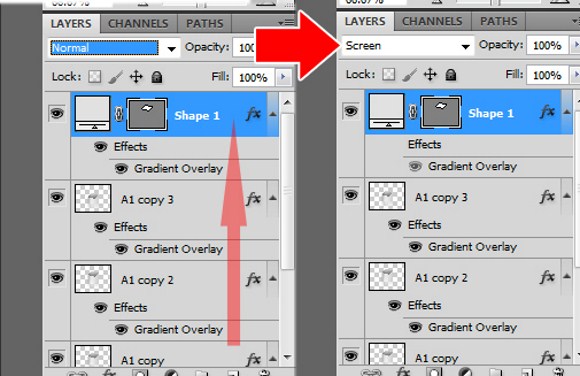
Next drag the shape1 to the top of the layers palette and then set the blend mode to screen.
Now paint something like this on a new layer. Use 50 % brush opacity and use black color on a soft brush tip.
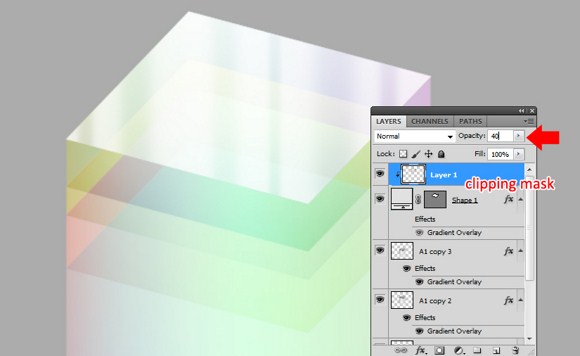
Press CTRL+ALT +G to create a clipping mask. Then set the layer opacity to 40%.
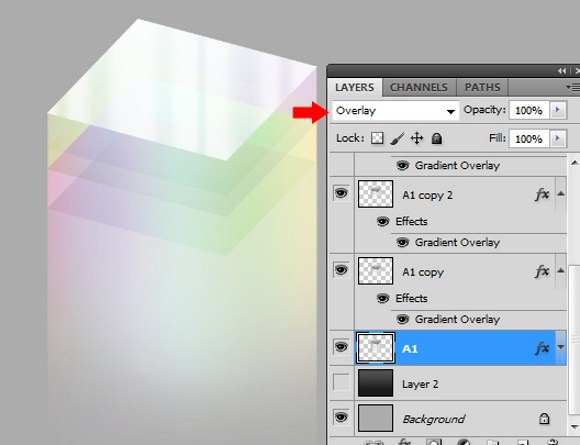
 Now go back to layer A1 and set the blend mode to Overlay.
Now with the gradient tool, change your background to any color combination of your choice. It is strongly recommended that you choose dark colors to emphasize the plexi glass effects.
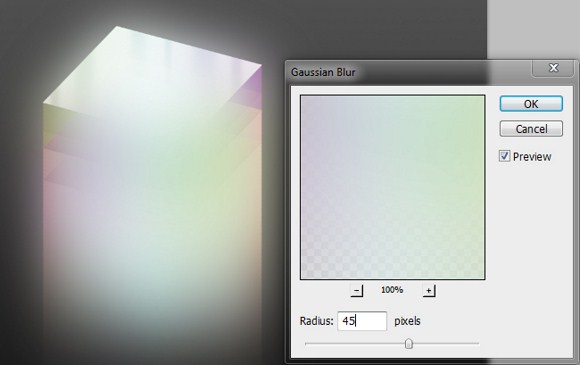
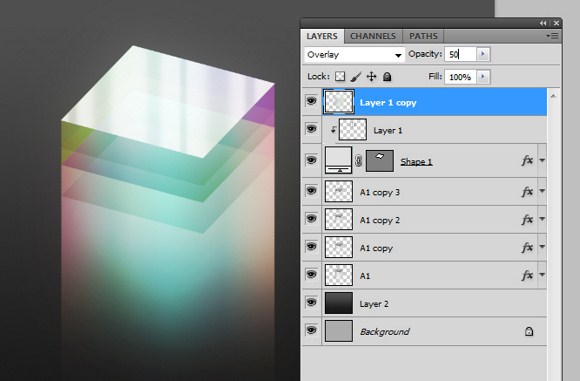
To add glow, duplicate all layers except for the background. Then merge them into 1 single layer.
After that apply Filter > Blur > Gaussian Blur and set to approximately 45px, depending on your document’s resolution.
Then change the blend mode to overlay and set the opacity to 50 percent.
And you are done!
Have fun with this technique and make sure you share your creations or ask questions in the comments.
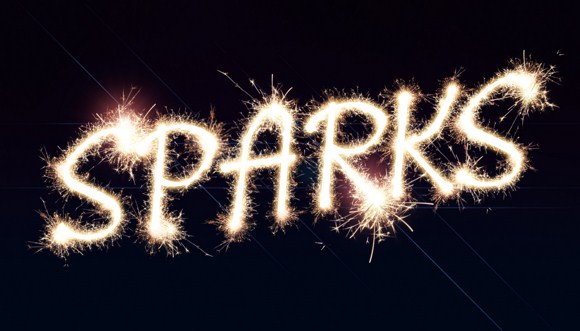
Easily Create a Great Looking Sparkler Effect in Photoshop
Have you ever imagined using those cool looking sparks you see from fireworks or welding in your next poster? If you have this tutorial will help you out tremendously. In this tutorial I will teach you how to recreate that sparkler effect on Photoshop.
First prepare your document size, dimension of 900 px by 600 px will work just fine. Once you master this technique you can work with any size canvas you like.
First you need to fill the background with black and set the foreground to white and type some text (use any available thin fonts like this). Any type of script or handwritten cursive font is a good choice for this text effect.
Resize the text to a large size. You can also opt to tilt or rotate the text slightly to whatever direction you like or skew the text just like you see in the example.
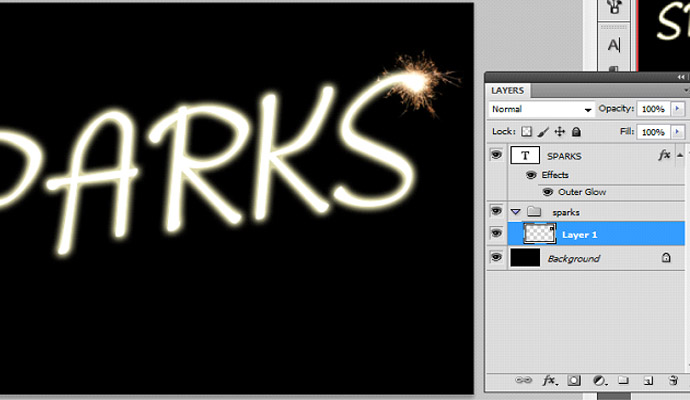
Apply an outer glow to text using these settings:
Check the outer glow first.
Set the opacity to 80-85 percent.
Set the spread to 8 – 10 percent. And size to about 18 pixels. (depending on the document resolution). Then press OK to apply the changes.

Note that these settings for your text really do not need to be followed. Just make sure you do not overdo things.
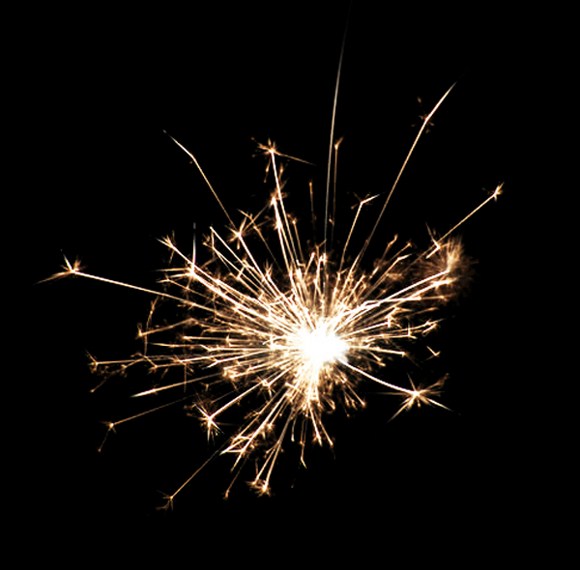
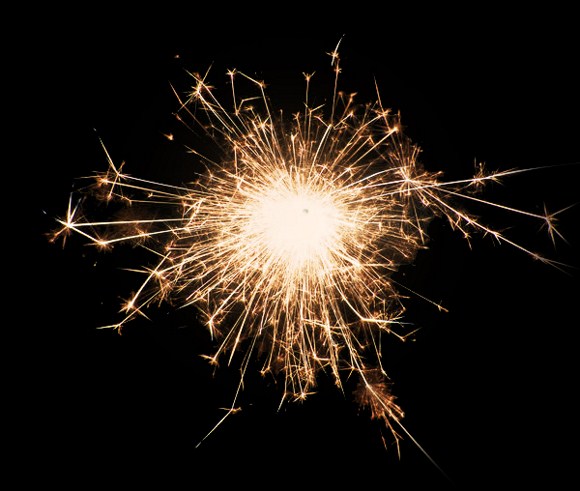
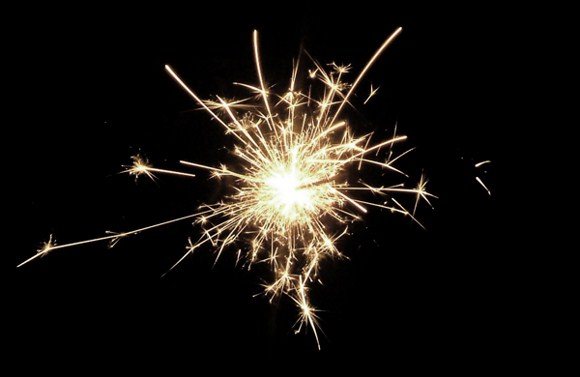
Here you see some stock photos of sparks. If you haven’t got one of these yet please find time to google it or search it in royalty free stock photo websites.
Getting at least three variations of sparks is important. It will help make the image more convincing because you will use the stock sparks in differents sizes and rotations.
Now you can use these downloaded images of sparks in Photoshop via draggng them to the program, or manually opening it in your file browser/explorer, or from Photoshop. To use it on the project, you can either drag the stock image (opened in Photoshop) to this project or document, or you can use the PLACE function found on the file menu.
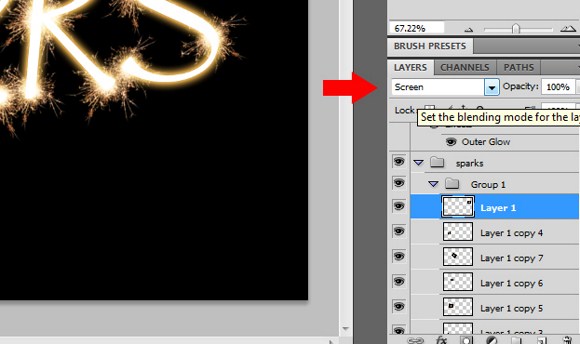
One you have placed the image in the project, it will automatically appear as a separate layer in the layers palette. Create a folder and set a folder name. Then place the stock image layer in the folder by dragging it in there. Now arrange your layers and folder so that the spark layer will be below the spark text.
Now select the spark layer and change the blend mode to either LIGHTEN or SCREEN. But I would prefer using screen since it would give a much brighter and vibrant effect.
Next is to place more sparks for the other areas of text. To create more copies swiftly, press and HOLD the ALT key, and drag the spark image while holding down the alt key. Drag the copy to your desired postion. It is also recommended to constantly resize and rotate your recently copied sparks so that it will look much nicer and convincing.
Place the sparks aligned with the text just like you see in the image below. Double check if you have placed the spark layers BELOW the spark text.
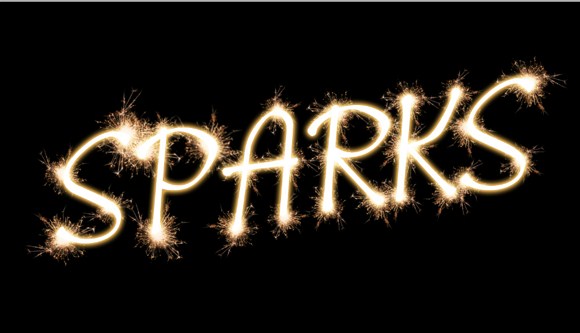
Continue to repeat this step and place spark all over the text. Do not forget to use varied sizes and rotations of the sparks.
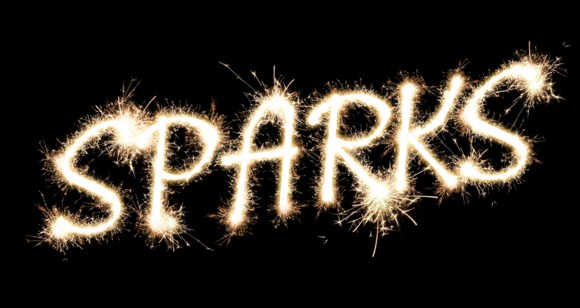
If you wish you can some lens flare to the design. You can find the lens flare filter in Filter > Rener > Lens Flare.

You can still edit the text effects settings if you do not like the result of the effects. You can also change the glow color of the outer glow effect to match the sparks color. You can also design you own background such as night skies, or stars if you wish.
That is all there is to creating this easy yet cool looking effect. If you have any questions or would like to share your work please leave a comment.
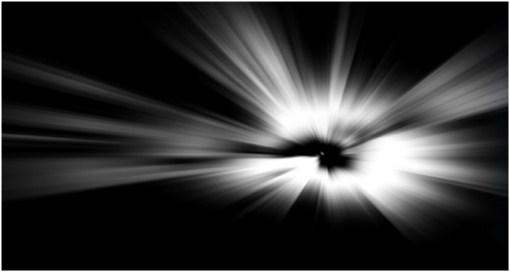
Apply an Awesome Light Ray Effect in Photoshop
This tutorial will show you how to make light rays to create a mystical effect on a photo. The light ray effect is perfect for pictures or shots of scenes with lots of clouds or landscape.
For example we have made this photo look more dramatic by creating light rays which were not there initially.
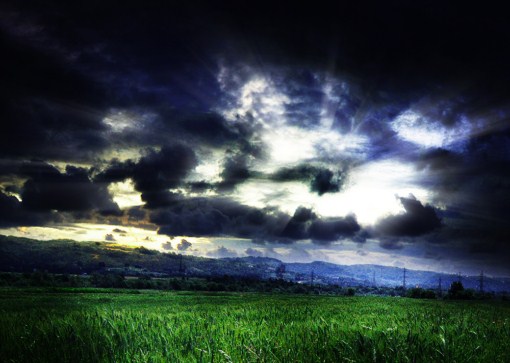
First setup and find the photo you would like use this Photoshop trick on. Check out the one we have below, the photo is a great example because it has several thunder clouds. This photo is already quite fantastic without photo manipulations and edits, however we can make it more dramatic and beautiful by adding some light rays and making some adjustments to the colors and image contrast.
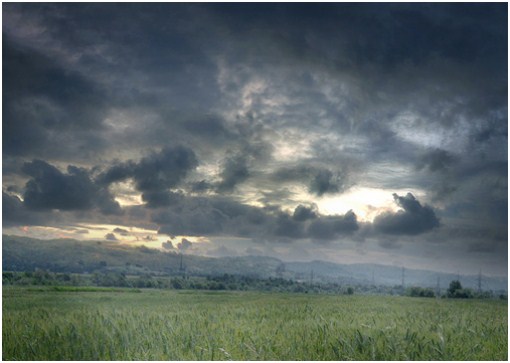
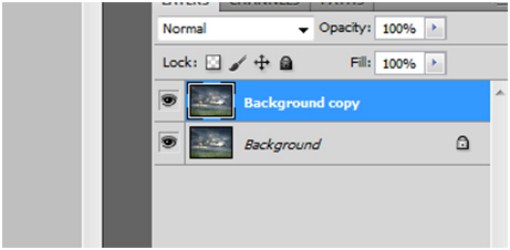
Open in Photoshop. You will not have to worry about dimensions as the resolution of your image should work fine. One thing to keep in mind is to keep the resolution at 1500 px wide or less so that it does not take too long to render the image. Now duplicate the background layer and you should have something like this on your layers palette.
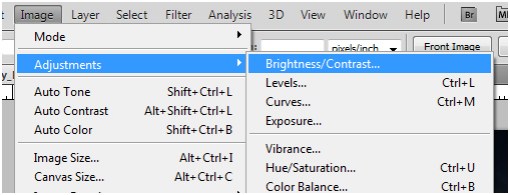
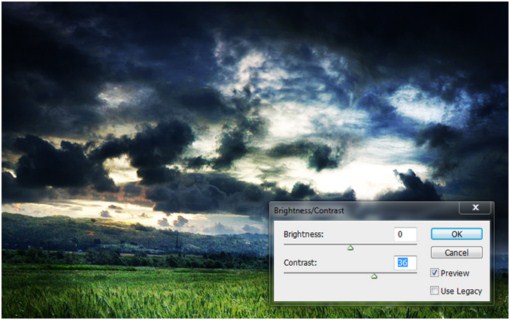
Go to Image > Adjustments > Brightness/Contrast.
Adjust the CONTRAST setting so that you are able to get the picture to look like this. Remember you may have to repeat this step in order to achieve this amount of contrast. In this case, I have repeated this step 3 times.
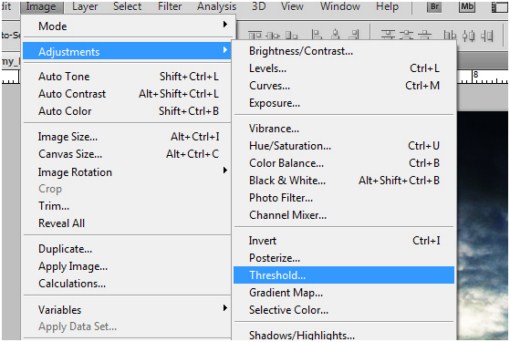
Now duplicate this layer, then select the recently copied layer (named “background copy 2”) and go to Image > Adjustments > then select Threshold.
After selecting it, you should be able to adjust the settings. Make sure you adjust the settings and get a balance of white and black. Just like this, not too much white on the clouds and not too much black.
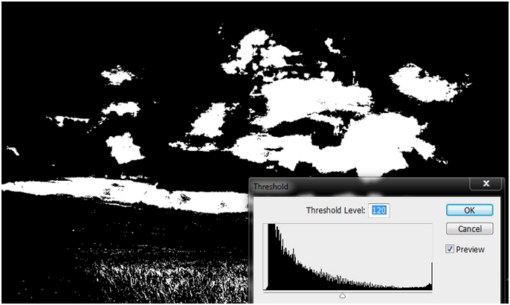
Sometime the threshold step will not be able to remove the whites in the grass areas, so you will have to remove them manually. In other photos, sometimes, there will be white areas which are not needed for light rays such as light colored objects other than clouds. In order to remove these unnecessary whites, you will be going to paint solid black on them using the brush tool.
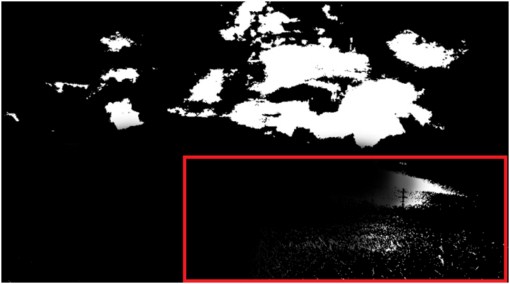
Just like the example, I am not yet finished covering the unnecessary white areas. Our mission here is to make the clouds the only areas that are white.
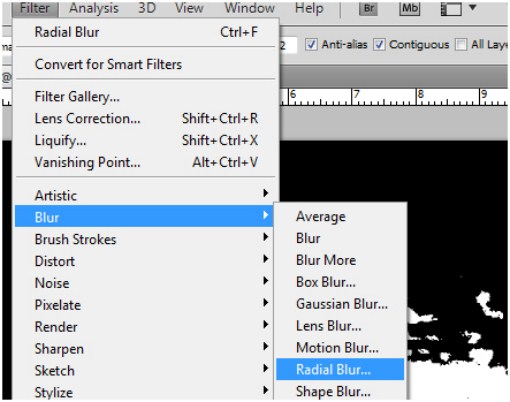
Next, go to Filter > Blur > Radial Blur
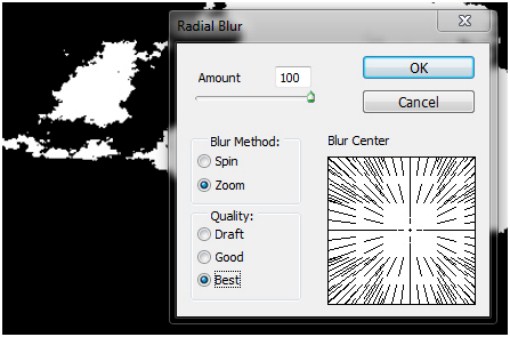
On the menu, set the amount to max 100, use the ZOOM as the blur method, and select best quality. You may have to move the blur center according to the light source to make the rays look more realistic. Press ok to apply the effect.
As you can see, the results are not that satisfactory yet, so you will have to repeat the effect by pressing CTRL+F.
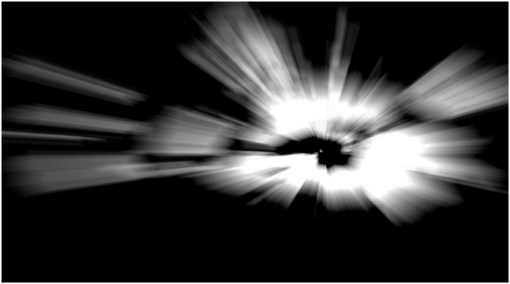
By reapplying the same effect, we get this result. Sometimes, you may have to repeat this step to achieve longer and more realistic rays.
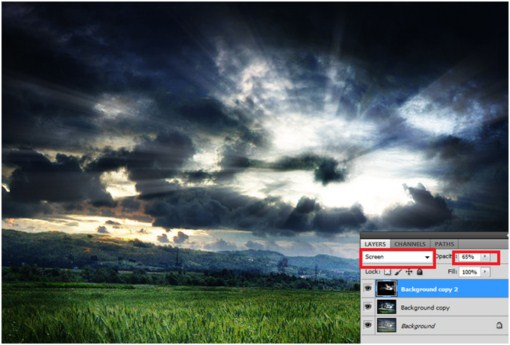
Now, change the layer blend mode to screen. Set the opacity to about 50 to 65 percent if the rays look too powerful or too bright.
There are some parts that seem too unrealistic to have lights rays shining on them. You are going to remove those unnecessary light rays using the eraser tool.
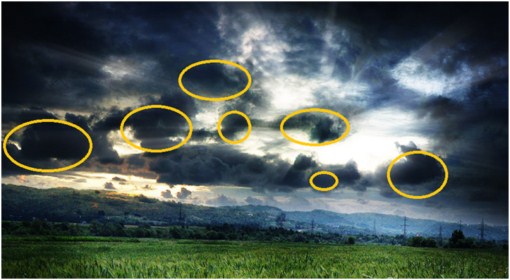
These are just some areas that I suggest to remove the light rays. Set eraser opacity to 50 percent or less so that you will be able to calibrate the amount of light removed.
We are finally done with the project. You can also enhance the picture by adding a colored soft light blend mode using another layer and colorize the light or you could still improve the background image’s hue, sharpness, contrast and so forth.
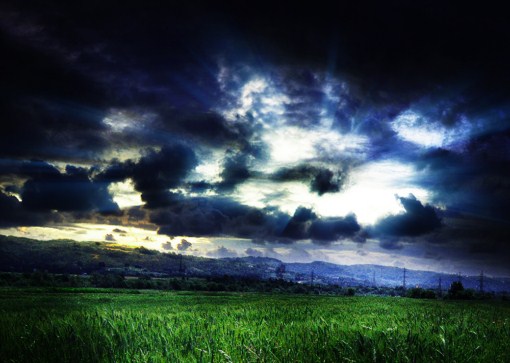
This is a fun effect to apply and you should be able to make some beautiful photos with it. Have fun and remember to share your creations.
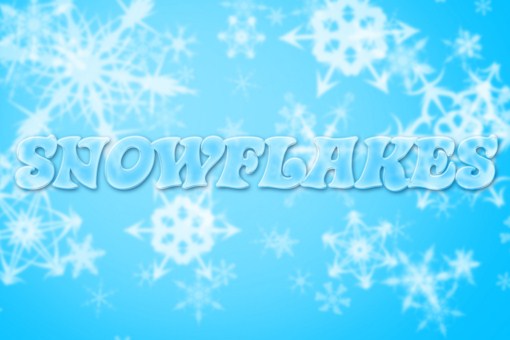
Photoshop an Awesome Glass Text Effect
To stick with my winter/holiday theme today I am going to teach you how to create a text effect just like the image below. The techniques I will show you in this tutorial will come in handy in your day-to-day design work.
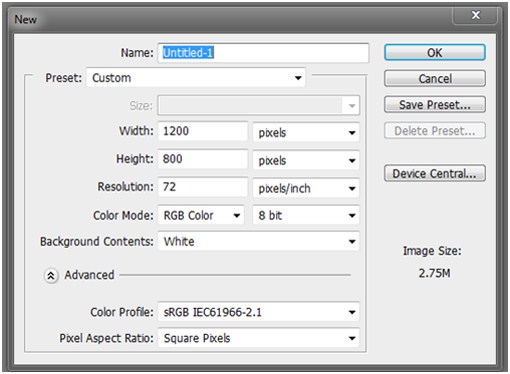
First you need to create a new document with dimensions of approximately 1200 x 800, you can create the document any size you want just so it is proportionate to the recommend size.
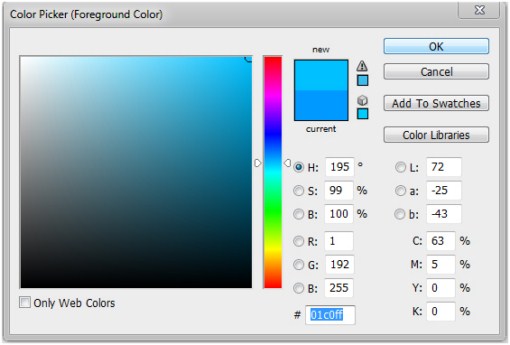
Pick a color or just type in “01c0ff” in the box at the bottom part of the color picker window. You can also just pick any other color but it is strongly recommended you choose colors close to this one.
Fill the entire background with the chosen color. And after that, create a new layer.
Now click on the brush tool and set the brush opacity to about 10 percent. Next, set the brush type into a soft brush and set its radius to 950 pixels.
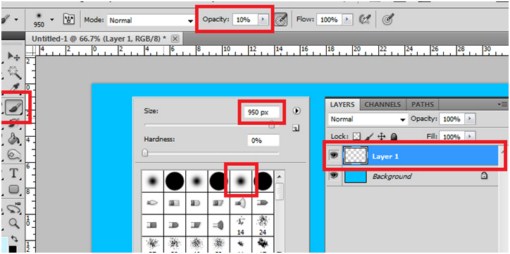
Go to the color picker again and choose the color “caf2ff” or something close. Use the brush and apply it on the image. Paint it just like the image shown below.
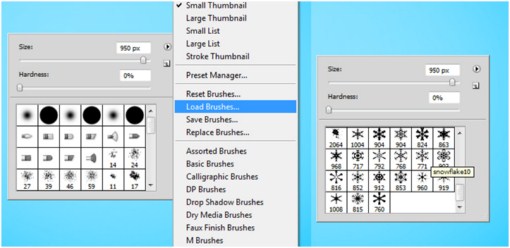
At this point you will be needing snowflakes brushes for Photoshop. You can find these brushes at brusheezy.com and search for “snowflakes” brushes. Download them and store it to the directory or folder where you installed Photoshop.
To open and use the brushes, just load it by right clicking on any part of the image while the brush tool is active. Select load brushes and select the recently downloaded snowflakes brushes.
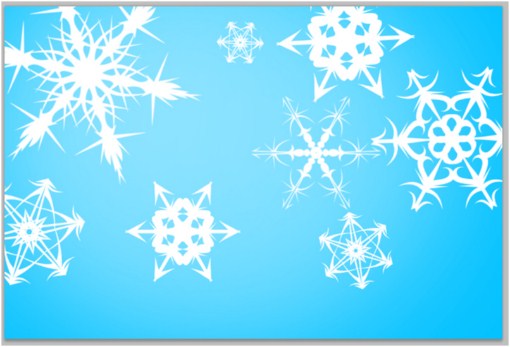
After that the brushes will be available for use. Select and use the assorted brushes.
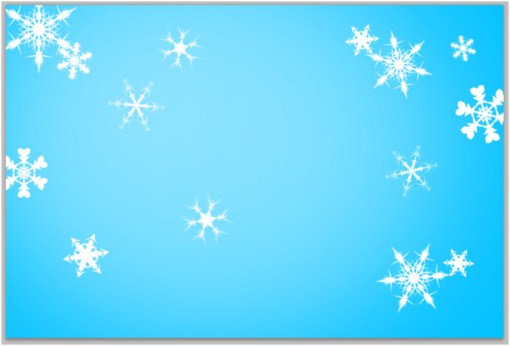
Create a new layer again, and use the brushes to paint snowflakes all over the image. First you paint small sized brushes. Also make sure you have set the brush opacity back to 100 percent and the color you are using is pure white.
Paint white snowflakes with random sizes and locations all over the document. It is advised that you limit the snowflakes sizes just like the example shown below because you are going to make the bigger ones on another layer.
There is a particular technique also where you are able to create small snowflakes but with different angles by creating each single snowflake in a separate layer which mean that if you have 10 snowflakes, you will create 10 different layers for each one.
Next, create larger sized snowflakes on random positions just like on the previous step.
On the layers palette, you will see the two layers which the snowflakes are on. Select the second topmost layer, the layer with the smaller snowflakes. Then go to Filters > Blur > then Gaussian Blur.
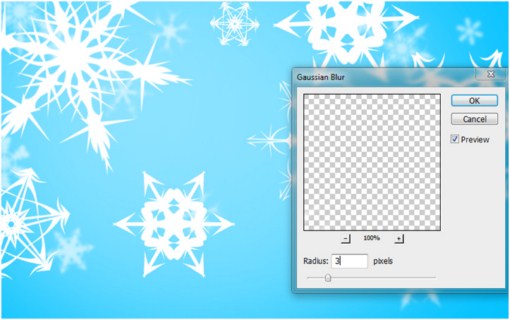
Set the radius to 5 pixels. Next, select the layer with larger snowflakes and then go again to Gaussian blur. This time apply a 4 or 4.5 pixel as radius.
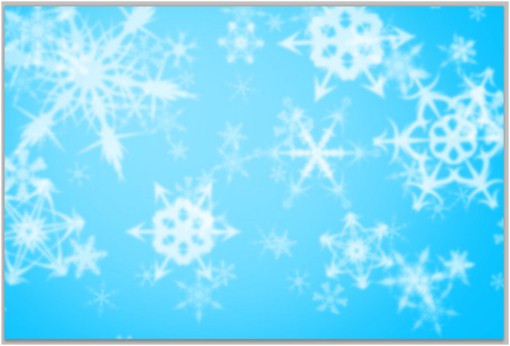
As long as the background snowflakes will blur more than the front ones, this effect will create a sense of distance.
And now by duplicating the layers and resizing them you can create more snowflakes. At this point your project should seem similar to this.
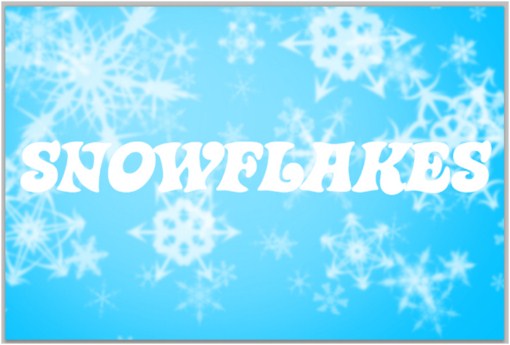
The next step is to create a text. It is recommended to use a type of font which has a wide or fat appearance just like on the example below. Note that you need to use a white colored text for this step.
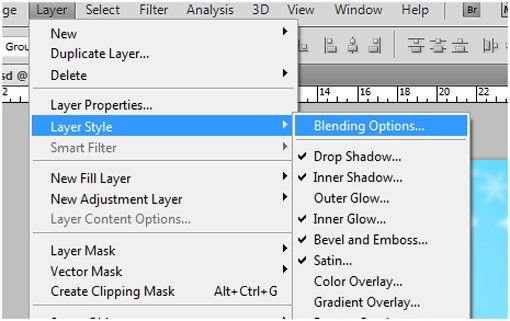
Go to Layer > Blending options
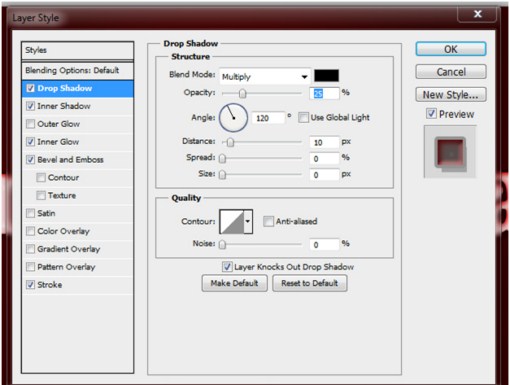
On the options, check the Drop Shadow to apply, and use the following settings:
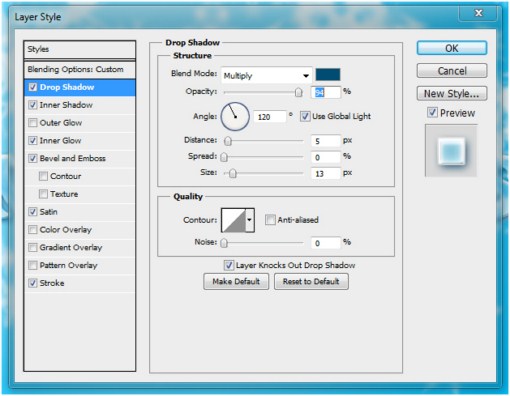
Blending mode: multiply,
Opacity: must be visible enough,
Angle: 120 degrees,
Distance: 5, spread: 0, size 13
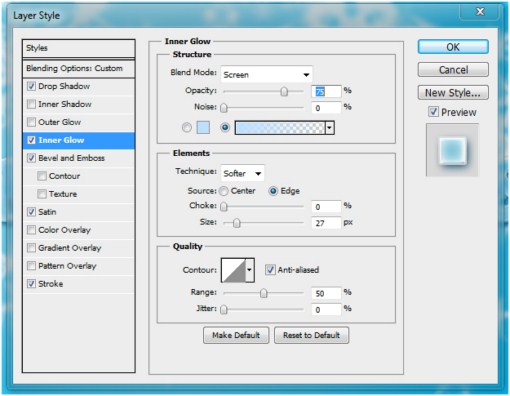
Apply an inner glow with the following settings.
Blend mode: screen,
Opacity: 75%,
A gradient light-blue glow, with choke: 0, and size: 27

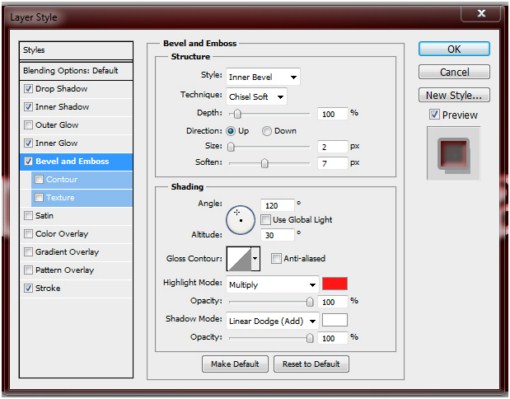
Now apply Bevel and Emboss with
Style: inner bevel,
Technique: smooth
Depth 100%
Size: 4 and soften: 2
Angle: -66 and altitude: 26 degrees
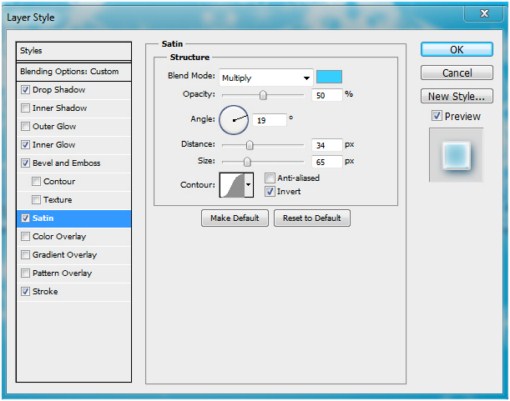
Apply satin with
Blend mode: multiply, color: close to the background color
Opacity: 50%
Angle: 19 degrees
Distance: 43 and size: 65
Check the invert box
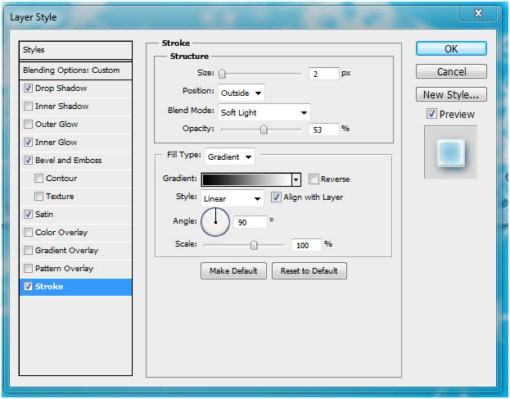
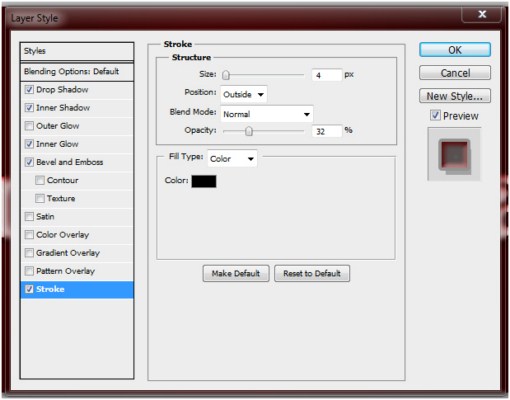
Apply a stroke effect with
Size: 2,
Blend mode: soft light,
Opacity 50% more or less,
Fill type: Gradient , and angle of 90 degrees
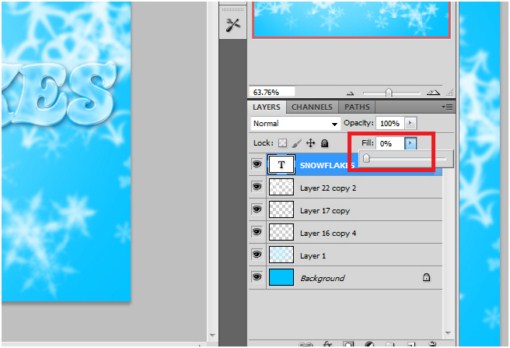
Lastly, set the FILL to zero for the text layer.
Save your work and you are done! As always, please share your creations in the comments.
Color Makeovers in Photoshop
In this tutorial I am going to show you the basic techniques on how to alter and adjust the colors of a photo in Photoshop. I will also show you how to add colors to grayscale photographs and images.
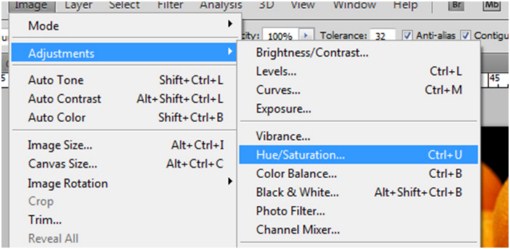
One of the ways to change or alter the color of an image in Photoshop is to use the Hue/ Saturation Tool on the Adjustments tab. You can find it here: go to image> adjustments > then Hue/ Saturation – or you can just press Ctrl+U.
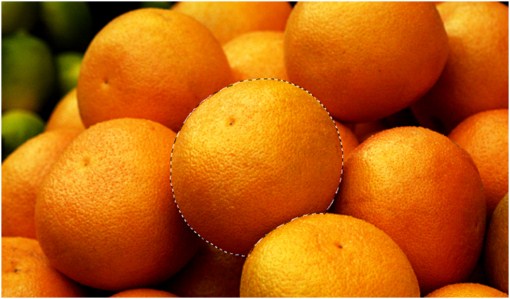
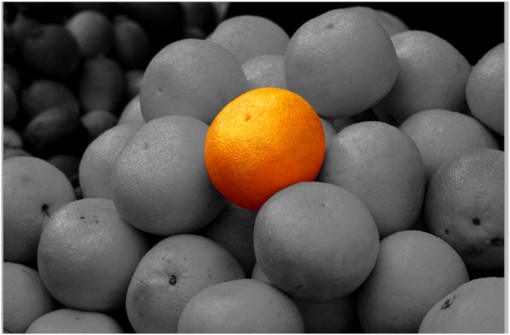
In our project we can use this image of oranges. Our goal is to change the color into something far from orange using the Hue/ Saturation tool.

Press Ctrl+U to bring the parameters and options of the tool.
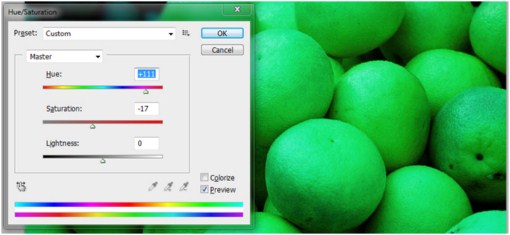
Now try to adjust the Hue to the right and attempt to make the image color green. Or you could also move to the left to achieve some colors closer to the red shade. After you decide the color, click OK to apply the effect.
So what if you need to only change the color of a single orange. Here is what you are going to do.
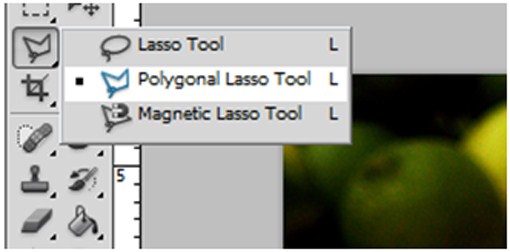
First, use the Marquee tool to select the individual orange.
Now select the single orange using the marquee tool.
Go to the Hue/ Saturation Tab again or press Ctrl+U. And adjust the hue parameter to achieve whatever color you like to apply.
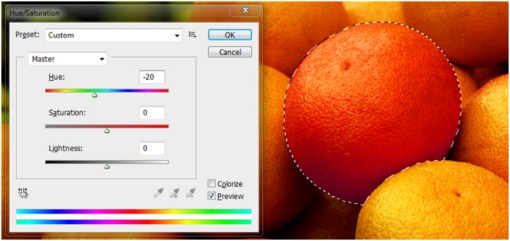
Because we have excluded the other orange fruits by using the Marquee Selection tool, we have only altered the color of one single orange rather than changing the color of the entire image. This technique is quite useful and important when you need to edit or adjust a single element or object of a certain image. Or you could do the opposite and change the hue of all the other oranges. Here is another popular trick used in Photoshop- excluded colors
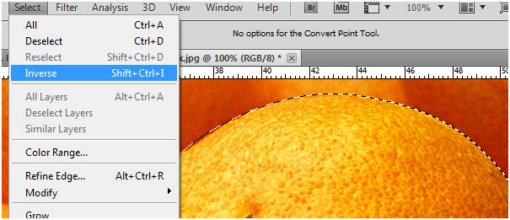
The goal now is to maintain the orange color of a single fruit while the rest of the image goes balck and white or gray scale. There are many other techniques to achieve this effect but this step is the most simple of all.
Select the individual fruit again using the Marquee selection tool. Now this time go to Select> Inverse to inverse the selection. This step should EXCLUDE the chosen fruit from the rest of the image.
Now go to Image> Adjustments> then locate and press Desaturate.
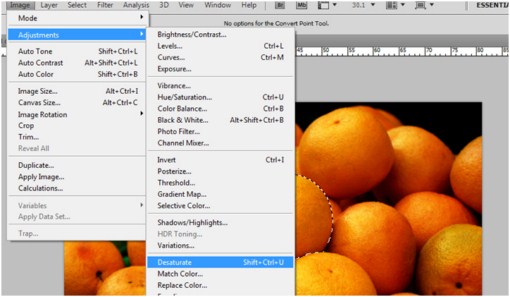
Press Ctrl+D afterward to cancel the selection. And there you have it!
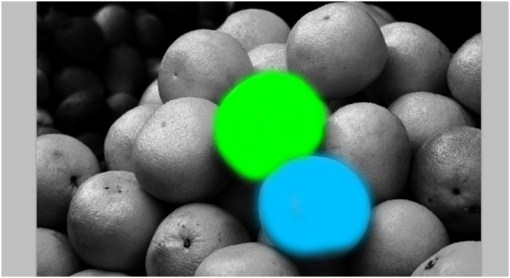
Another Technique in applying colors to a colorless, gray scale image is taking advantage of layers and LAYER BLEND MODES. For example, we have here a grayscale version of the fruits image.

Now what we need to do is color at least one fruit using the blend modes and layers.
First create a blank layer by pressing Shift+Ctrl+N. You should have 2 layers back on the layer palette. Now you MUST select the blank layer first. Start using the brush tool, but first select a decent color not black, white or grays.
Now try to imitate what I did here. I just select a couple of colors then painted on the chosen orange fruits.
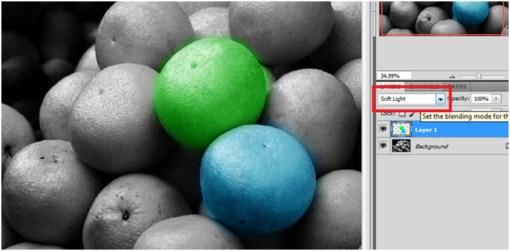
Change the blend mode into Soft Light, and see how the effect applies.
You can also use the same technique when encountering tasks such as making white tshirts into red colored ones. Just like this example where we have a plain white tshirt. What we need to do is to make a red colored t shirt. The steps are just the same but only using a different type of blend mode.
What we have here is a plain white shirt.
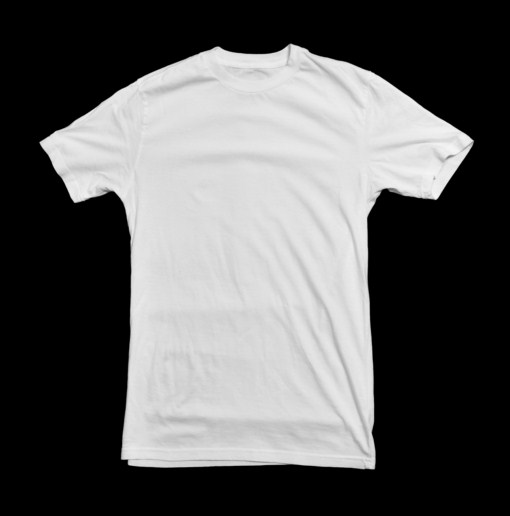
Now create a blank layer by pressing Shift+Ctrl+N . Select this blank layer. For this case, let us just use the color red to paint over the shirt on the layer you just created.
See to it that you paint on the blank new layer not the background/ default layer.
Now change the blend mode to LINEAR BURN.
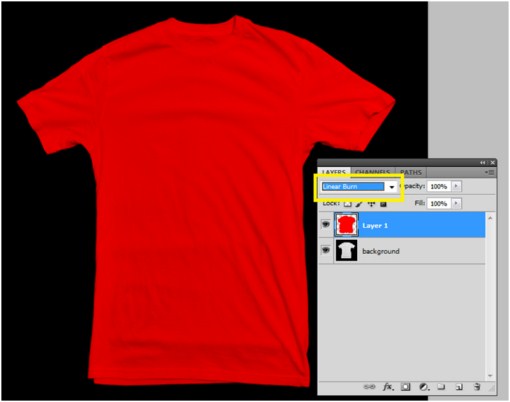
And that’s it.
As you can see changing colors of certain elements in photos is quite easy with Photoshop but can be very useful. Please ask any questions you may have and remember to share your images in the comments.
Create a Joyous Christmas Greeting in Photoshop
With Christmas right around the corner we thought it would be a good time to do a Christmas themed Photoshop tutorial. Today we will complete a project with a Christmas Season theme by using text effects and layers special effects to create a snowy inspired Christmas greeting. Note that this tutorial was made in Photoshop CS5.
First you need to create a new document. This document will have a 1200 pixels wide and 800 pixes high. Landscape oriented dimension work best for this particular project.
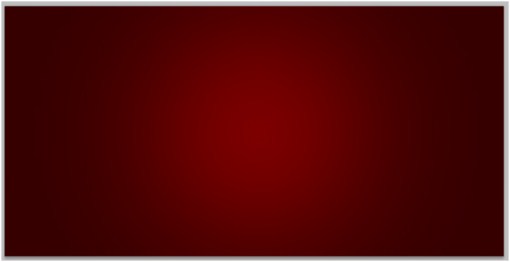
Now we will setup the background. Select a dark reddish color and fill the background layer as shown below.
Next, select a warmer and brighter red color and then use the brush tool.
Before you start painting, modify the brush size by right clicking on any area of the workspace and adjusting the brush size by moving the parameters up or down. Move the brush size to about 900+ pixels. Set the brush opacity to 30 percent.
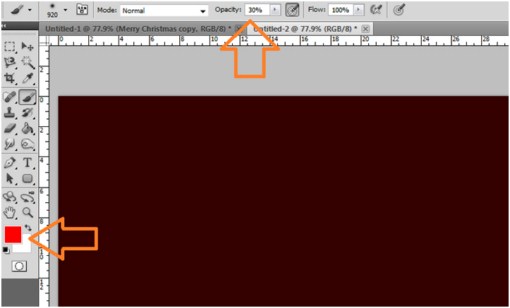
Now paint the center portion of the image. Make sure you get results close to this one shown below.
Now locate the Type Tool on the tools palette.
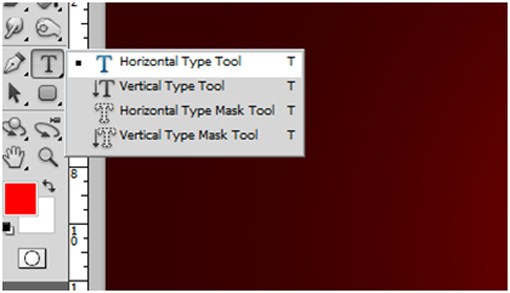
Select your font, it also preferred to use a font which is fat and bold. The following text effects that we will be using later on are very effective and attractive on a bold font face. For example, the font type called the PerwinkleFancyJF, a free font type, is quite nice to look at when you apply these text effects.
Next, create text using your chosen font, and size the text object to be approximately the same size as in the image.

Now go to Layer > Layer Style > then click on the Blending options.
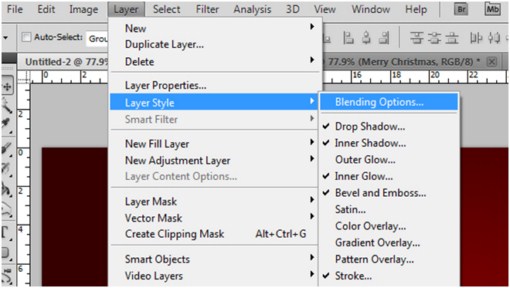
Here we want to check the Drop Shadow box, choose the solid black color, change the blend mode to multiply, set the opacity to 25%, change the angle to a 120 degrees, set the distance to 10 pixels, and leave the spread and size at zero.
Make sure your settings looks the same as mine do here.
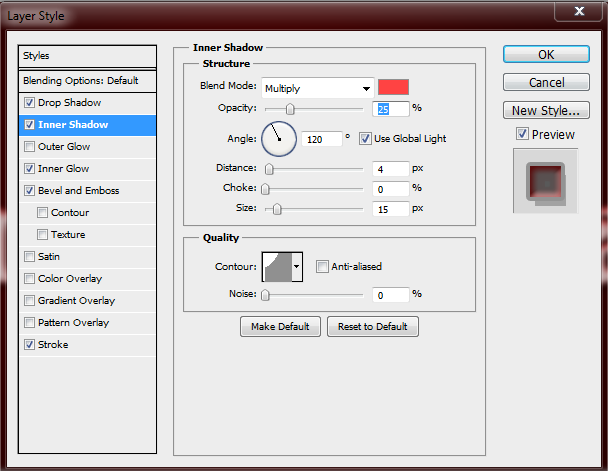
Next we need to add an Inner Shadow by checking its box. Set the following as instructed, blend mode to multiply, color is something close to pink or light red, opacity to approximately 25 percent, angle of 120 degrees, and set the Contour using the shape just like the one on the image below.
Do not forget to fix the distance to 4 pixels and the size to 15 pixels. Leave the choke at zero.
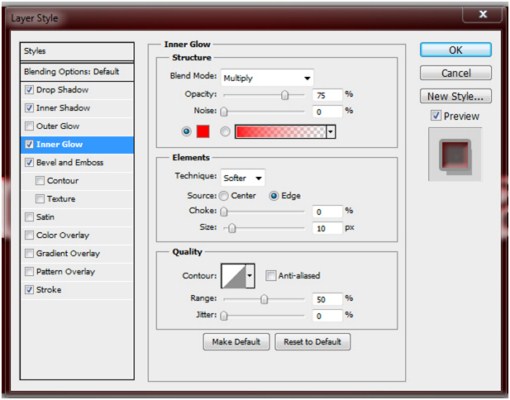
For the Inner Glow settings follow the parameters shown below. Be sure to check every single box and settings bar to achieve the effect for your text.
For Inner glow
At this point you should be able to see the text effect for this project.
Lastly, apply a stroke style by checking the Stroke box. Try to follow the settings, but if you wish to experiment, you could try different settings to achieve your ideal effect, not only for this layer style but also with the other layer styles. You could even add some other styles and try some other options later on for other projects.
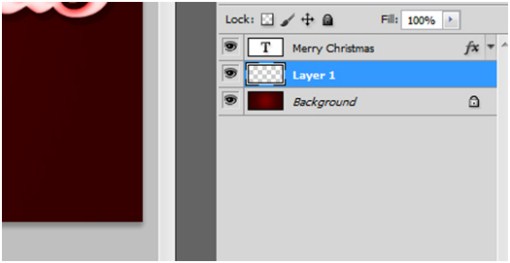
Create a new layer between the background and the text layers.
Go to Window > and click on the Brush Option. A window will open up showing the options and settings you can do for your brush.
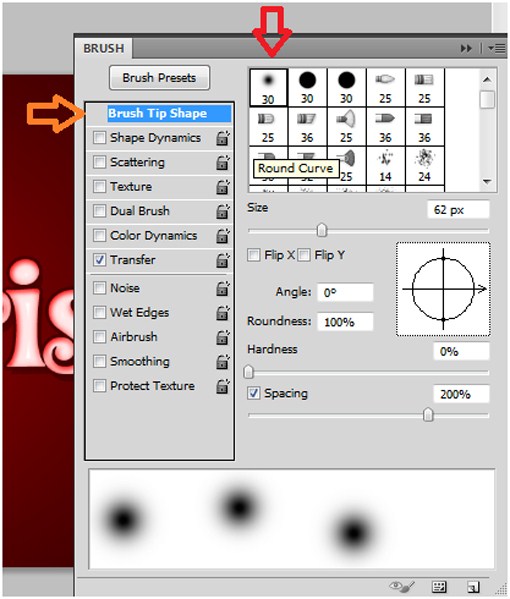
Select the brush on the very first box shown. Make sure that you click on the Brush Tip Shape.

Enable the shape dynamics box. Set the size jitter to 100 percent
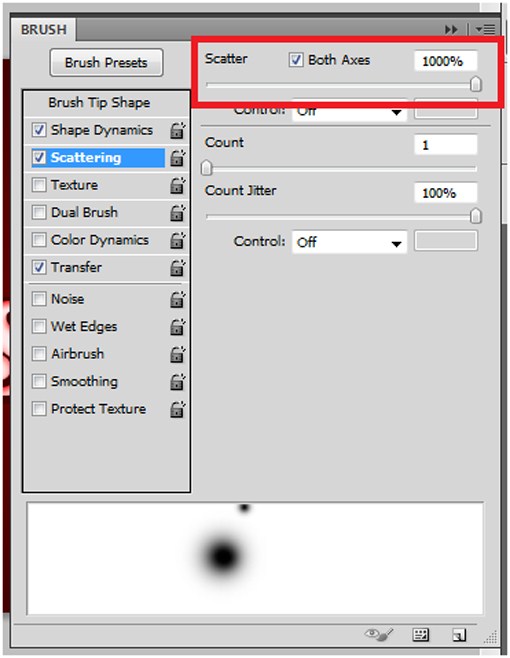
Enable the Scattering box, and then set the Scatter to 1000 percent. Also check the Both Axes box.
Now paint over the entire image as if you were drawing snow.

Finally, draw snow on the bottom part of the image. This is optional but this will help to create a sense of falling snow. You can also add other elements and stock images to your project if you wish to.
Have fun creating your holiday images and please share your creations with us in the comments.
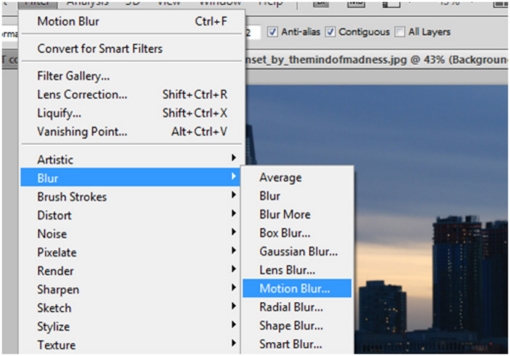
Motion and Speed Effects: Adding Motion Blurs in Photoshop
Motion Blur is an effect in Photoshop under the blur filters which renders an image blurred but with direction and sense of speed and movement. It is somewhat similar to overstretching an image but it is more realistic because it applies blur.
This guide will help a beginner learn how to apply motion blur effects in Photoshop to create unique and creative designs and images.
Motion blur is located in the Filters > Blur > Motion Blur.
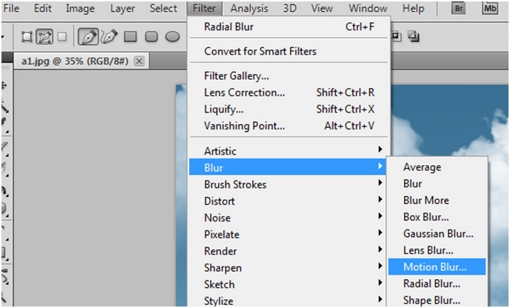
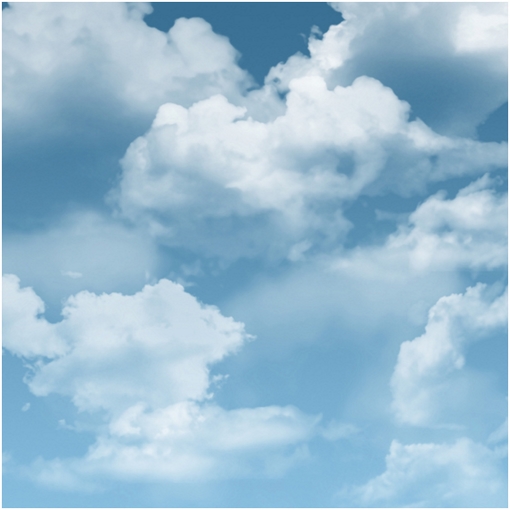
Motion Blur can be applied in directions. We will use this cloud image as an example.
By opening the motion blur effect tab, we gain access to the adjustment parameters which include angle and distance.
For now, set ‘Angle’ at ‘0’ and distance at ‘200’.
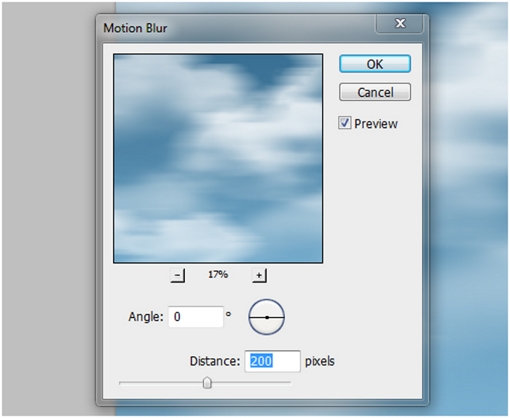
We can then see the image preview when we set angle and distance. Remember with motion blur the larger the number on the distance, the longer the image stretches, and it goes with the direction according to the angle given.
We can try different angles and amounts. Play around with the different distance and angle settings to see what you get.
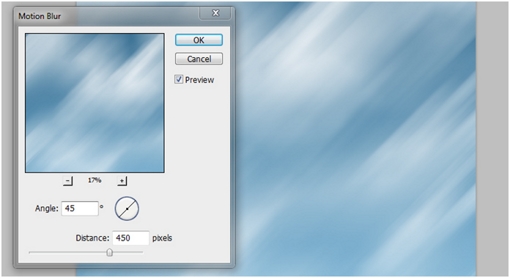
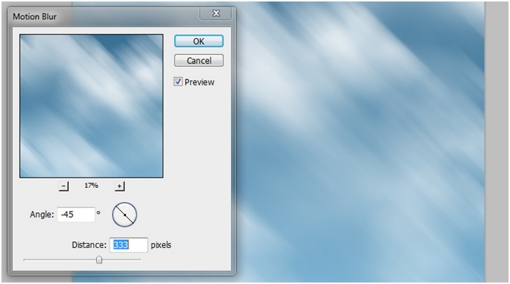
You also use negative (-) numbers in the angle setting. This will help you to achieve left or right inclined angles when you need it.
Next we are going to make a project where adding or applying motion blurs is useful. Usually, motion blurs work great when you need to apply a sense of movement or motion, direction, and speed of static and boring images. Sometimes we need to emphasize motion and speed to make an object or image interesting.
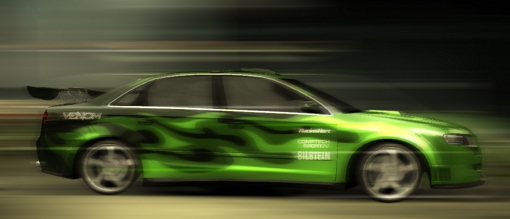
For example, we have a static image of an Audi 3.2 FSI Quattro sports car from the NFS Most Wanted video game. As you can see the car is not running. Now our job is to make it look like it is moving fast by creating a motion blurred background.

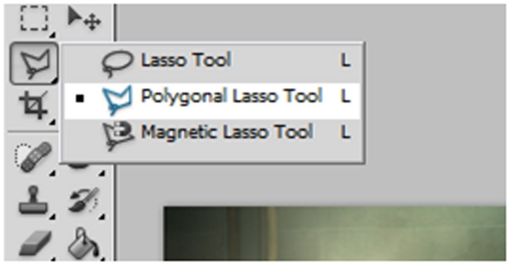
The first thing we need to do is to trace the car itself to exclude it from the changes we will be making to the background.
Now trace the car using the marquee tool. Now the car should be the only item selected in the image.

Press CTRL+C or copy, and paste it. Photoshop will automatically create a new layer for it.
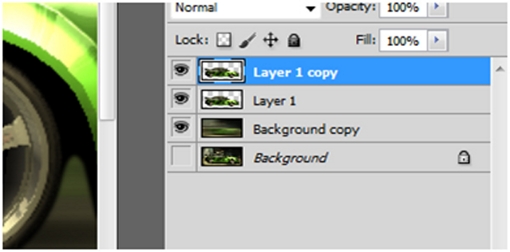
Now select the background layer and duplicate it. You should have a total of 3 layers just like the guide below.
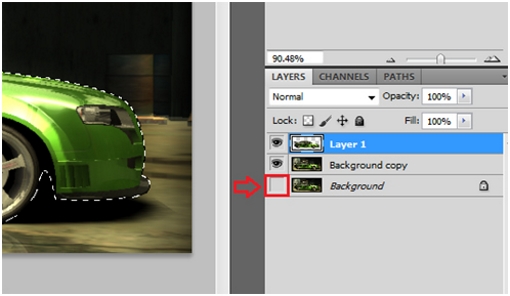
You should also hide the background layer afterwards to prevent from any accidents incase you made any mistakes to the other layers.
Press CTRL+D to cancel selection mode.
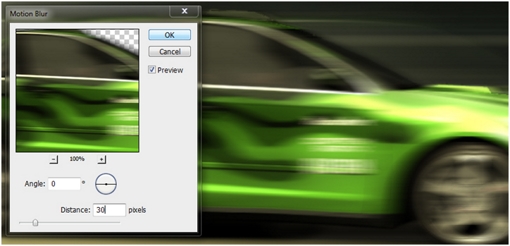
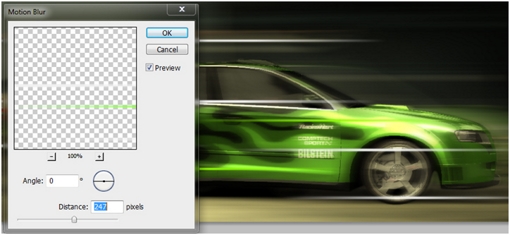
Now select the 2nd layer or the background copy, and then go to filters> blur> and then motion blur to apply the effect on the background.
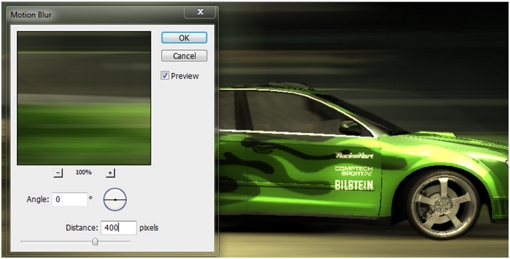
Apply a distance amount of about 300 to 600 pixels, and maintain an angle of zero degrees, then press OK.
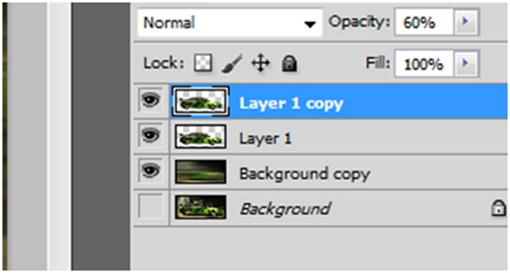
Now select the car layer and then duplicate it.
Apply a motion blur to this layer. Leave the angle to zero degrees and apply a distance of around 30 pixels, and then press OK.
Now adjust this layer’s opacity to 60 percent.
Create a new layer, add some line similar to these.
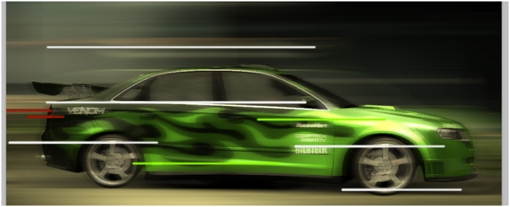
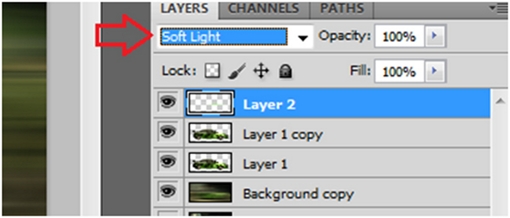
Now apply a motion blur to the lines. Put in amounts just like the example below. You can experiment with the parameters to achieve different lengths.
Then adjust the layer blend mode to soft light.
Next apply smudge to the wheels. Select the smudge tool from the tools palette. Select first the “layer 1 copy” layer.
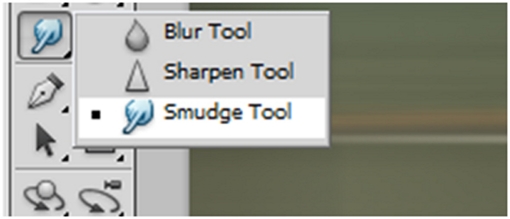
And apply it on the wheels according to the direction of the wheel’s rotation.
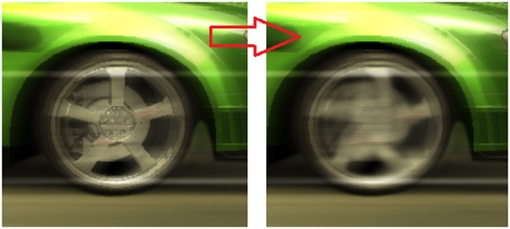
Notice how it makes the wheels look like it is really spinning.
Once you have completed this tutorial you should have an image of a car that appears to be moving. This was accomplished with motion blur on the background and the car along with some other tools.
Have fun with this tutorial and remember to share your creations with us in the comments section.
Fun with Filters in Photoshop
We will run through different Filters in Photoshop and it different parameters and effects. In this tutorial, we will have a fundamental overview of the functions and effects if we use the certain filters in Photoshop.
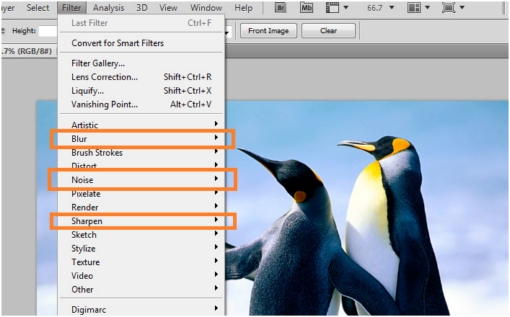
But first, we will need to locate the Filters. On the main menus, just find the Filters tab and it will bring down the list of filters available.
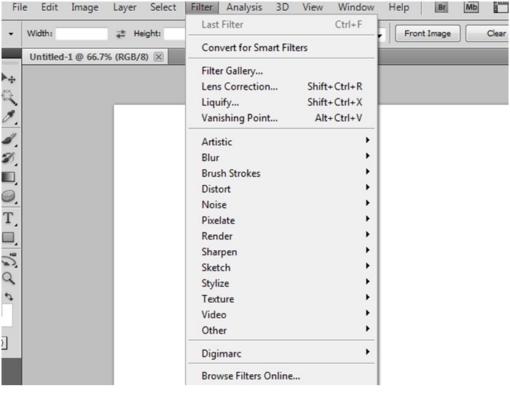
From this point, you can now start using the filters, but you can also view the filters through the Filter Gallery, which give you a more detailed preview of each filter.
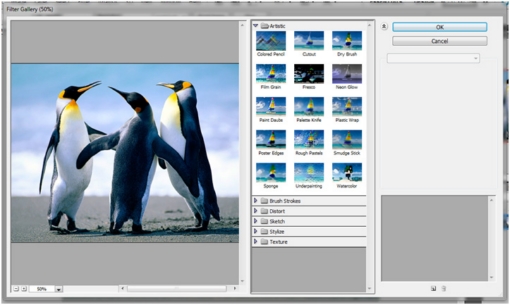
Here, we can preview the outcomes or results done to the image after we apply a certain filter. In the example below, we can see the different effects done to the image under the Artistic Filters.
Note: of course you have to open a valid picture or document to use a particular filter on it. Some filters will not be available when working on a file which is on a grayscale color mode or indexed color mode. Some filters will also be available for use when the image is on a different bit channel.
For now we try the WATERCOLOR filter effect.
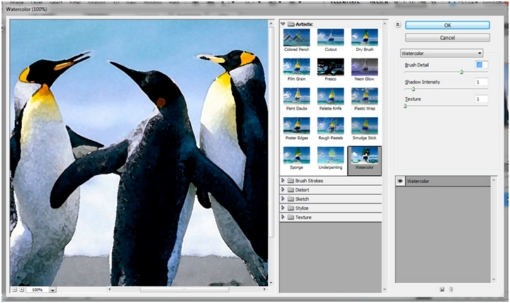
The picture will now look like as if it was a piece of art painted with watercolor, just like the filter name says. For this filter effect, we use :
brush detail: 10,
shadow intensity: 1,
and texture: 1.
Of course, please try out other filters and see different effects. For example, the cutout filter effect which is nice to use when creating images that needs few colors such as gif files used for web and printing.
Now we try out the filters in the Brush Strokes.
The filters that belong to this group does not seem far from the artistic filters, which also gives the image an artistic appearance by applying strokes.
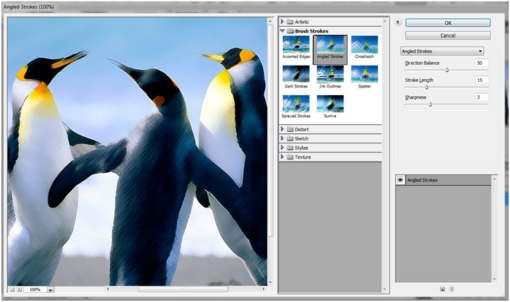
Here, we made the image like a neatly done stroke artwork. Here we use:
Direction balance: 50
Stroke Length: 15
Sharpness: 3
Next would be the Distort filters. This filter group will be quite useful when creating fantasy like images or editing new images to look like an antique photo.
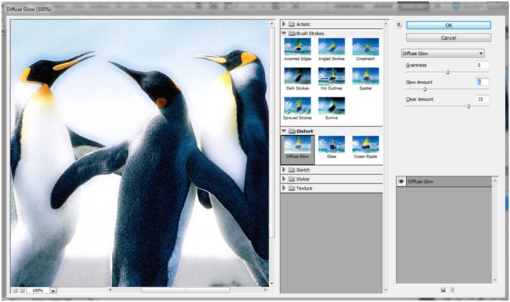
This filter effect is called a Diffuse Glow effect. The parameter is up to you.
Here we use:
Grainess: 5 (set it to zero to achieve a noiseless and clear appearance)
Glow amount: 5
Clear amount: 15
Other filter effects such as the glass and ocean ripple will make the image appear like it is place behind a glass.
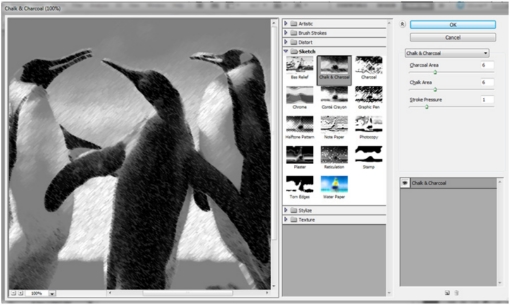
Next filters are the Sketch Filters, and one the most popular effects is the Chalk and Charcoal Effect. It makes the image like it was sketched by hand. This effect is applied in order to simulate a charcoal portrait of a person, but not really like the real charcoal and chalk medium.
Of course there are lots of effects and filters that belong to this category. For example, the graphic pen, will make the image look like it was hand drawn using a ink pen.
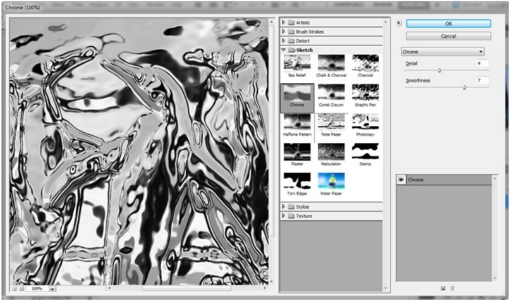
Although one particular filter would seem to be different from other effects that belong in this group, the chrome filters. Just like its name, chrome will render the image a silver, metallic or mercury like effect.
One of my favorites is the Halftone Pattern effect. And it is very useful when making a retro-like or poster inspired theme image.
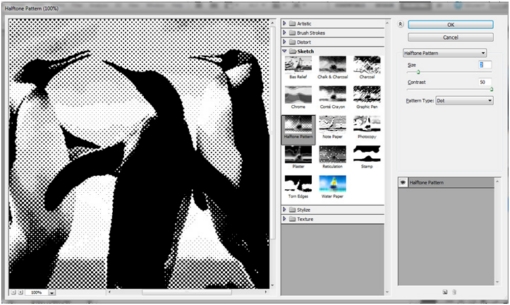
You will not achieve this appearance like on the example when using the default settings. You have to adjust the Contrast to the max level to achieve a solid black effect.
There are some useful filters that are not shown in the filter gallery.
The Blur effect which is quite useful in much more advanced purposes in combination with other tools. Blur filters are also useful when smoothing skin and face makeovers projects.
The Sharpen effect is also useful when you need to emphasize the image’s edges. This effect is also useful when you need to simulate professional camera techniques such as tilts.
Noise effects also come handy when you need to create images with texture and create depth. This effect is also used to imitate antique photos.
Creating Mirror Reflections in Photoshop
In this tutorial, we are going to learn how to create or mimic a mirror reflection to an object using Photoshop.
The first part is going to learn the basics of creating a simple reflection of text or image object. Now in your work space, you got to have already an object that you need to create a reflection with.
So let us try out first with a simple text and try to make various reflections in different angles and positions. Create a text just like the sample you see below.

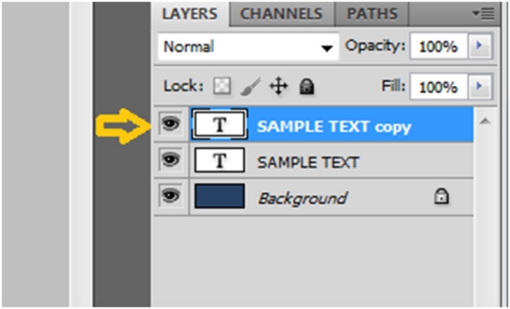
Select the text layer you recently created, and duplicate this layer. You will now have a “sample layer copy” which is the exact replicate of the original text; however you will not still be able to see it distinctly since it is still aligned with the original.
If you try to move around the copy layer with the transform tool, you will be able to see it clearly which is the original and which the duplicate is.

The text which is enclosed in the box is the duplicate. This is the object and layer we are going to make as the reflection.
Select the Transform or press “CTRL+ T” then move the object to a position directly below the original. After that, right click on any area in the box, and choose the flip horizontal option.
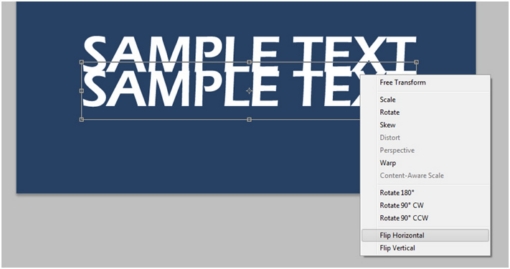
The text will just be flipped just like this.

Right click on the area inside the box, but this time select “rotate 180 degrees” and apply the changes.
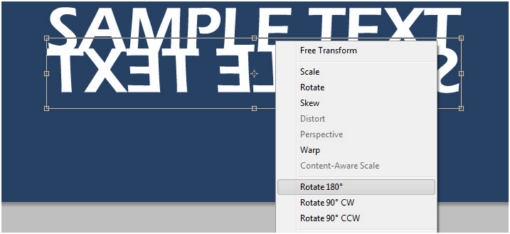
You should be able to get a position like this.
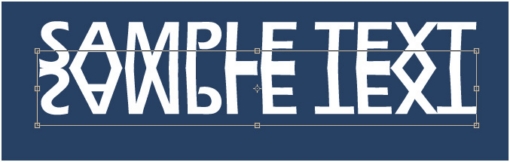
If in case you get a space or gap between the original text and the reflection. You can always move the reflection object towards the original texts so that it touches it.
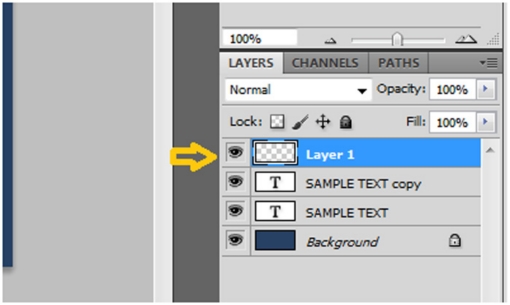
Next step is to create a new and blank layer.
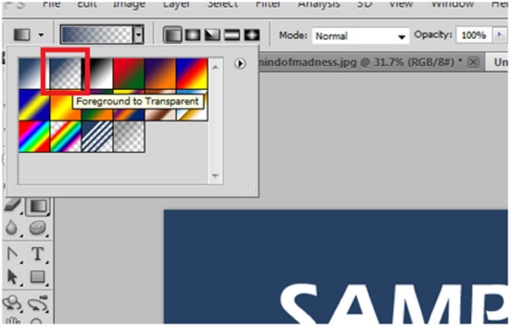
Now select the gradient tool.
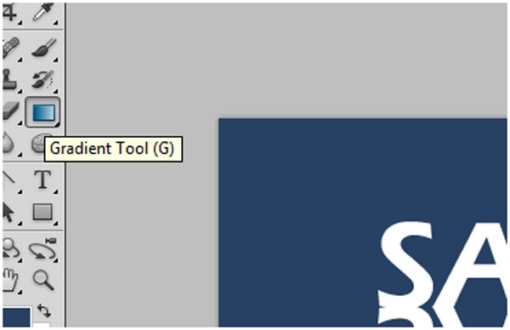
And select the foreground to transparent preset.
Now hold Shift Key, left click on the bottom part of the duplicate text, and drag it up to the bottom area of the original text.

The effect should be relatively close to the sample below.

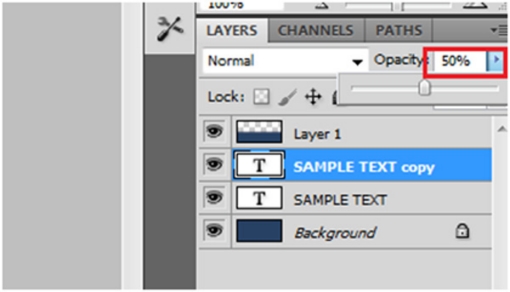
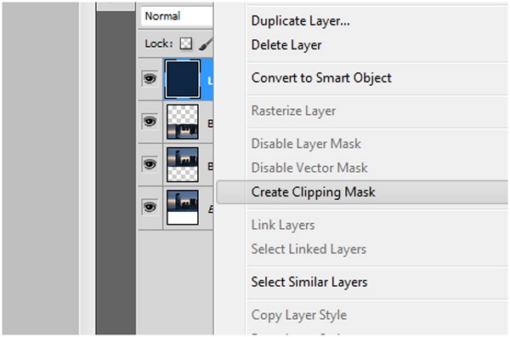
Now right click on the layer, and click on the “Create Clipping Mask”.

This will make the gradient only effective on the reflection layer.
Now adjust the opacity settings on the layer COPY, not the original one. Set to about 50%.
Finally you get an output just like this.

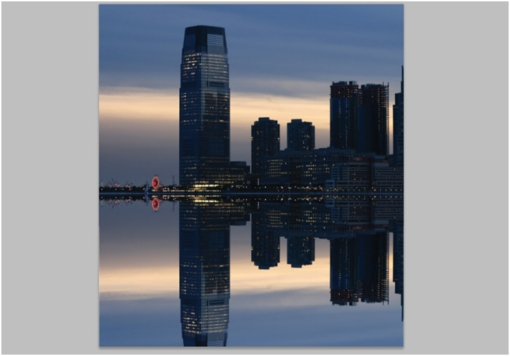
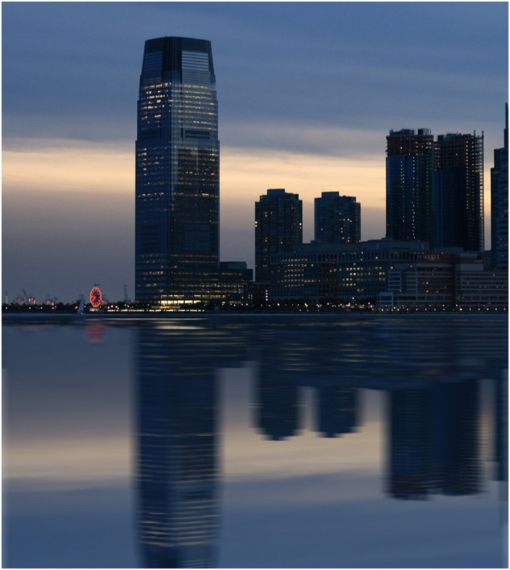
You can also apply this technique on landscape or waterscape photographs. Creating a reflection sometime is necessary especially if the other elements in a photo such as rough water are not desirable to look at or it simply spoils the photo’s composition.
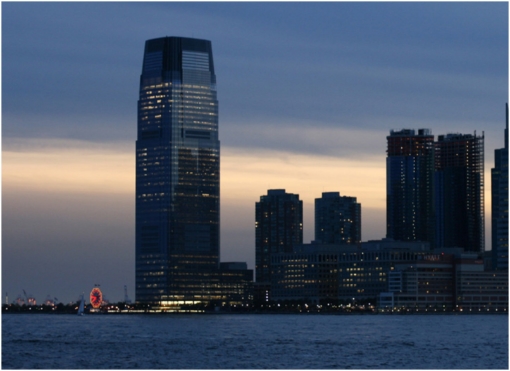
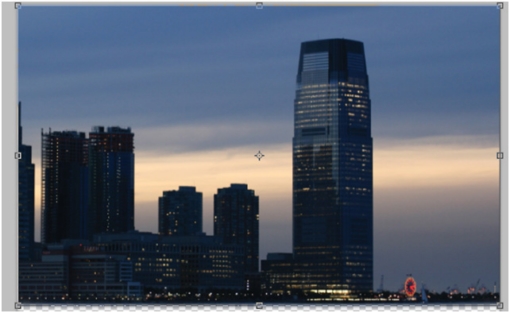
Like in this photo, how would it look like when we add a reflection of the buildings instead of just rough water?
Initially, we need to crop the image to ADD a reasonable space to put in the reflection.
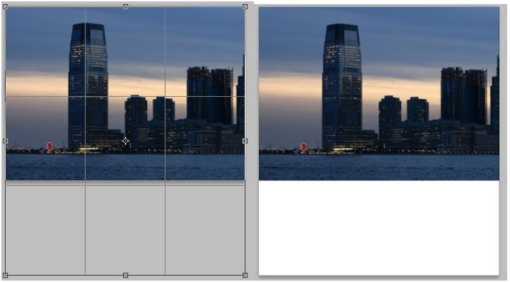
We need to REMOVE the water using the RECTAUNGULAR MARQUEE TOOL
Select only the area which is covered in water. Images with even and straight water lines are easier to work on.
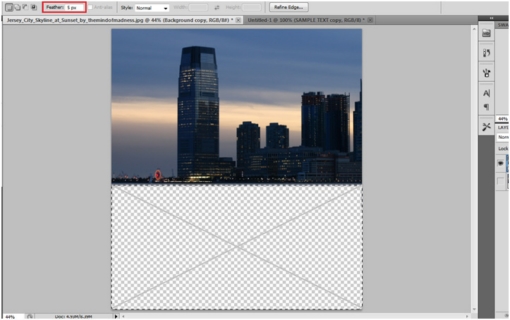
Delete this area leaving only the buildings and the sky background. Also try to put a reasonable amount of feather to make sure the removal of the areas would not leave a clean edge. This will help the manipulation much more convincing.
As you can see on the guide below, I have created 2 duplicates of the original layer. 2 duplicates are necessary to create this effect.
Now flip the 2nd duplicate horizontally.
And next is to ROTATE it to 180 degrees.
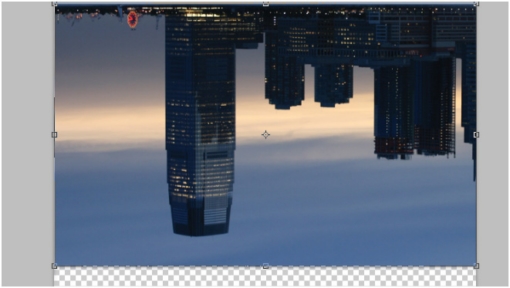
Now move the object below. Move it to a position where it will look like just a mirror reflection.
You can still go further if you want. Try creating a new layer filled with darkish blue and right click on the layer, then select create clipping mask.
This step is optional but, it will help make the reflection effect more realistic.
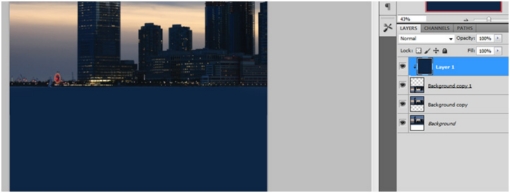
Adjust the blue layer’s opacity to about 35 percent.
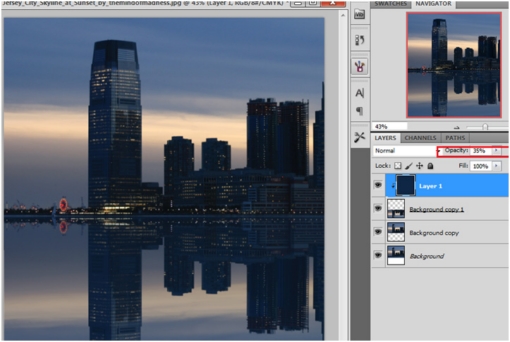
Now select the reflection layer, and apply a motion blur of about 10 pixels distance. Go to filters > blur > motion blur

There you have it. It looks more realistic now.
There will be other effects such as realistic waves but that would be on another much complicated project.
Have fun with this and if you use it please link your creations in the comments section.