Bursting with Creativity? Check Out this Awesome Sunburst Photoshop Tutorial
This tutorial will show you how to create a very cool sunburst or rising sun effect on Photoshop.
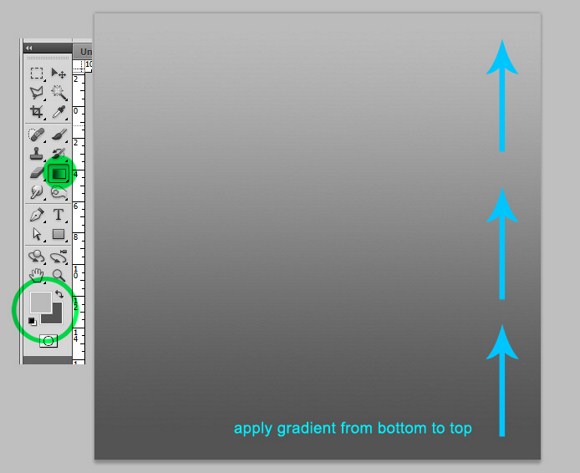
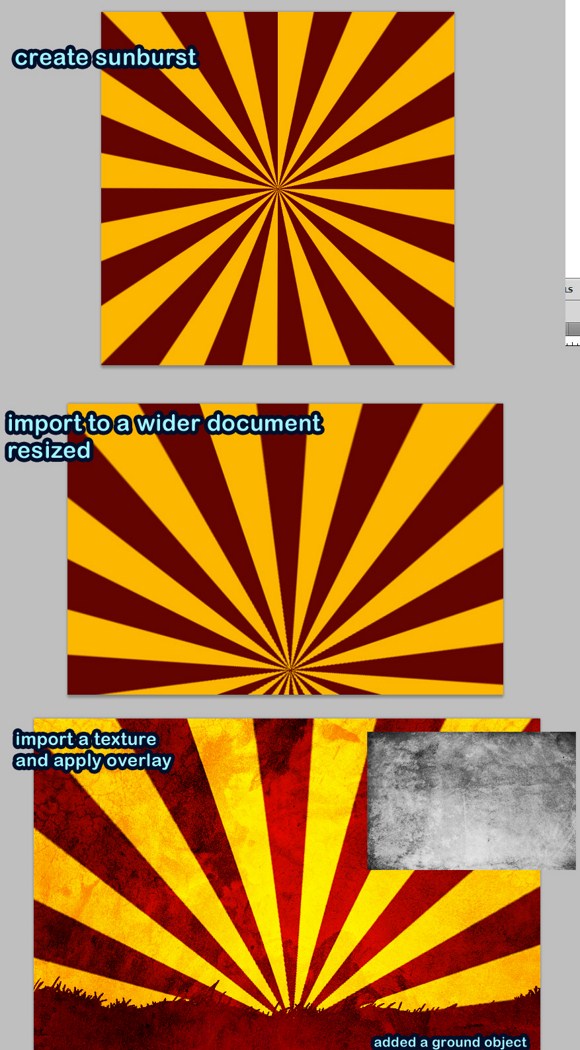
First create a square sized document like 800×800 pixels. This document is for the sunburst image which is also known as the rising sun effect. Select 2 shades of gray for the foreground and background color. You must not choose pure black or pure white.
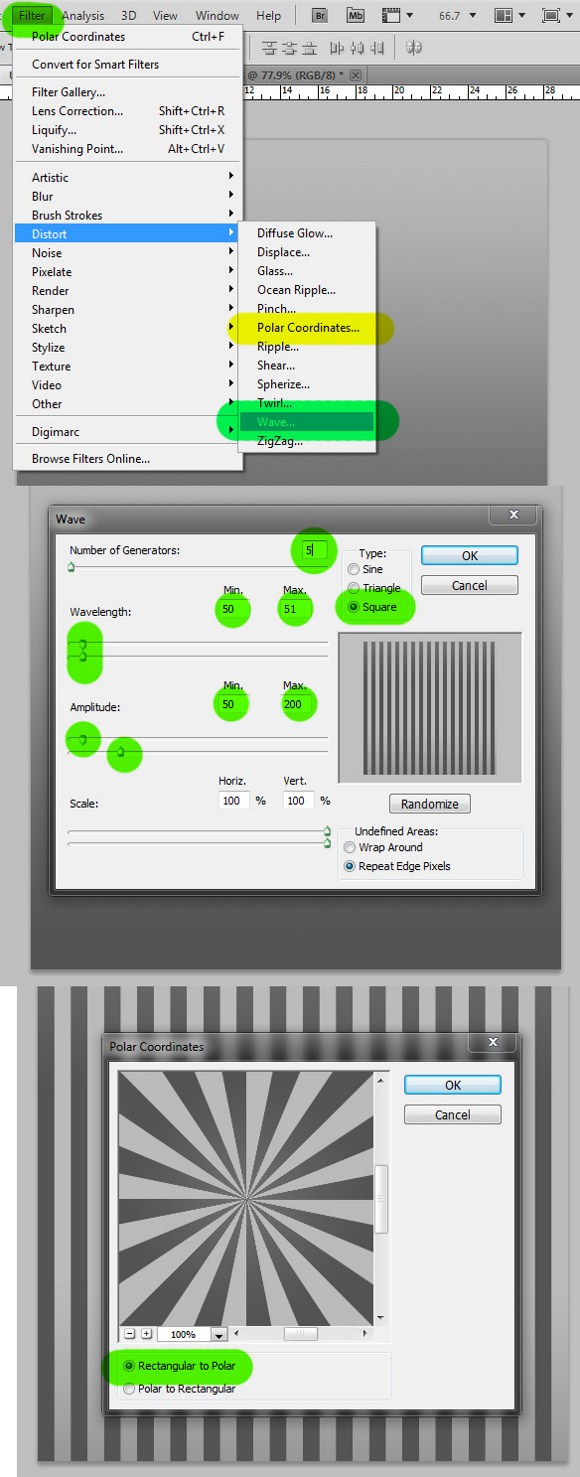
After the gradient part, go to filters > distort > wave. Set the number of generators to 5, change the TYPE to SQUARE, set the WAVELENGTHS max to 51 and min to 50, change the amplitude max to 200 and min to 50.
After creating the stripes pattern, go again to filters > distort > then apply the POLAR COORDINATES and check RECTANGULAR TO POLAR. The result should now create the sunburst effect.
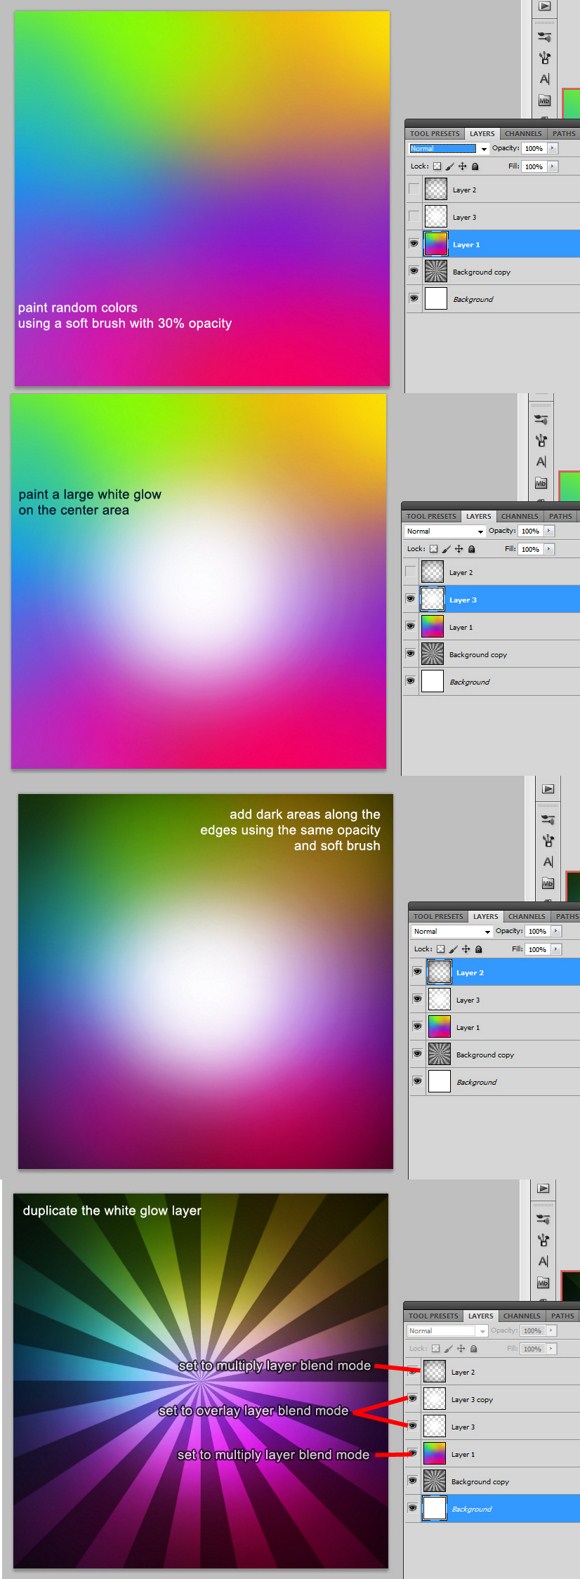
Now we move on to putting some radiant colors on the sunburst. Create a new layer. Select the brush tool (hotkey B) and set its opacity to 30 percent, and a brush size of approximately 300 to 400 pixels. Using random colors, paint all over using the brush settings. It is suggested you paint in the manner used below.
Next, create a new layer again, and paint a large, pure white glow in the middle area. You may adjust the brush size to suit your taste. Now, paint some black areas on the edges using black color.
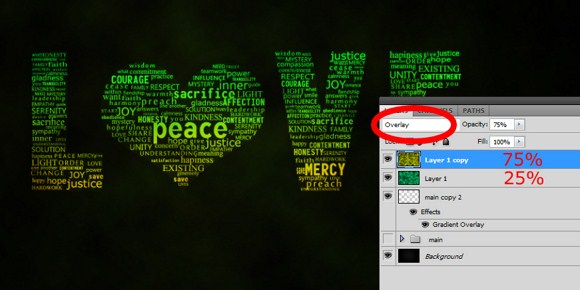
Duplicate the white glow layer, and use these following layer blend mode settings:
The dark edges layer – set the blend mode to MULTIPLY.
The white glow layer – set it to OVERLAY
White glow duplicate layer – set it to Overlay but with 50 percent opacity
And the colored layer – set to MULTIPLY
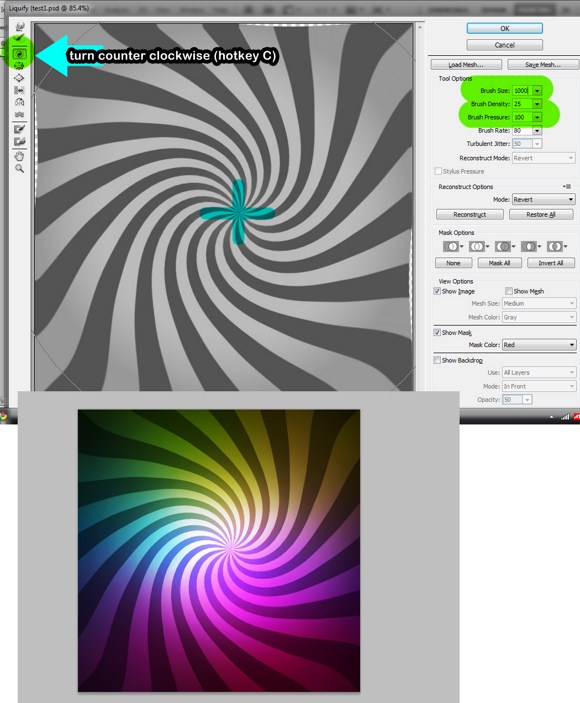
Lastly, select the sunburst layer, then go to Filters > and select LIQUIFY (hotkey SHIFT+CTRL+X). set your brush radius (found on the right side) to about 1000 pixels. Apply pressure on the center, and gradually reduce the size of the brush to achieve much appropriate swirls on the middle. Apply the filter effect.
Ok, so basically, that is how you create the sunburst effect with the swirly stuff. But there is another way to create sunburst or rising sun effects with only two colors.
Using the same first steps mentioned above, the gradient + distort wave stuff we did, create a sunburst using and orange/yellow and red pattern. After creating the effect, we import or copy it to a landscape document. Draw a landscape using the default grass brushes.
Then import a paper or grunge texture (the texture layer should be the topmost layer) which you can download from any stock image site. Apply an overlay blend mode to that texture layer and viola we have an awesome landscape with the rising sun effect.
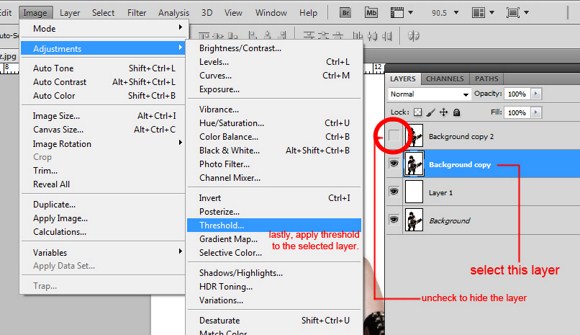
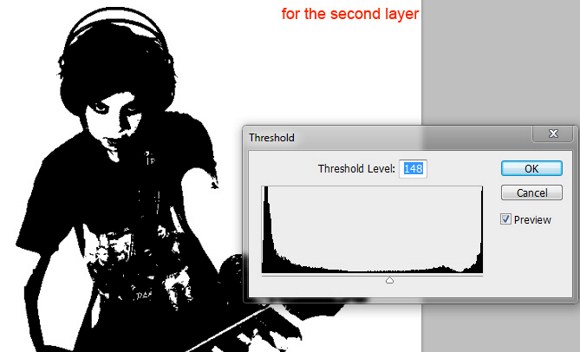
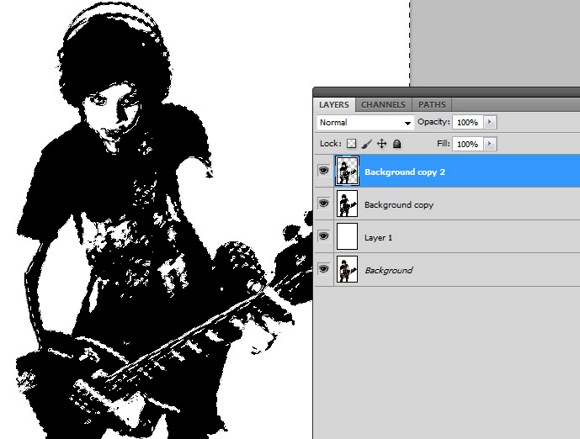
Here’s a bonus. Search the web using these keywords: samurai, geisha, free, and vector. You can also download any VECTOR or SILHOUTTE images to use as subjects in the image. Import it to the document just like the example. Delete the background using the marquee tool. Note: if you can’t find black and white images, you can use Image> adjustments > threshold on your image.
Create a new layer. Press ALT+CTRL+G to clip layer. First paint a dark blue over the clip art. Then paint black later using 30 percent brush opacity on the lower parts. Set the layer to screen.
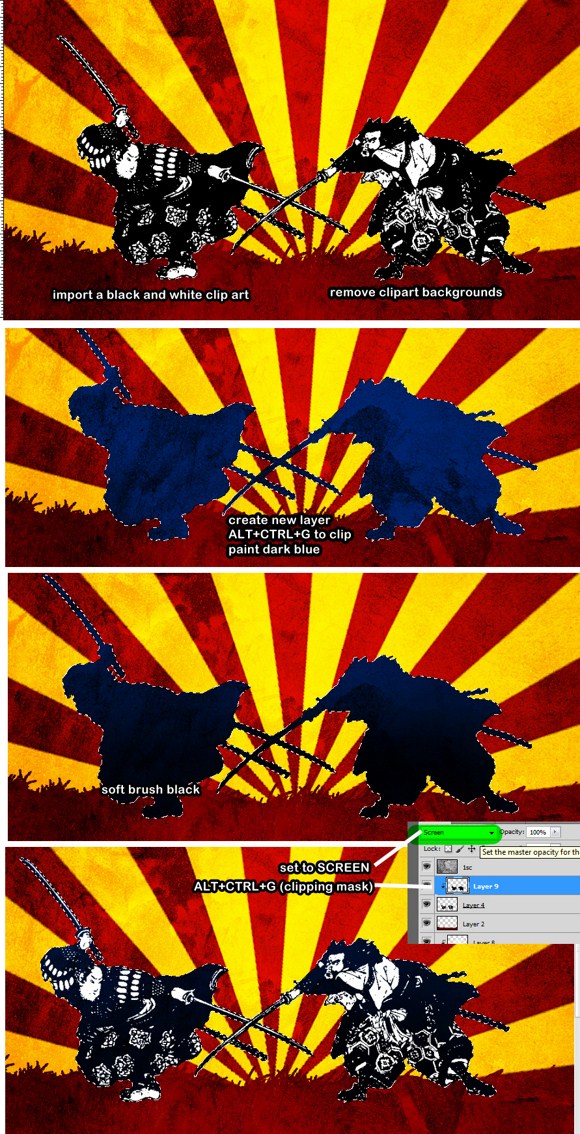
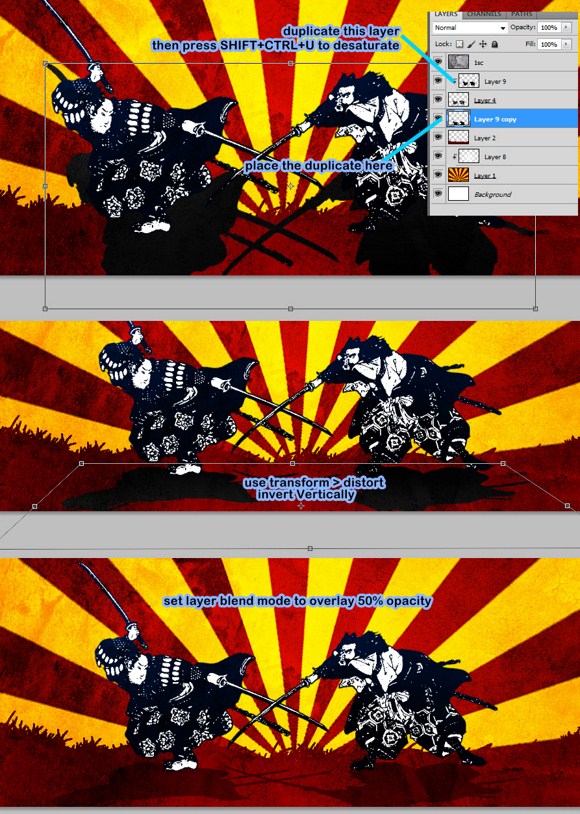
And for the last few steps, duplicate the layer which was clipped earlier (blue and black color), place it below the clipart layer. Transform it, invert it VERTICALLY, then use distort to reshape it into a realistic shadow. Set its layer blend mode to overlay and set the opacity to 50 percent.
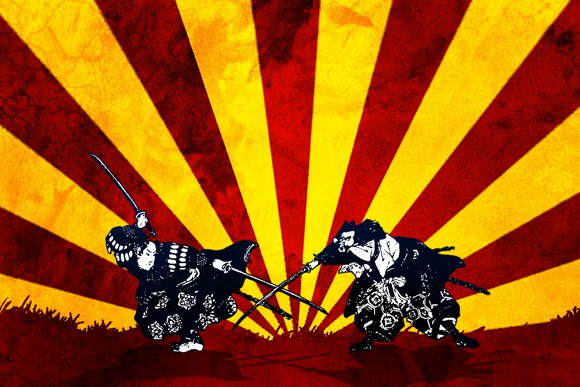
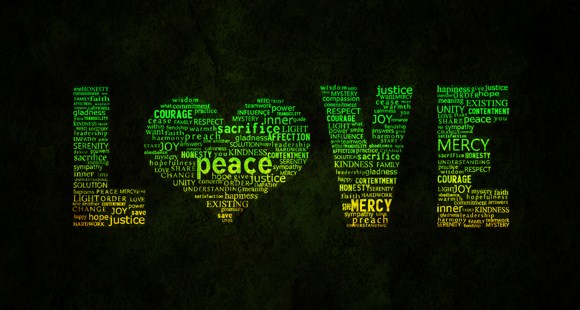
Here is what the finished product should look like:
We hope you enjoyed this tutorial. As always, please feel free to ask questions or share your creations in the comments.
Remember to check back next week for another great tutorial.
Photoshop the Underworld with this 3D Text Effect
Many of you, including me, have already stumbled upon several Photoshop tutorials like this on other web sites. Unfortunately, I was not able to follow right away because of the confusing instructions and left out parts and details which are very important. So here’s my detailed tutorial of this Photoshop technique.
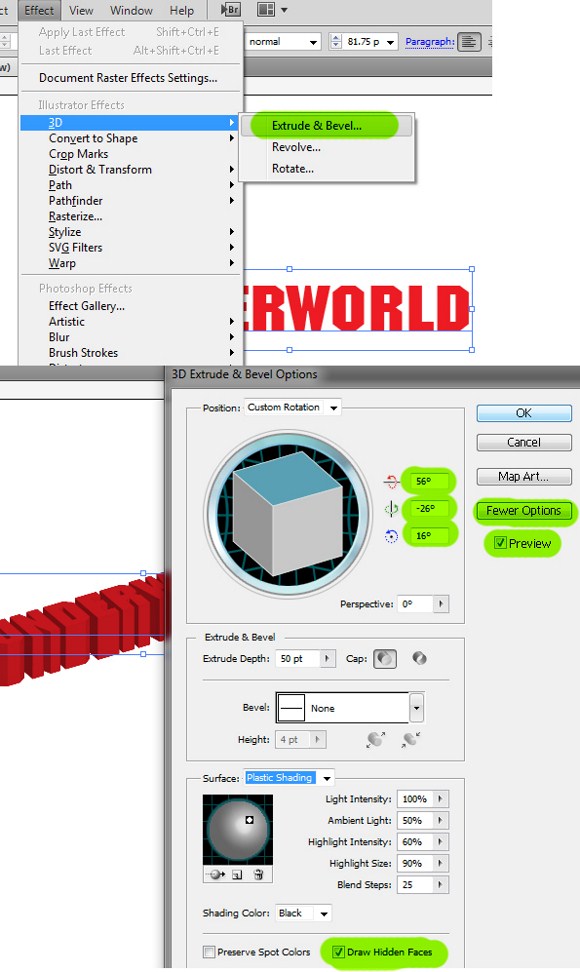
The main feature of this technique is the creating of the 3d effect. We will be using Adobe Illustrator to prepare the 3d text. You also need to use a SQUARE type of font to make things a bit easy. Search and download for fonts like Antrox or Blockbit. You can find these fonts for free at UrbanFonts.com.
On Adobe Illustrator: Create a new document in illustrator (standard RGB) then create text using the square fonts. Go to Effects > Bevel and Extrude. Set these degrees adjustments: 56, -26, and 16. Enable More Option, Preview and most importantly, the Render Hidden Faces.
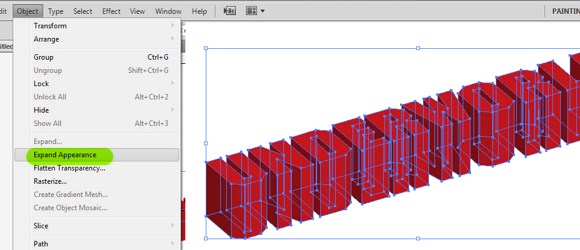
After the 3d text is done, go to Objects > Expand Appearance. Now you will see the separated paths of the 3d text. Now activate the direct selection tool (hotkey A), and click on the text topside faces. Once you have selected the faces, delete them.
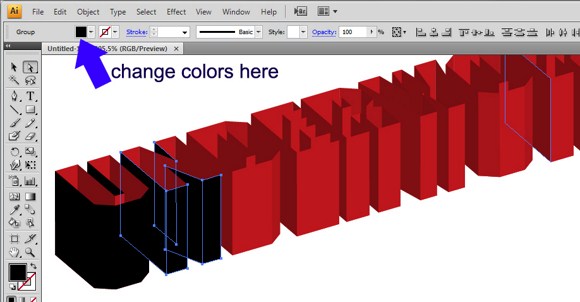
Select carefully each visible face facing outwards then change their colors into solid black. Look at the image this is the reason why we need to use square fonts. Text with curved areas are very difficult to select and modify once extruded. To change the colors just find the small box on the top left area of the interface and change the color to solid black. DO NOT CLOSE the Illustrator yet.
On Photoshop, create a new document (1500×1000 pixels) and fill the background with solid black color. Copy all the paths in Illustrator including the black faces and paste it as PIXELS in Photoshop.
Once copied in Photoshop, REMOVE the black parts using the Magic wand tool. (At this point, you can now close Illustrator.)

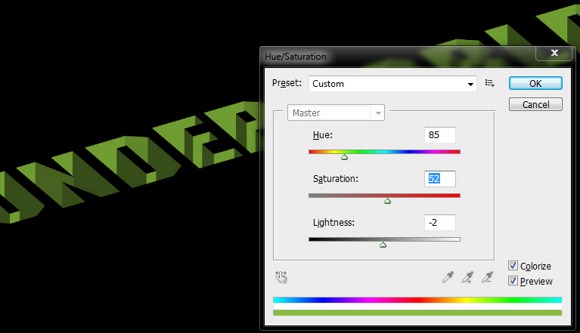
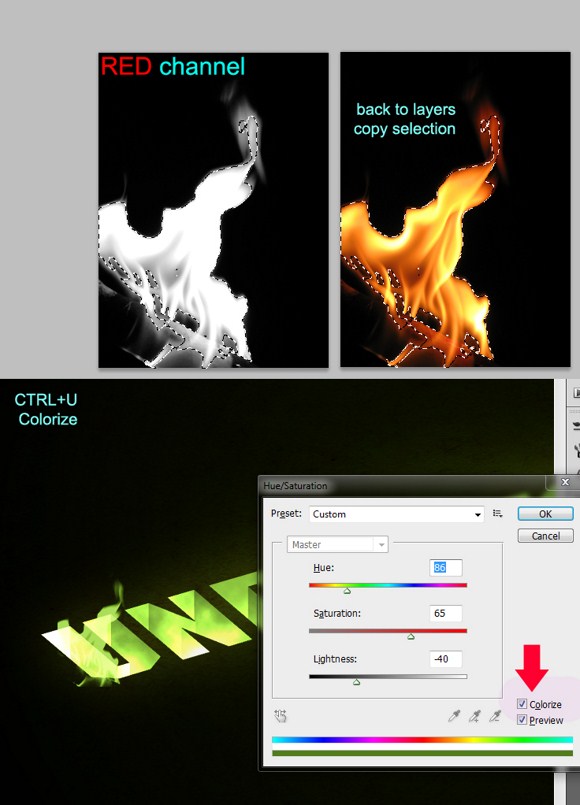
Recolor the 3d text using the Hue/saturation tool (CTRL+U), and adjust the color to make it something in the shade of green. enable the Colorize option.
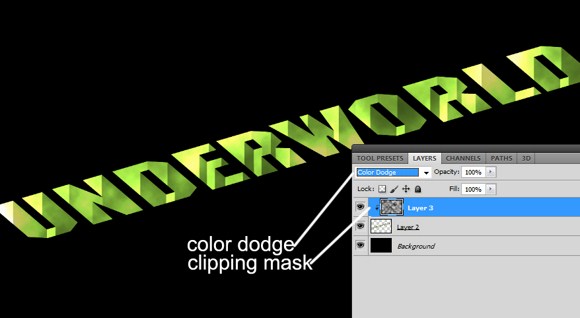
Create a new layer. Go to filters > Render > Clouds (make sure you press D to revert the colors default). On the clouds layer, press ALT+CTRL+G to create clipping mask. Change the layer blend mode to color dodge.
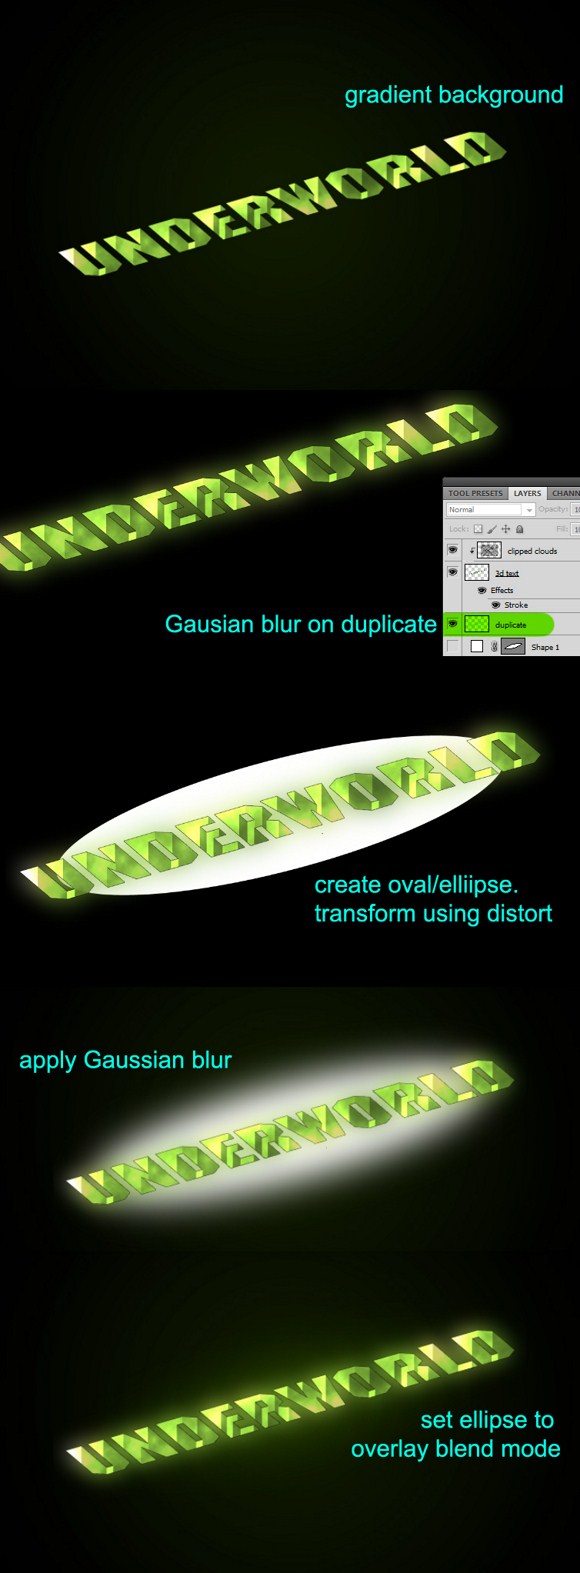
First, create a radial gradient background using a dark shade of green.
Next, duplicate the text layer including the clipped layer, the merge the duplicates. In the layers palette, send the duplicate below the main 3d text. Go to Filters > Blur > then Gaussian Blur. Use about 30-40 pixels.
Create a perspective ellipse in color white. Apply again Gaussian blur using 45+ pixels radius. Set the ellipse layer to overlay blend mode. Once done, you may have to resize all the objects smaller to help with our next steps.
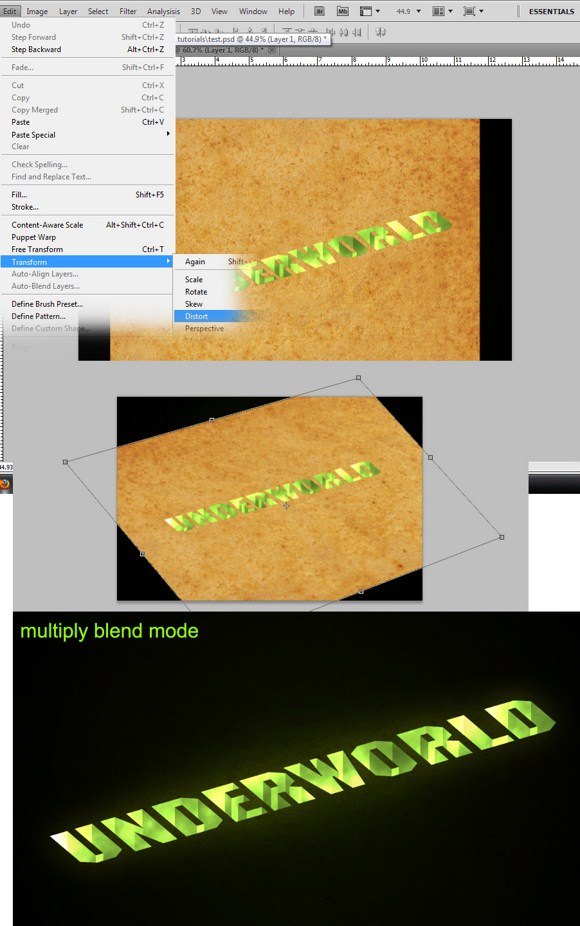
Search and download for a “paper texture” like the image below. Import it then transform it using Distort. Place the layer next to the 3d text and set it to multiply blend mode. (You can add more textures like cracks to make it more awesome.)
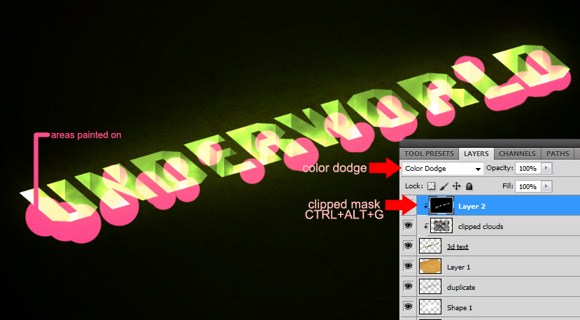
Create a new layer; place it on top of all other layers. Fill with black color and set to Color Dodge mode. On this layer, create clipping mask (CTRL+ALT+G). Grab your brush tool and change your active color to WHITE. Paint on areas where you need to brighten the 3d text. You may have to reduce the brush opacity to 50 percent if necessary.
And the last part, the flames. Search stock images of flames on sites like sxc.hu.com. open a flame image in Photoshop, then go to the Channels Palette (next to layers).
Select the Red channel. CTRL+CLICK on that channel. Go back to layers and COPY the selection. Paste it on the main document and change the layer blend mode to Linear Dodge (or screen perhaps).
Press CTRL+U, enable colorize, and adjust the parameter to match with the main color neon green. Repeat the process above and add more flames. You may use smudge to change the shapes of the other flames.
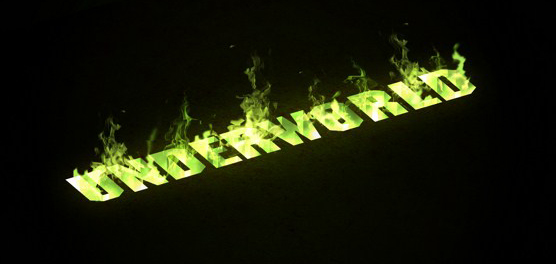
And we are done. Aside from flames, you can also choose to add smoke or lights.
Please feel free to share your creations with us in the comments.
Make a Painting Come Alive with this Photoshop Tutorial
I have been doing a few internet strolling until I came across with this screen captures magically alive paintings in Hogwarts of the Harry potter movies. So, I suddenly got an idea of how about making a painting come to life. So guys, I want to show you some of the steps I have been doing in Photoshop to make a painting of a man trying to get out into the real world.
First and foremost, we will need a photo of a man crawling out and turn it into an oil painting. Just go to your favorite search engine and look for stock images using the keywords man, crawling, crawling man, and then download it. You also need to download an image of a classic picture/painting frame, and an image of a patterned wallpaper texture. (Downloading a wallpaper is not essential therefore it is optional.)
The first thing we are going to do is to prepare the painting. Open a new document with resolution sizes not lower than 1500×900 pixels. You can have a larger size but not more than 4000 pixels in width. Import the frame and the man images on the same document. Resize and arrange them to about the size shown below. You can reduce the opacity so you could see where to put the images.
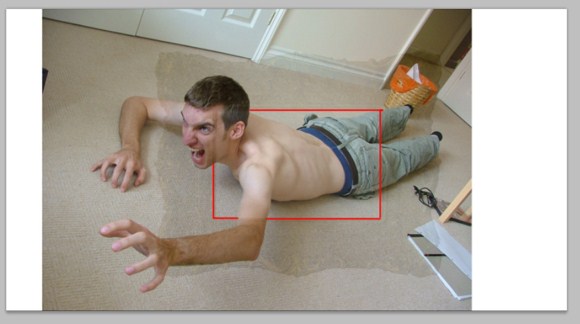
As you can see, I have positioned the image this way so that the head and arm would really go out of the frame, while the rest of the body stays inside. The red lines are the boundaries where we will cut out the unnecessary parts. (Also notice also that I have placed it that way so that you cannot see the trash bin.)
For now, let us proceed to removing some parts. Slowly remove or erase the parts that are meant to go out of the frame. Use the marquee, eraser, or the pen tool + selection techniques to remove these parts.
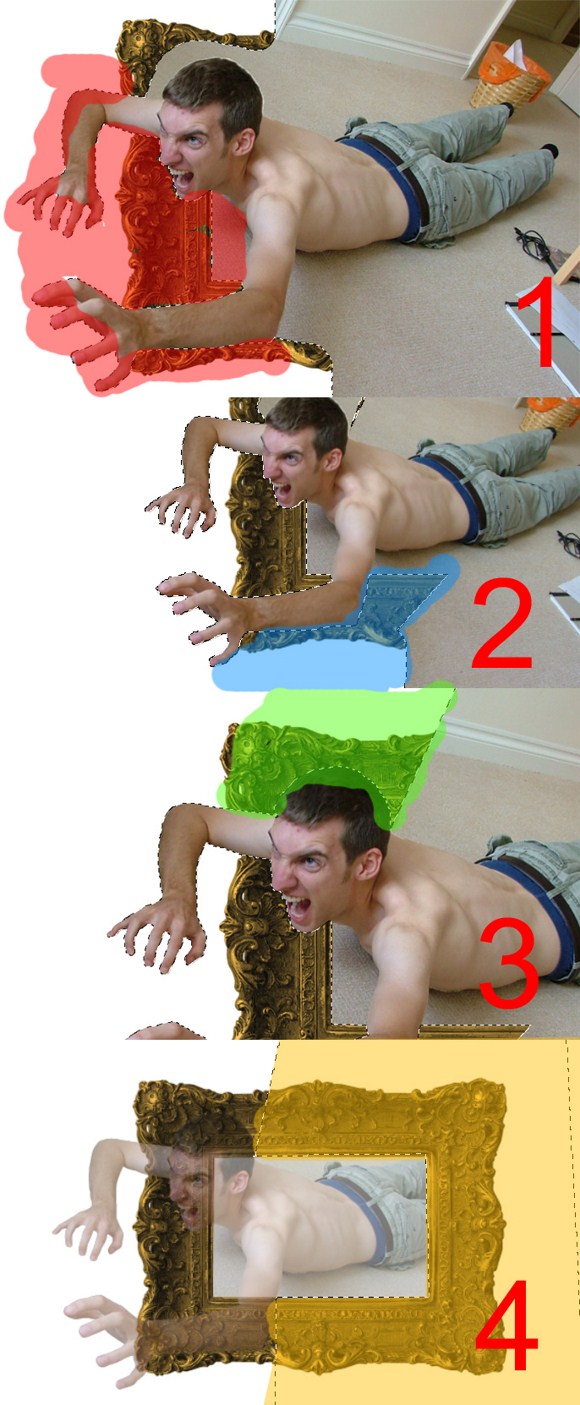
As you can see on the image above, you need to remove the areas one by one. First carefully trace using the pen tool to remove the areas around the fingers. Be careful not to remove areas below the chin which needs to be inside the frame. Next remove the areas on the lower part. On the hair areas you will need to be patient to successfully and cleanly cut out the surrounding areas. Sometimes, you need to use channels to achieve a cleaner output. And lastly remove those areas to the right parts.
Next part is to do the oil painting effect on some parts of the man. This will give the idea that the oil painting is transforming into a man.
Duplicate the man layer THREE (3) times so that you will get a total of 4 copies of it. Name the layers a, b, c, d respectively with layer a as the topmost layer. Hide the layers except for layer D.
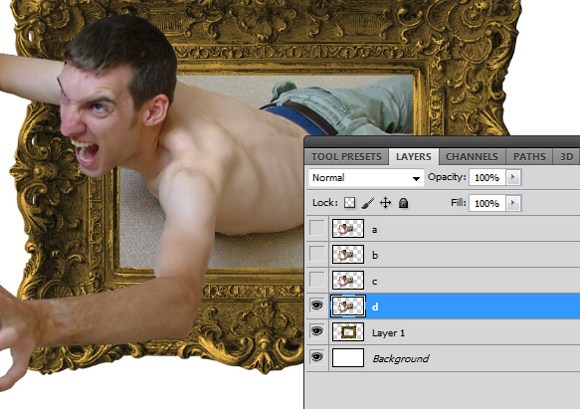
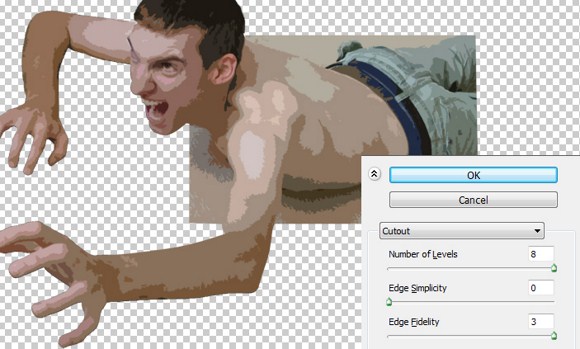
Go to Filters > Artistic then select CUTOUT. Use 4 levels, 0 edge simplicity, and 3 edge fidelity. Set the layer blend mode to LUMINOSITY.
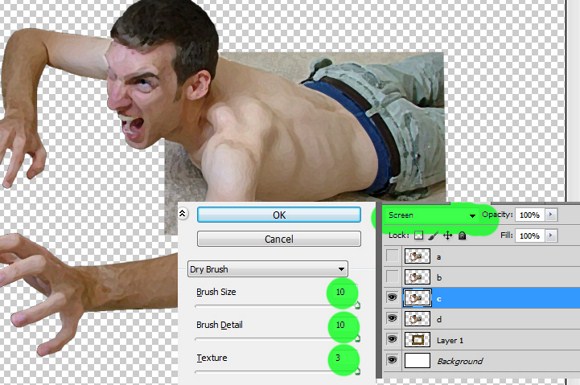
Unhide layer C. go to Filters > Artistic and then select DRY BRUSH. Set the parameters all to maximum. Change layer blend mode to screen.
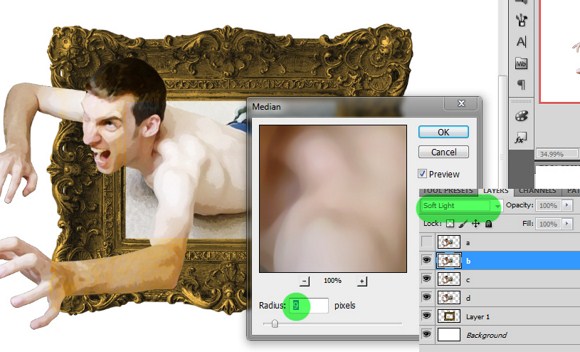
Unhide layer B. Go to Filters > Noise > Median and set the radius between 9-15 radius. Note that this depends on the document resolution. Set the layer blend mode to Soft Light
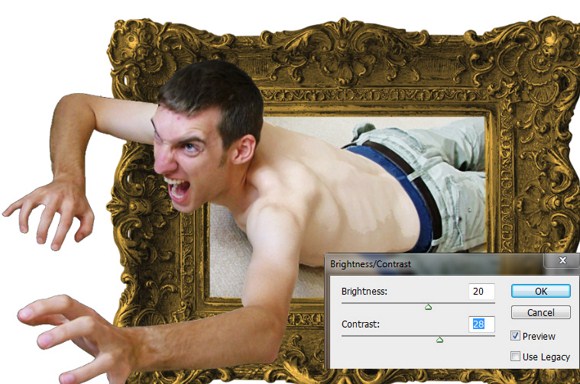
Lastly, unhide layer D. Go to , Image > Adjustments > and then play with brightness and contrast. Achieve a clear and vibrant look. Then slowly erase (eraser tool) USING 50 percent opacity on parts inside the frame so that parts inside the frame will have the oil paint/watercolor effect.
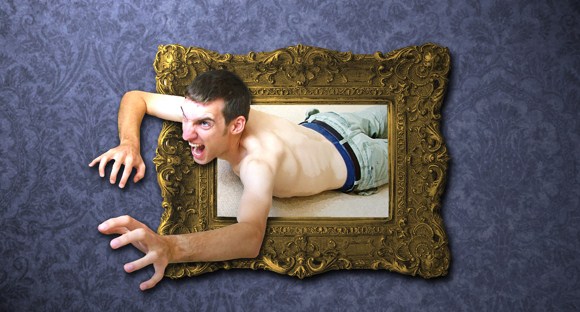
And basically that is it. After applying the wallpaper as the background, shadows and lighting effects the overall effect now looks quite more convincing.
Be One with the Blur – Create a Cool Bokeh Effect in Photoshop
The Bokeh effect is a term in photography referring to the way the lens of a camera renders the blurred or out of range focus light. These blurred lights are usually seen as the distant lights found in the background of an image. A popular setting for Bokeh lights is from the distant lights from night time shots in the city streets.
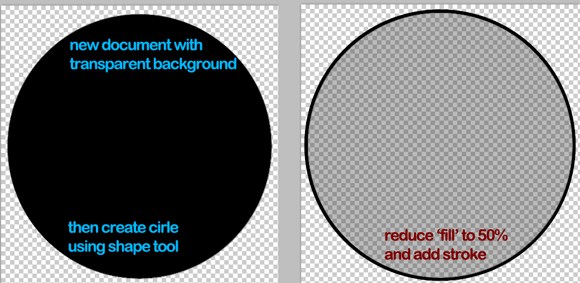
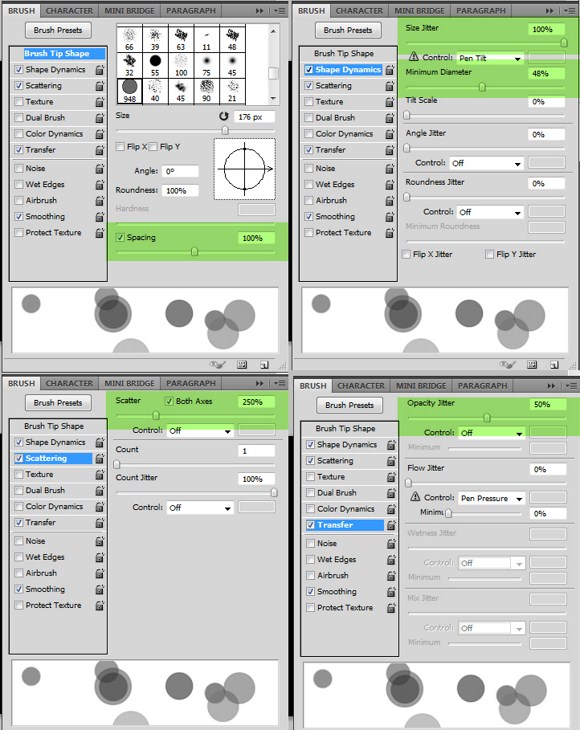
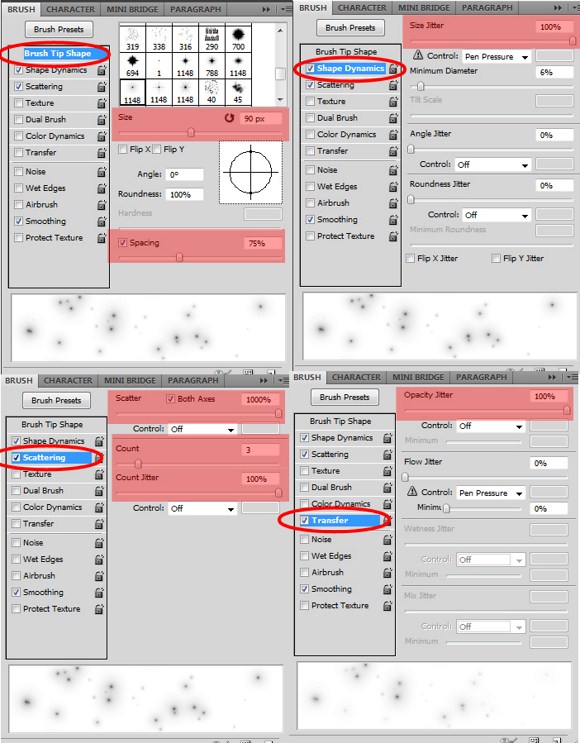
First part in creating the effect is creating your own brush. This technique will also be useful in the future when you need to create your own Photoshop brushes. Do these steps: create a new document in Photoshop 1000×1000 pixels with transparent background. Create a perfect circle using the ellipse shape tool with black as the base color. Then add stroke with the right amount of pixels (see thickness below), black color and is located INSIDE the circle.
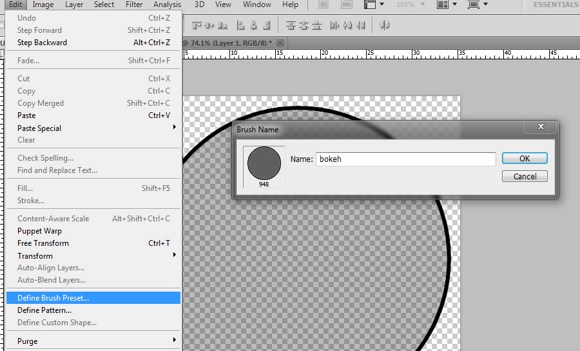
Once you have done this, go to Edit > and click on Define Brush pattern (make sure the circle is selected). Save this pattern named as “bokeh”.
Now you have the brush ready, proceed to create a new document with a landscape size. Any size will do as long it is in landscape. Use a DARK GRAY, not pure black as the background color for the whole thing to work.
Activate the brush tool (hotkey: B), and find the ‘bokeh’ brush you have just created a while ago. Bring up the brush options by pressing F5 key. You will see several tabs or menus which will contain sub menus.
On the BRUSH TIP SHAPE, adjust the spacing to 100%. Notice how the circles appear farther from another as you set it higher. Enable the SHAPE DYNAMICS and set the Size Jitter to a max amount of 100 percent. Adjust the minimum diameter to any amount lower than 50 percent.
Now apply scattering then set the scatter level to at least 250 percent. Setting it too much high will paint the brush on much wider range in random placements. In other words, it will be too scattered. Lastly, apply transfer (also known as other dynamics in other versions), and then set the opacity jitter to at least 50 percent.
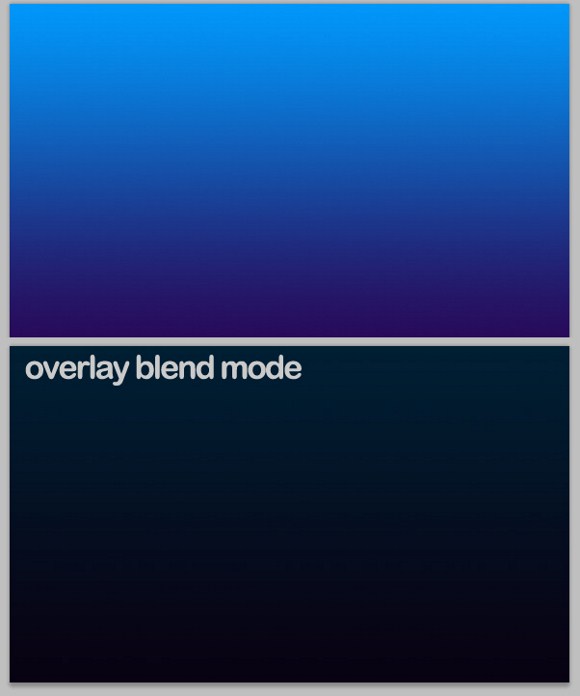
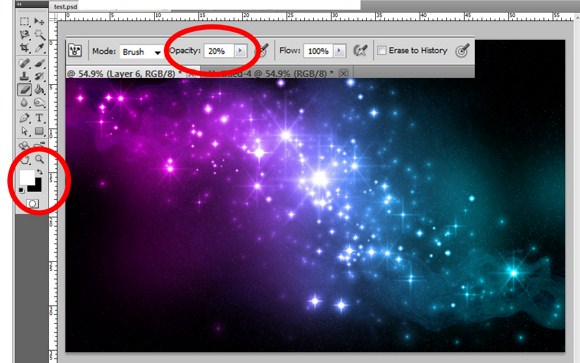
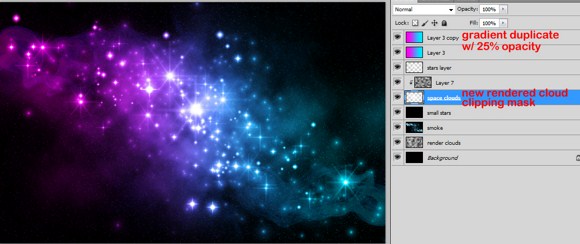
Before painting on the circles, fill a new layer with a gradient of your choice, and then change the blend mode to overlay. Blue and violet are good colors to try with. Also you can apply more than 2 colors and with different gradient directions even including diagonal.
Create a new folder and set the folder’s blend mode to color dodge. Next, create a new layer between the gradient and background. Paint the bokeh brush over the area using white color and the settings above. After painting, apply this to the layer, Filter > Blur > Gaussian blur. Adjust the radius until you achieve something like this. The amount of radius applied depends on the document resolution and dimensions.
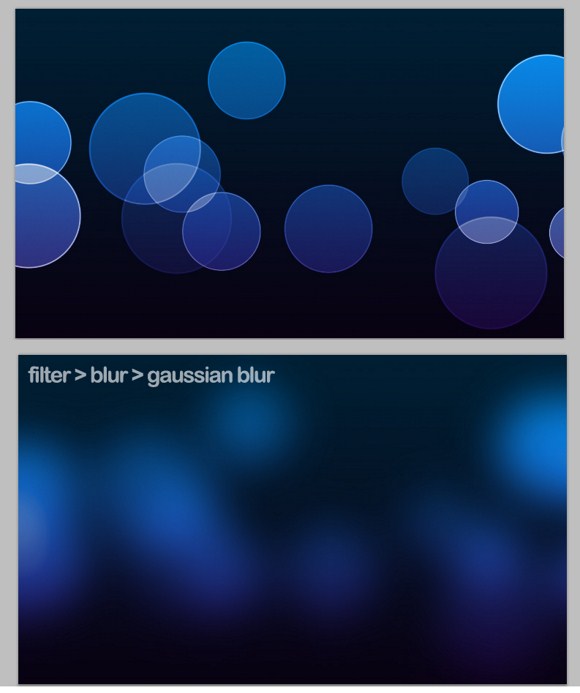
Next, paint again another set of circles but this time, use a smaller brush size, using only filter effect Gaussian blur of 1 or 2 radius size, and lastly a lot more circles. Remember that this layer must be inside the folder.
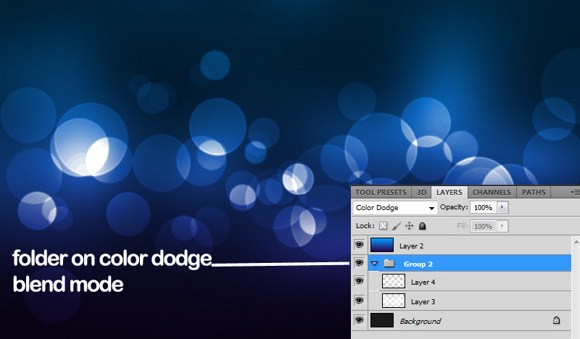
And basically you are done with the simulation of the bokeh effect. You can add more circles with varied amounts of Gaussian Blur to create several depths of lights. Add a catchy text phrase and overlayed glows to create a more spectacular effect.

We hope that you enjoyed this tutorial and that you will find it useful in your future designs. Please feel free to ask any questions or share your creations with us in the comments.
Pimp Your Ride: Creating Realistic Custom Car Vinyl in Photoshop
This tutorial will teach you how to visually pimp out any car using Photoshop. You could shop your own car and share it to friends and make them wow with the visual effects you have made.
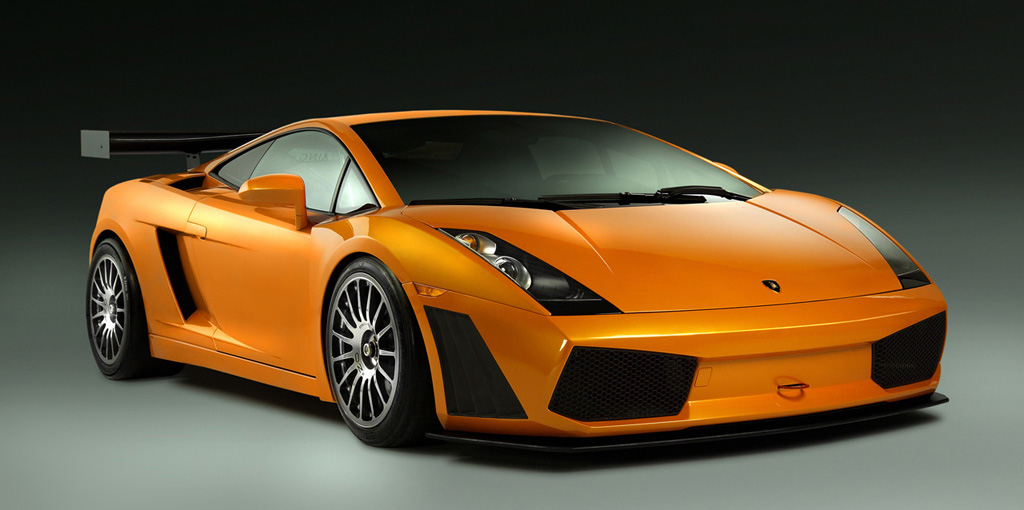
First step is search for an image of any car to download. Make sure this car has in plain or in stock color. It means that car has only one car paint. Our example below is an orange Lamborghini Gallardo, which is a very sweet and exotic car.
After you have downloaded an appropriate image, open it up in Photoshop. You may have to create a backup copy in case you overwrite the original image and want to create another customization. The following steps are going to be very time consuming and quite delicate so expect to get frustrated, but do not give up.
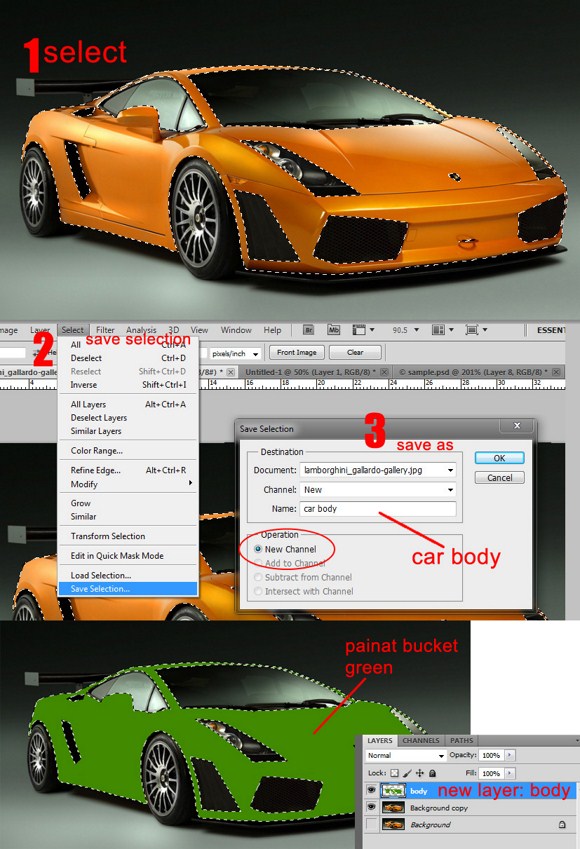
– Now select the car’s body EXCLUDING the windshield, the wheels and rims, the black areas and headlights, and spoiler. You need only to select where the paint are in. you can choose any selection tools you want, in my opinion, it is better to go with the standard marquee tool or the pen tool.
– Let us introduce to you about saving selections. This is a useful practice because it lets you RESELECT to areas which you may have deselected intentionally or unintentionally. Just load the saved selection if in case the shift+ctrl+D keys do not work. Save selection as ‘car body’ or anything close.
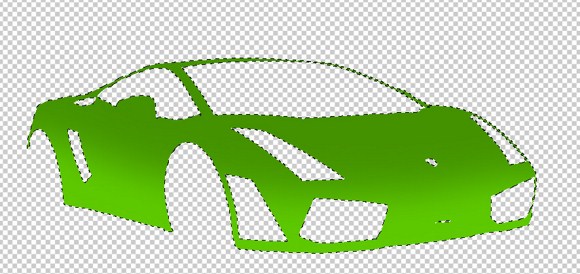
– After you have your selection, make sure it is remained selected. Add a new blank layer. Inside the marquee, paint a desired color (example green). This will create a shape of the car body with the chosen color. Before proceeding, hide this layer.
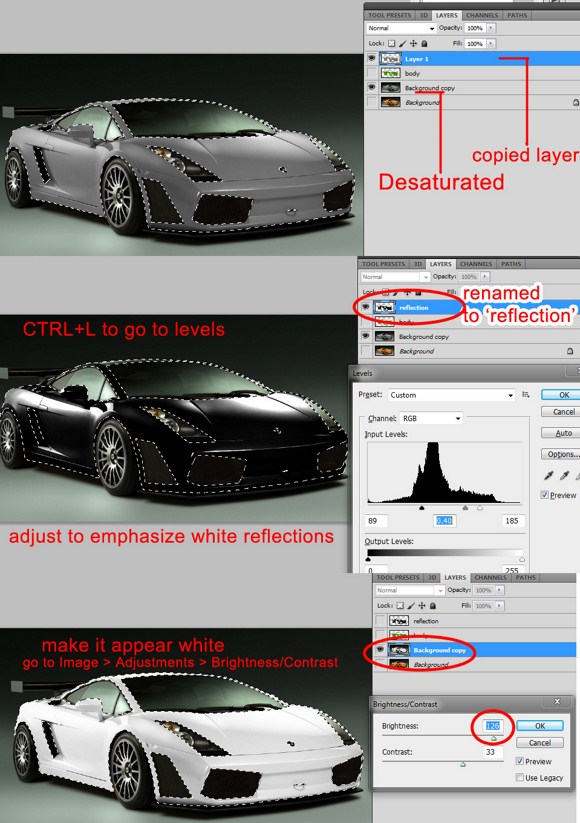
Load the selection if you have it deselected. Copy the selected parts onto a new layer, and name this layer as Reflection layer. You need the car layer (only the selection not the whole layer) and reflection layer DESATURATED. Do this by pressing CTRL+SHIFT+U.
On the reflection layer, go to Image > Adjustment and clock on Levels (or by simply pressing CTRL+L). Now we need this layer to be in high contrast. Adjust the parameters so the reflections are very white, and the areas with no reflections are pure black. Try to follow the knobs to achieve the same result. You can also use the curves tool to do this step. This is an important step to make the overall effect realistic.
Now on the original car layer (do not mind the other background layer, it is for back up purposes), go to Image > Adjustments > brightness/contrast and adjust to make the care like its painted in white.
Remember the green colored body layer? Let us temporarily hide all layers except for the body layer. Load again the car body selection then select the brush tool. Choose neon green color (you can choose any color after you have mastered the effect). Paint the lower part of the body using a soft brush with a decent brush size and 50 percent brush opacity. This will give a gradient paint job on the car.
Download and import this PNG to your document. Feel free to use the tribal stamp I made.

Place 2 copies of the tribal flame in the project. Modify the shapes of each flame object using CTRL+T transform tool. While on transformation mode, you can RIGHT CLICK the box to use the WARP and DISTORTION. After that, add the STROKE and COLOR OVERLAY effects to each of the objects. Just refer to the example below.
Combine the 2 objects by making it as a smart object. Select the two layers > Right Click to one of the selected layers, then click the CONVERT TO SMART OBJECT. After making it a single object, Right click the layer again, and then click on CREATE CLIPPING MASK. After that, change the blend mode to overlay.
Last part, finally, UNHIDE all layers, set the reflection layer to SCREEN MODE with 80 opacity, and you be surprised at what have you been done. Here is the final output of the project.
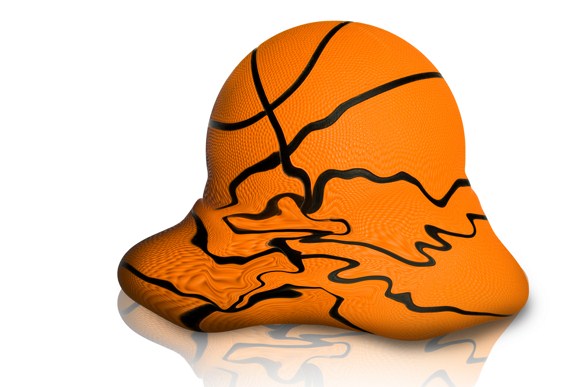
Blazing Hot Tutorial – How to Melt Objects in Photoshop
This tutorial will reveal to you the basic steps on how to make various solid objects MELT. Yep, you read it right, you could create amazing graphics and illustration when you place melted objects on you image. This tutorial covers on how the Photoshop tool called the LIQUIFY can create cool effects.
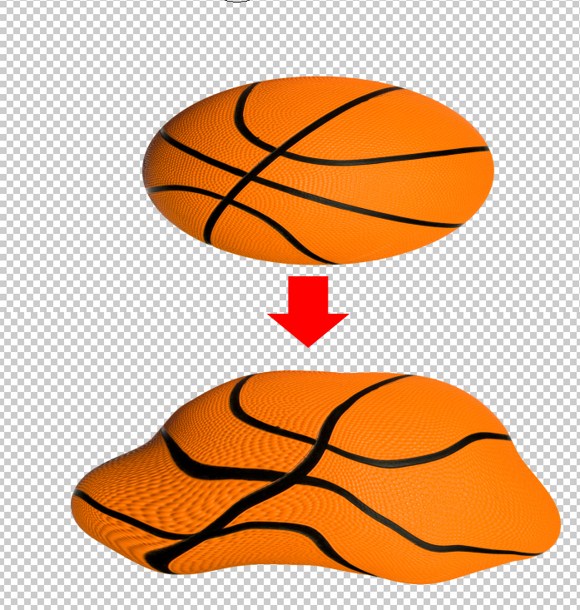
First find a simple object on the web for example a basketball. Google for images in the web and download these images with white or no background if possible. If you cannot find the right image, you can look for objects on royalty free websites. As you learn more Photoshop effects you can bookmark those stock photo websites in the event you will need more photos for future projects.
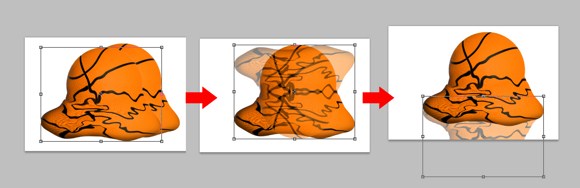
For now let us import this basket ball to your new project. You can have any size or resolution as long you will have enough space to create the melting parts. Refer to image below.
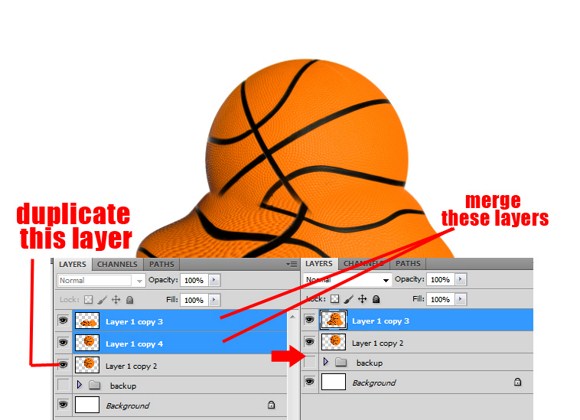
Duplicate this image or layer. Press CTRL+T and resize it to an oval shape just like you see below. If it is necessary to move or flip the image horizontally or vertically, do so.

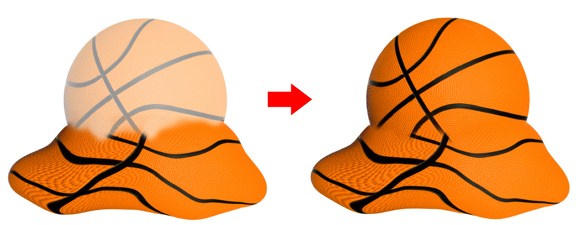
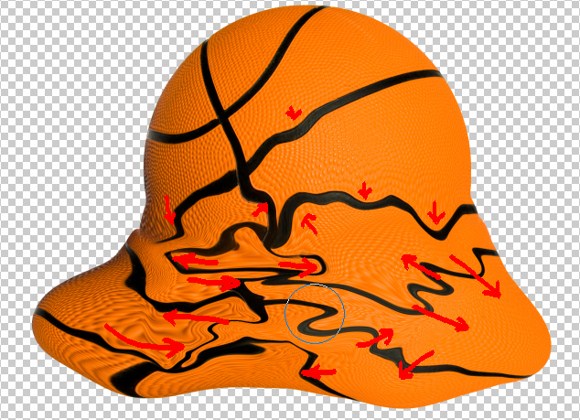
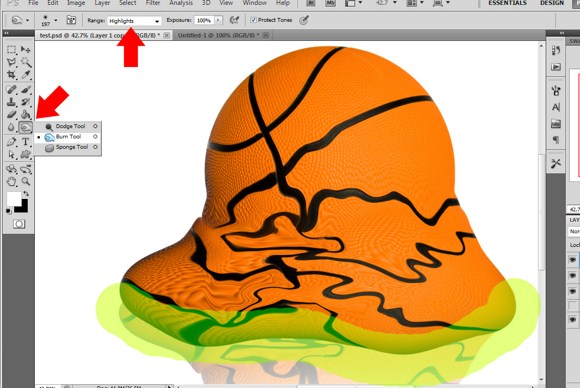
Make sure you are selecting the oval layer. Then Press SHIFT+CTRL+X, or go to Filters > Liquify, to open up the liquify filter effects.

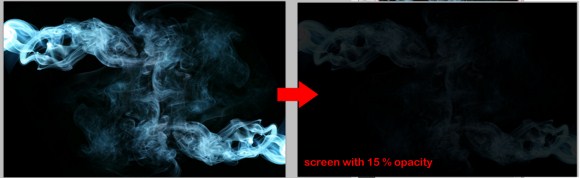
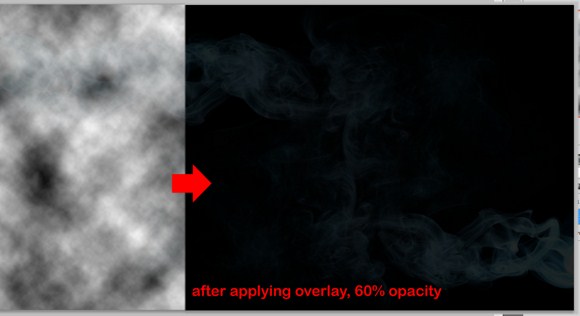
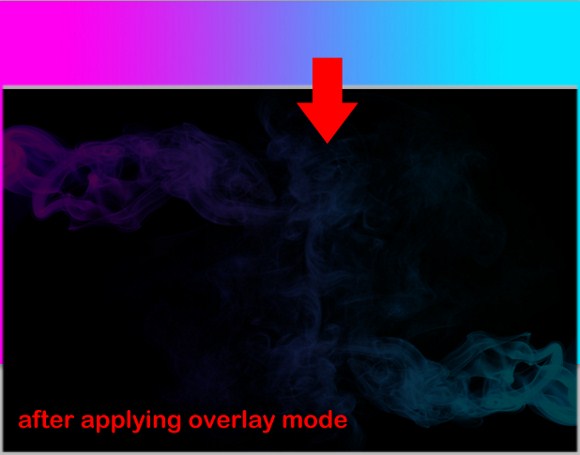
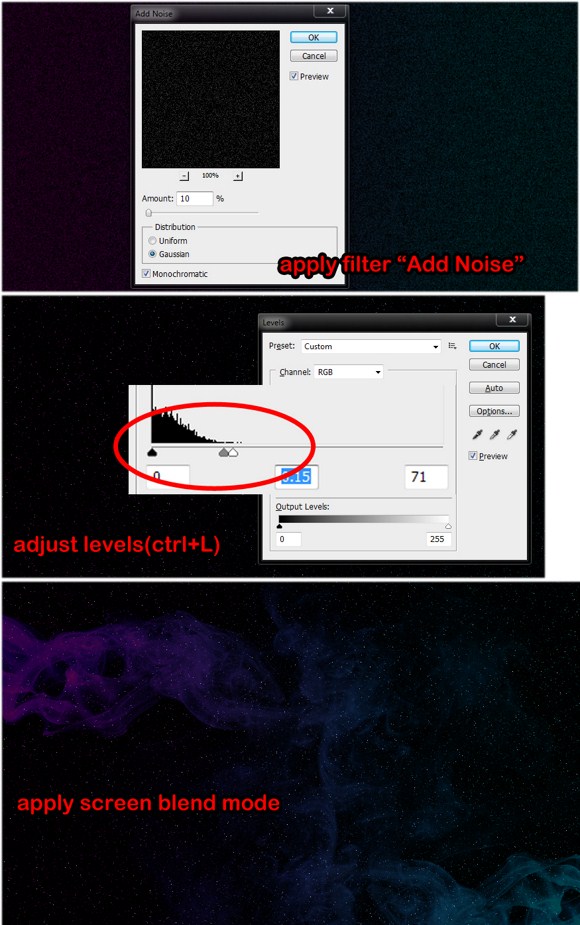
Create a Cool Galaxy Effect in Photoshop


Create a cool Island in a Bottle using Photoshop
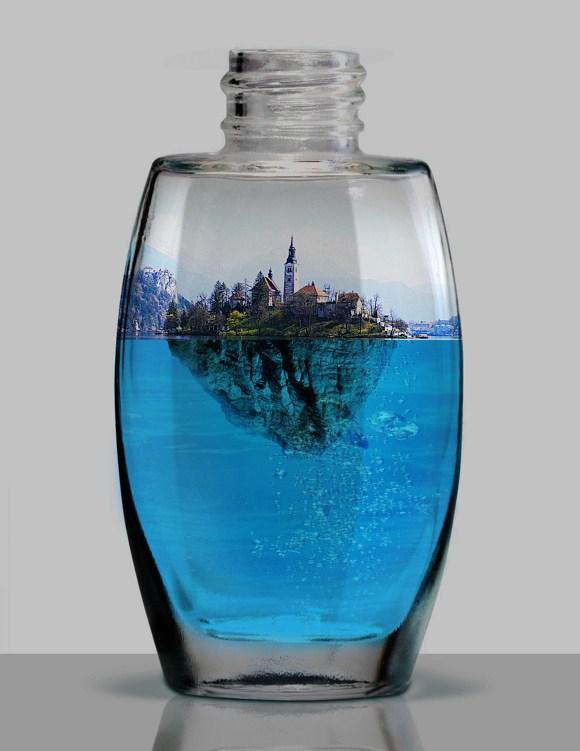
This tutorial will show you how to create a digital piece of art of a miniature, but realistic, island that floats inside a bottle. With this photo manipulation in Photoshop, you can surely amaze your friends with the amazing effects of your work!
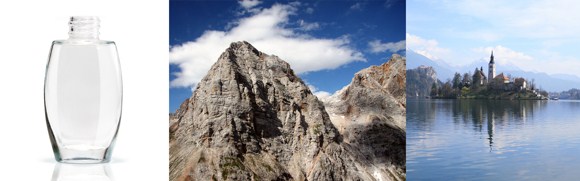
First you are going to need these 3 primary stock photos which you easily find on royalty free stock image websites. You will need to find images for an Empty Bottle, an Island, and a rocky formation. As for my own search, I used these keywords when finding the photos: island, empty bottle, bottle, glass, beaches, mountain, rocks, and beach rocks. Please see the images below.
Now place or import the bottle stock image to your document. You can have any Photoshop document size or resolution for this project. Select the bottle layer then set the layer blend mode to MULTIPLY on 100 percent opacity. You can also create an optional background but be sure that you blur any background image that goes through the glass to imitate how real glasses distort light. For now, use a simple monochrome background.
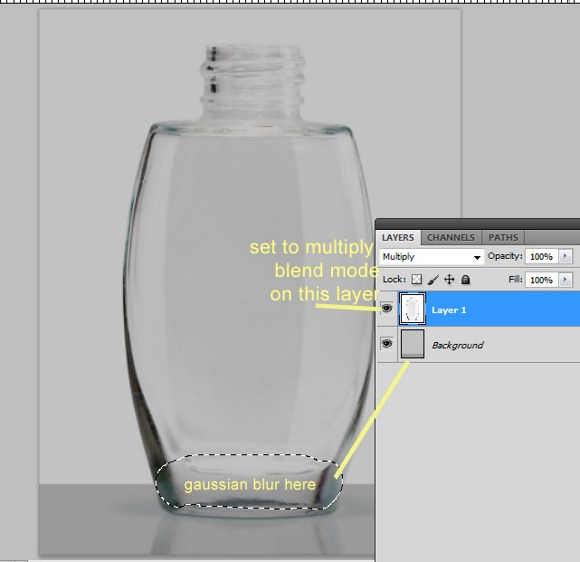
Next place the island image below the bottle layer. You may have to sharpen, add more contrast and colors to the island image so it will look better. Erase all areas that go out of the bottle. On the sky areas, use a soft brush to remove the edge of the photo.

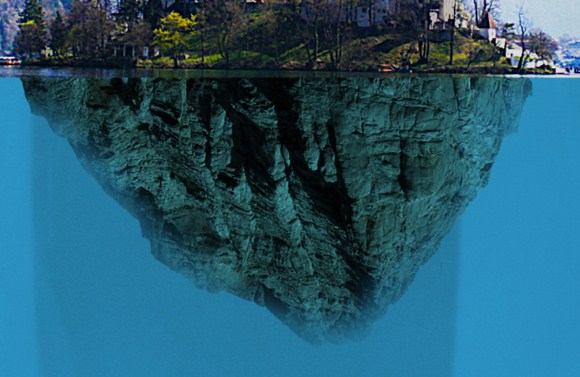
Open the rock/mountain stock photo. Use the marquee tool (on my part, I used the MAGNETIC marquee which very easy to use) to isolate the parts that you only need. Use the image below as a guide on how to isolate the object. On the example, we are using a rocky mountain peak as the lower part of our floating miniature island. If you cannot find the image exactly below, you can use a pile of rocks or an image of another mountain peak.

After selecting the important part, place it on the main document project, then invert vertically by making use of the Transform Tool (CTRL+T). Resize the rock image so that it will not exceed the islands width. Again, you may have to adjust the rock image’s contrast and colors so that it would match with the island.
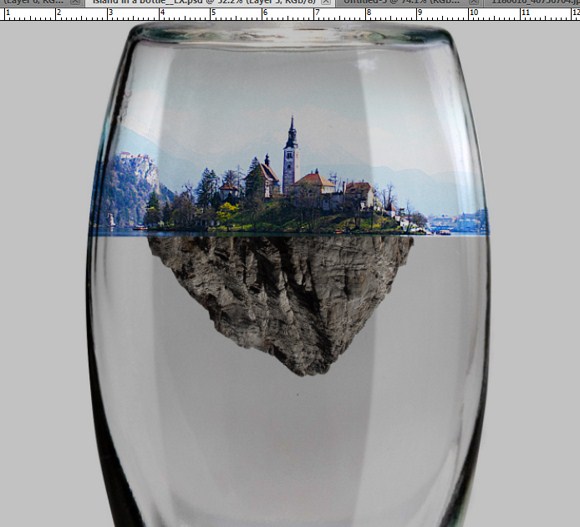
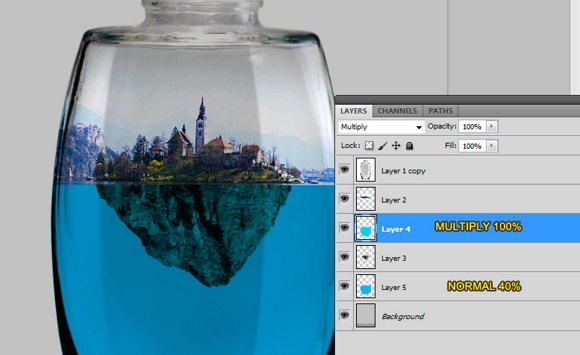
Next, we will add the water. Using the marquee tool again, select the appropriate areas where water should be only present. In the project, water should only be available below the island and strictly inside the bottle. Create a new layer for this water and use an aquatic color. You can also choose other colors other than blue. But for now let us just stick to blue water.
Create a new layer. Now, by using the SAME SELECTION, fill the selected area with a slightly darker shade of the first color used. Arrange the layers where the ROCK layer should be in BETWEEN the water layers. Set the first layer to Multiply blend mode, then the second one to normal but with 40% opacity.
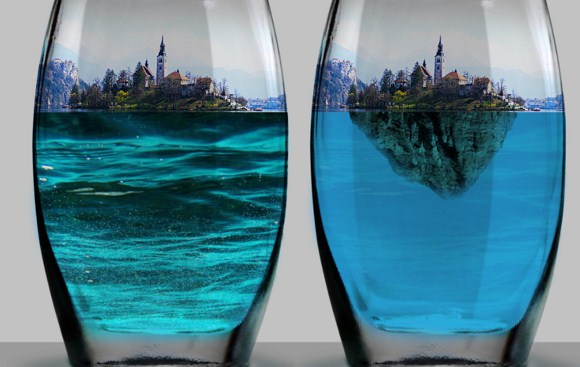
Go to the rocks layer, and with the ERASER TOOL erase softly (50 percent) some areas at the edges so that it will have depth and it will really look like it is underwater. Be careful not to erase too much.
Now we need to put on bubbles and waves. But if you can find bubble brushes on the web, which is pretty easy, you can use them in this project. Google the image UNDERWATER, and import the image in Photoshop. Transform and remove the unnecessary areas using marquee or eraser tools. Change the blend mode to SOFLIGHT with 20-30 percent opacity.
You may search again for BUBBLES or Underwater bubbles, then import the image. You can use either overlay or Softlight for bubble. Resize and place duplicates if needed.
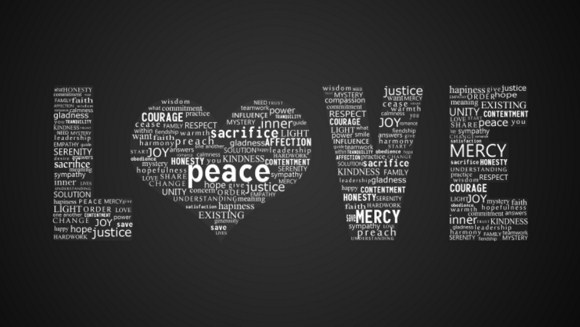
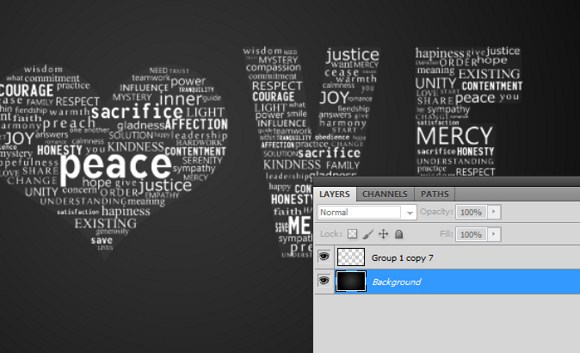
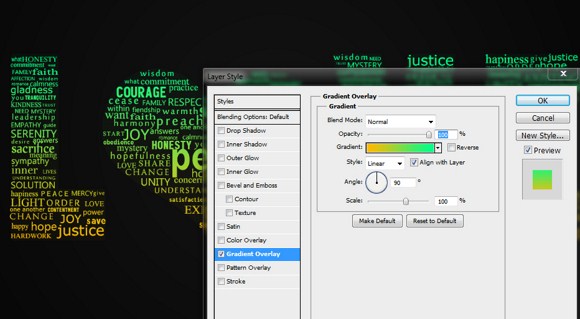
Create an Awesome Typographic Piece of Art in Photoshop

Rock Star Stamp Effect

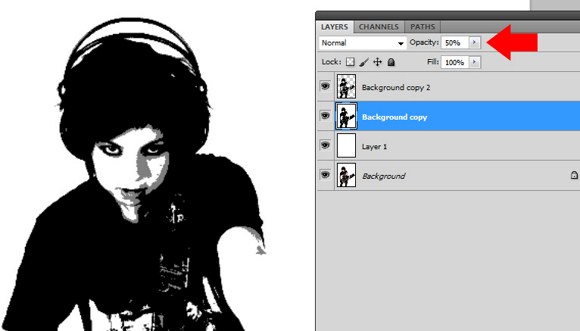
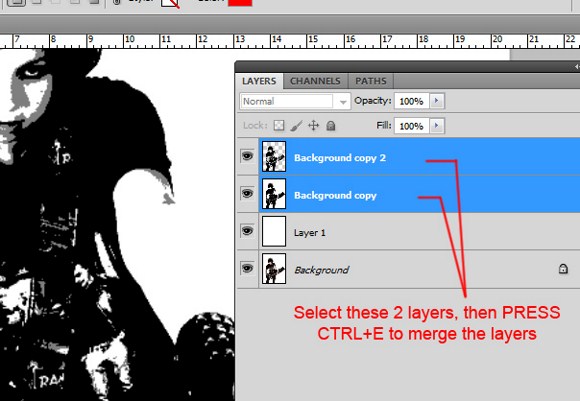
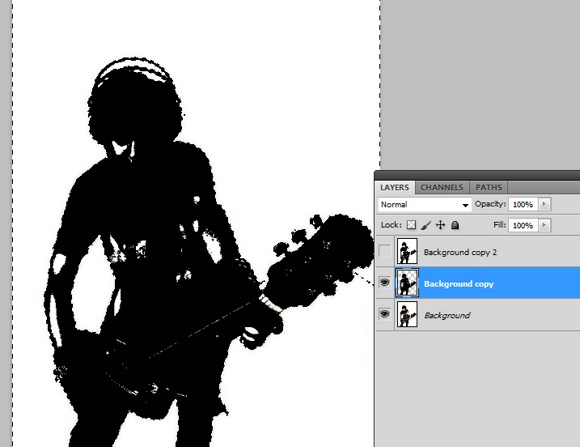
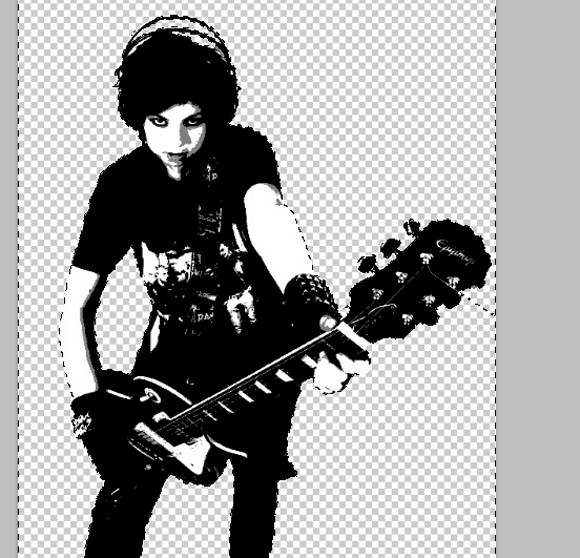
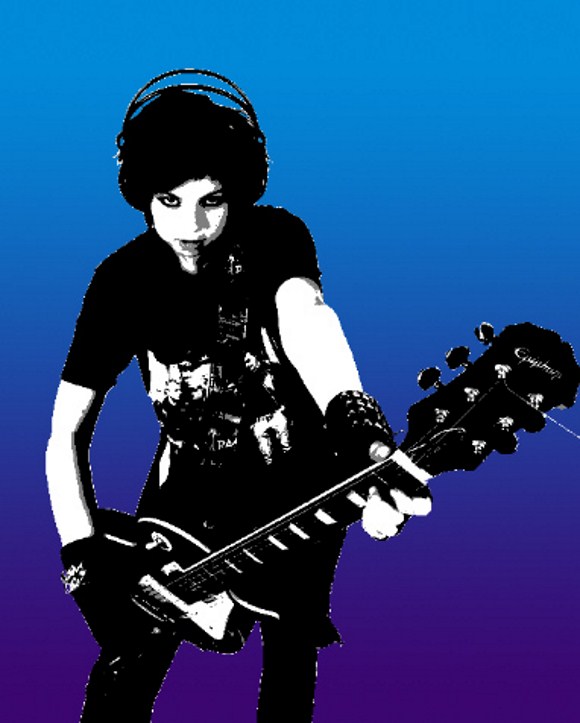
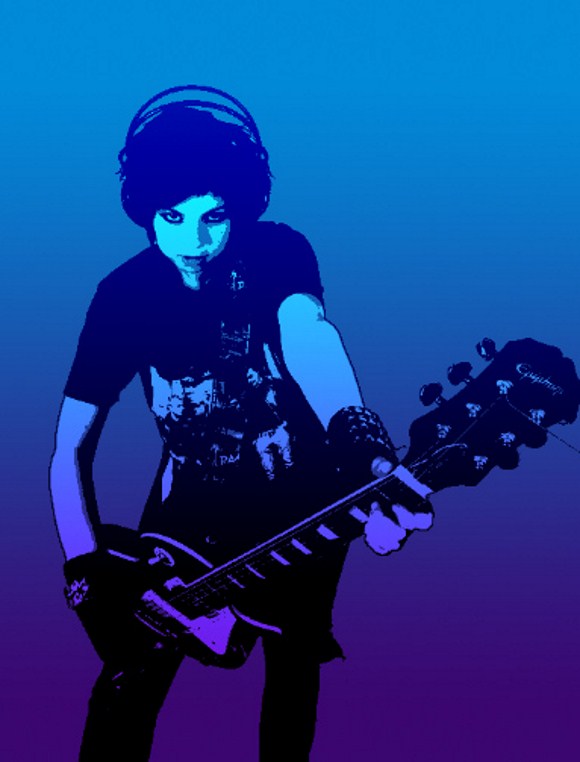
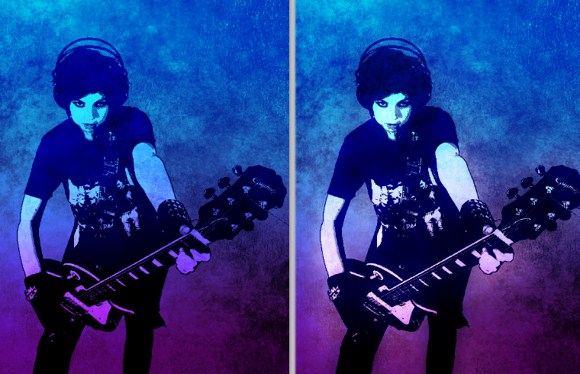
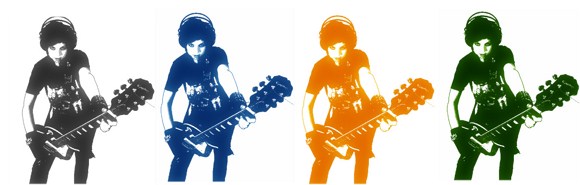
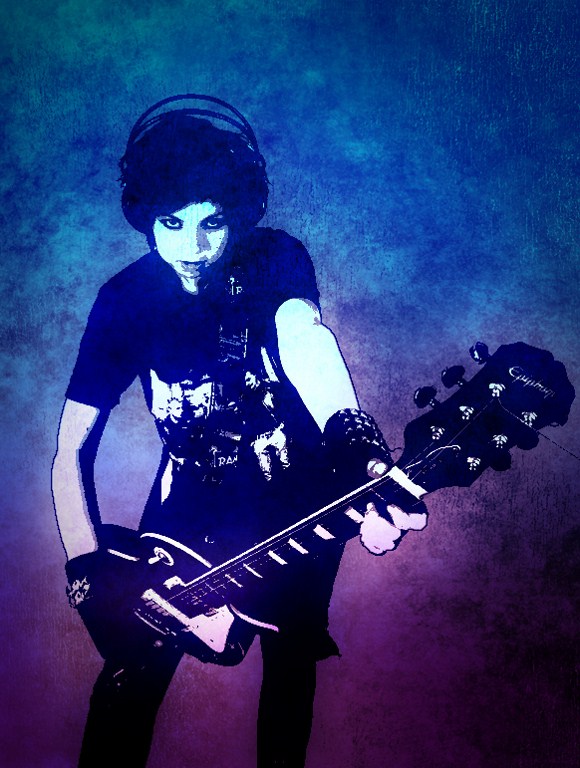
This is a really cool effect you can have a lot of fun with for web, poster, or business card design. Please share your work or ask any questions in the comments.
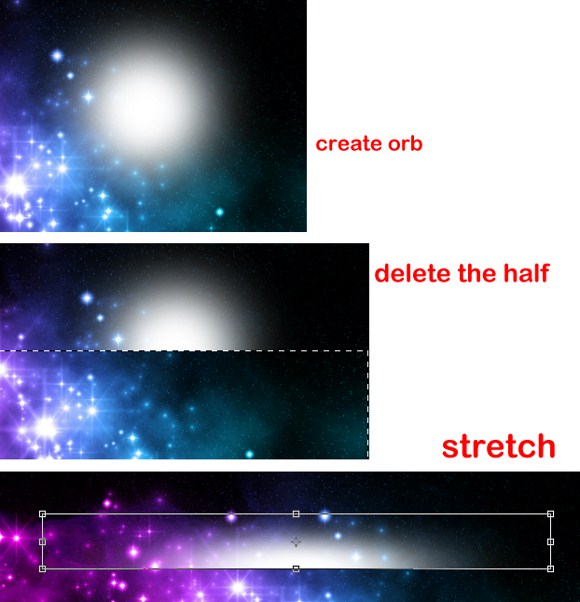
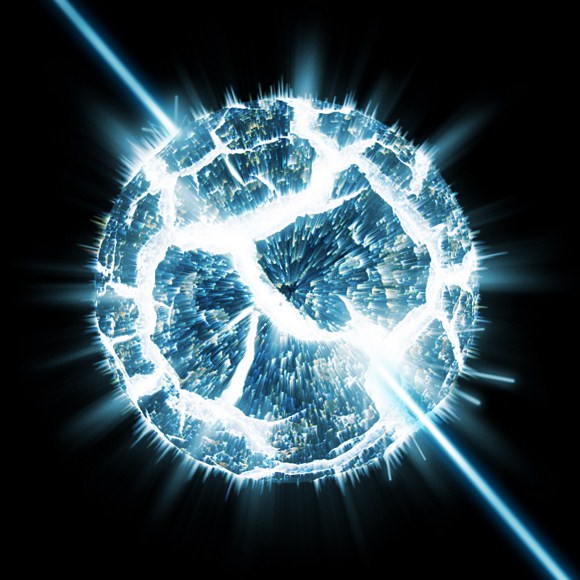
Create an Awesome Exploding Planet Effect in Photoshop
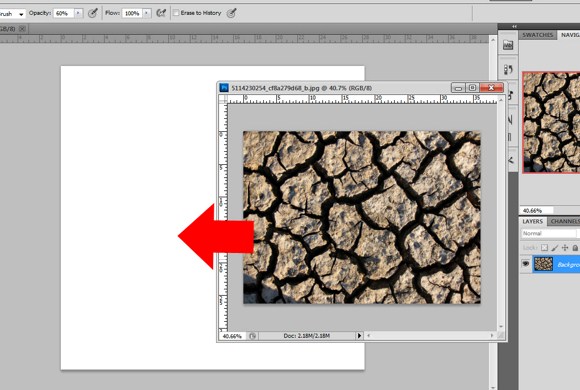
This tutorial will show you how to create an exploding planet effect using Photoshop. This effect is also used to recreate the dying star or super nova effects. This Photoshop technique is going to involve using stock photos of earth or mud cracks so it is suggested that you Google and download images for cracked mud before starting this project.
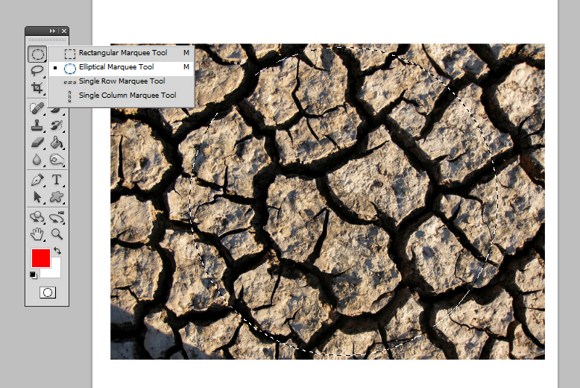
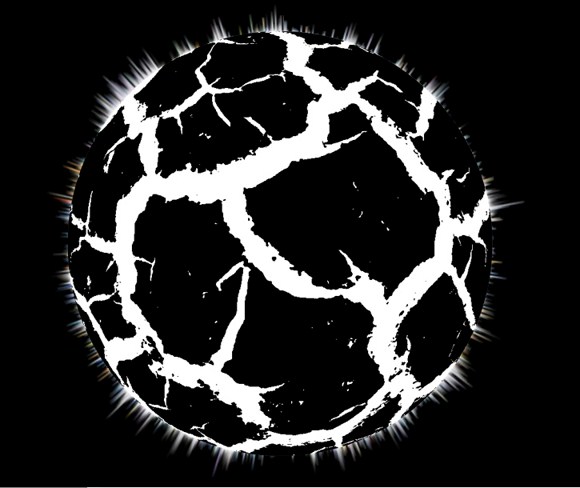
First, create a document with perfect square dimensions. A document with a 800×800 pixel dimensions should do good. If you have already found a decent cracked or dry mud photo just like below, drag it to the main document.
After you have imported the crack image, adjust the size by using the transform tool by pressing the CTRL+T. while resizing the image, you will need to press SHIFT in order to MAINTAIN the image PROPORTION.
Now click the ROUND or ELLIPTICAL MARQUEE tool and select a perfect circle on the image. Press SHIFT while select with marquee tool to get a perfect circle.
After that, press SHIFT+CTRL+I to invert the selection, then remove the outer areas by pressing the DELETE key.
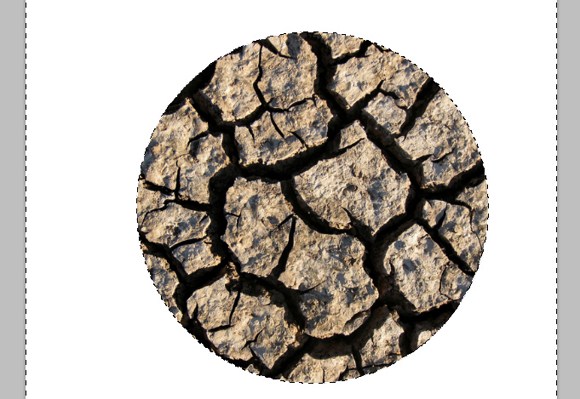
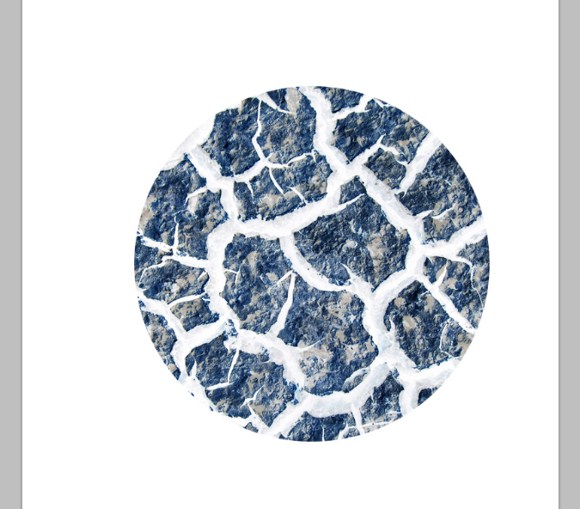
Now invert the image by pressing CTRL+I
Before you continue on the next steps, it is recommended that to move the “cracked planet” to the center. This will make the next steps easier to accomplish.
If the planet now is placed well, the next you do is go to Filters> Distort > and then click on Spherize. Set the amount to max 100 percent. Apply the changes.
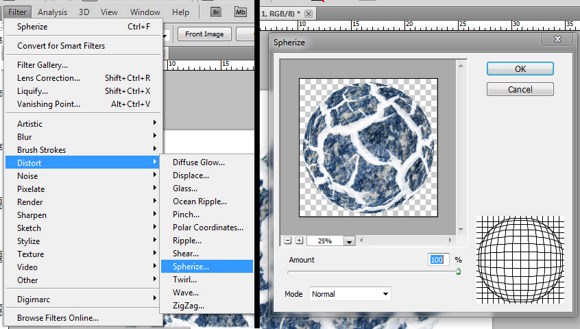
This filter effect will make the planet more 3 dimensional looking. However, if the planet still looks flat, you could apply the same effect. In the example above, I had to apply the filter effect twice to make it more planet-like.
Next, duplicate the layer, so that when you see your layers palette, you will have two layers of the same object, just like below. (you can also apply UNSHARPEN to the original planet to improve the visibility of the details.)
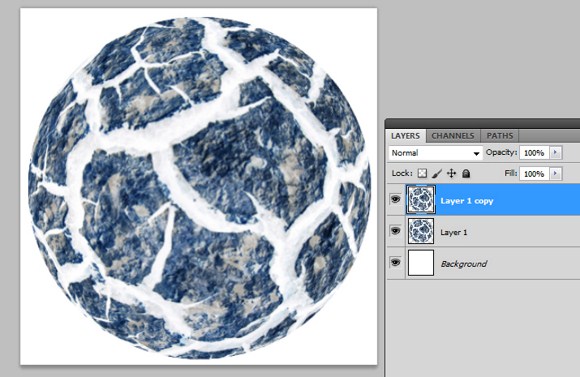
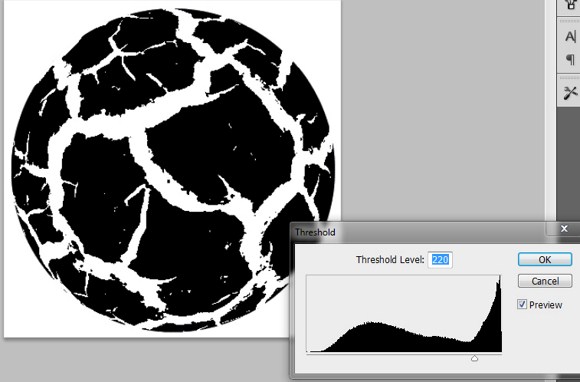
On the copied layer apply the THRESHOLD effect (Go to Image > Adjustments > and find and click Threshold).
Now select the 2 layers and then activate the TRANSFORM tool or PRESS CTRL+T while the 2 layers are selected. This will select and resize both layers, including the one with threshold. While resizing, PRESS SHIFT to maintain proportion. Lastly, do not forget to place them at the center.
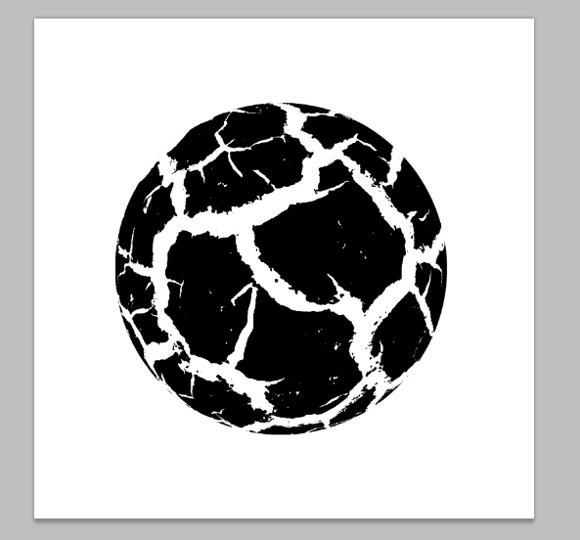
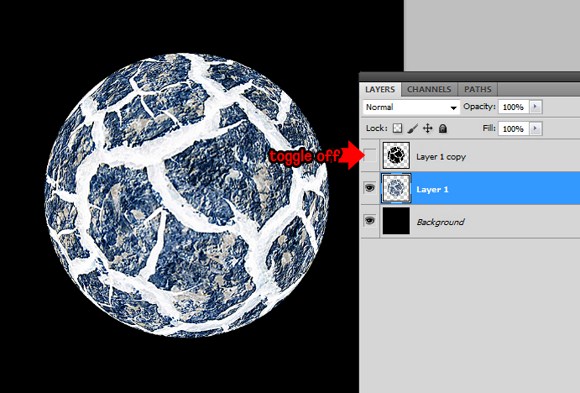
APPLY a black background using the PAINT BUCKET tool. You need it to apply it in the BACKGROUND LAYER.
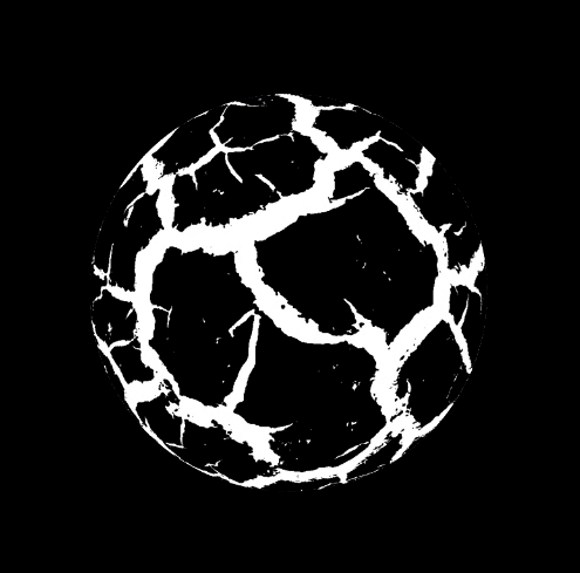
Toggle the visibility off on the threshold layer and go to the original planet layer.
(Although it is optional, Filters > Sharpen > Unsharpen Mask could improve your image quality.)
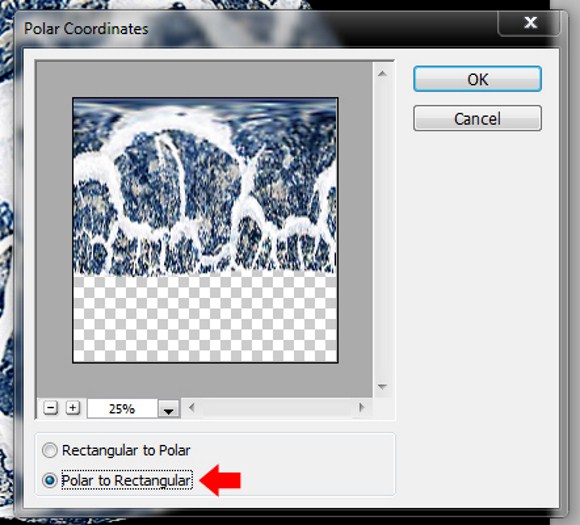
Next, go to Filters > Distort > Polar Coordinates, and apply Polar to rectangular.
Rotate the image to 90 degrees Clockwise (Go to Image > Image Rotation > and select 90 CW.)
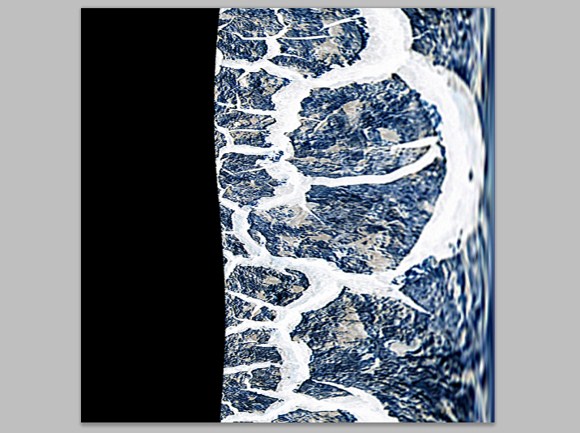
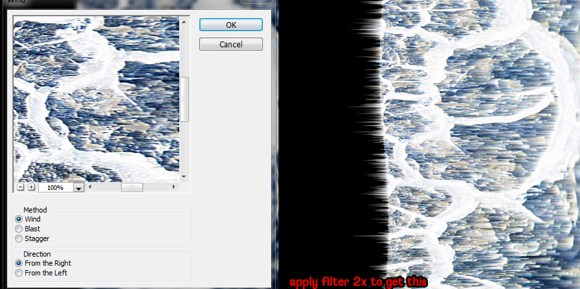
Go to Filters > Stylize > and apply WIND.
Now rotate the image again, but this time rotate it 90 degrees COUNTER CLOCKWISE (90 CCW).
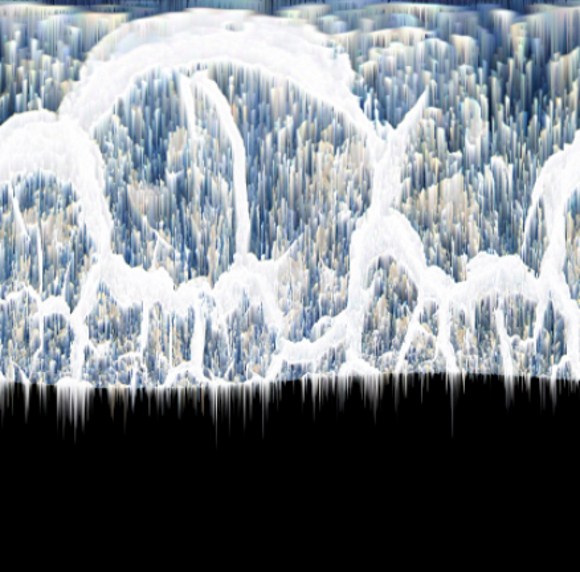
Apply polar coordinates filter again, but this time, using Rectangular to Polar.
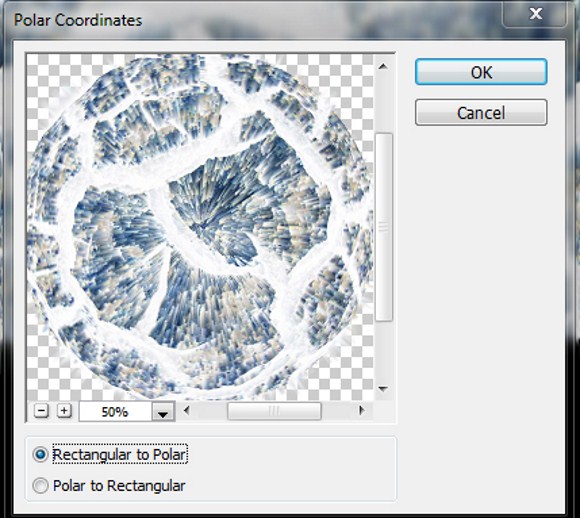
The result should look like this.
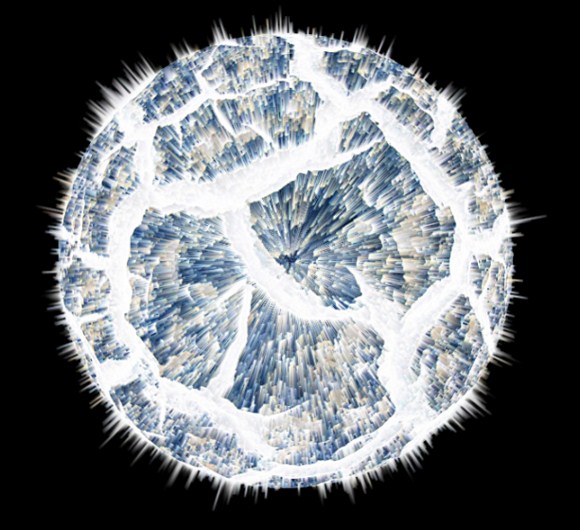
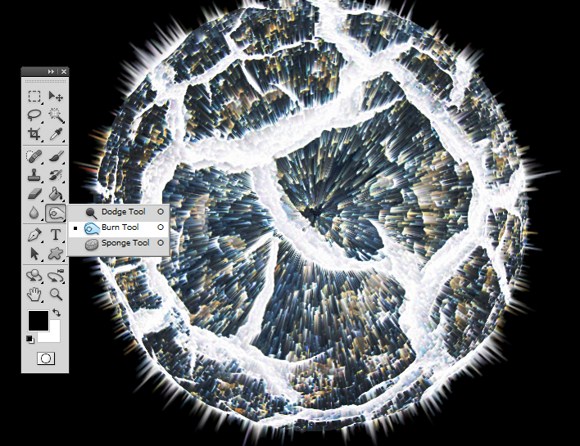
If the planet seems to be too bright, you may use the BURN TOOL to darken areas around the planet.
Now let’s make the threshold visible again by checking the visibility box. Then go to Filters > Blur > Radial Blur.
Set the amount to about 60-80. If the results are not satisfactory, you can press CTRL+F to apply the filter again.
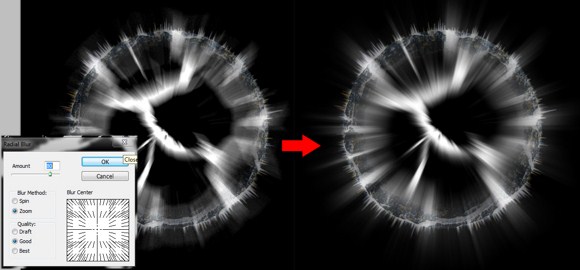
Change the layer blend to screen.
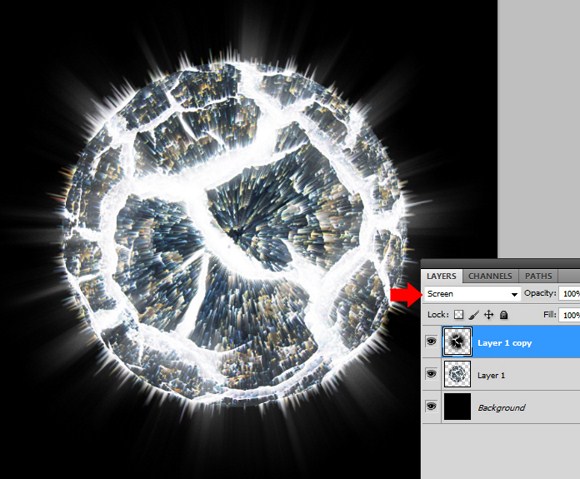
And basically we are done. You can add some more elements like longer rays or alter the main color to reddish and yellow theme to enhance the image.
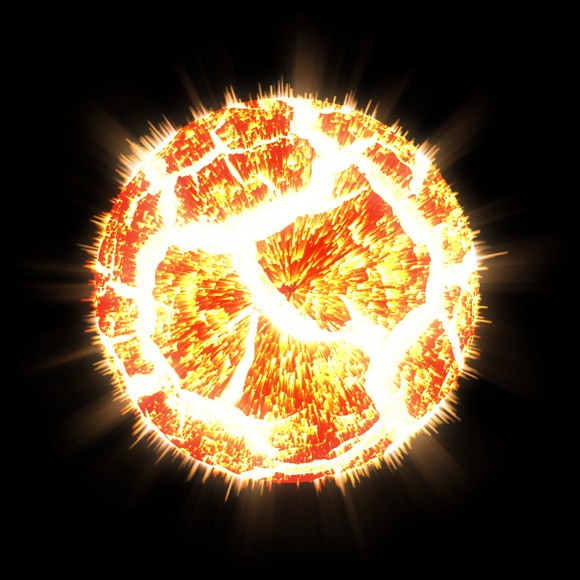
You can do some pretty cool stuff to your creations with this effect. Please ask any questions and share your works of art in the comments.