What to Consider When Going Mobile With Your Web Site
Just like any other businessman, I too have this strong desire to empower users to sign up for and buy my services any time they want, using any device that can connect to the Internet. However things such as budgeting, potential for revenue, and the type of business you have are the kind of annoying “practical” realities that always come in the way.
Therefore, I started to look at this from the perspective of the developers and see how hard it is for them to make a version of the website suitable for mobile browsers. After all, the amount of money I have to spend getting it done for me would be quite proportional to the amount of challenges a mobile web developer would face trying to give me what I want.
Moreover, once I know the kind of work my web developer would have to do on my project, I can tell whether he’s really quoting a fair price or trying to take me to the cleaners.
Purpose of the Website
Do you want people to just be able to read through your website and contact you, or do you want them to be able to do things such as purchase stuff, sign up for your services, play a game, or something else that requires a higher level of user interaction?
This will also decide whether the developer has to just design a bunch of web pages for optimal viewing on hand-held devices, or whether he has to create some kickass application that people should be able to access and use easily on their tiny screens.
Even if you’re not up for a complete mobile store, I would at least allow my subscribers to receive regular updates for all the current stuff going on with the company – promotions, offers, contests, or anything else that can be valuable for the customers who have agreed to receive such information.
For example, if receiving calls from customers is something you absolutely need for your business, why not give them an easy-to-use website where they can easily locate a clickable number? Imagine having to wade through your mailbox to find a vendor on one hand, and having a simple URL from where all you have to do is click in order to dial! I would choose the latter as a customer any day of the week.
Which Mobile Devices to Support?
Ensuring your website strictly follows the standards that are implemented in the phones with the highest market share should be the first step. Because believe me, as much as you want everyone to be happy, there are nearly 43 million or so smartphone users in the US alone. Here’s a chart from the Neilson company’s presentation earlier this year:
In other words, whether you or not you want to include all the mobile phone users in your plan, you definitely don’t want to leave out the guys who use the iPhone, the Blackberry, or the ones with Microsoft Windows Mobile devices.
Now, making something compatible with more devices means more complexity. Which means more effort for your developer, and most probably, more cost for you.

Mobile Browsers to Support
Once you’ve decided which phones you’d like to support, you also have to know that each of these phones is capable of using more than one browsers. Here’s a graph from StatCounter for the market share of mobile browses for the past year:
As you can see, Opera, and the default browsers for iPhone, Nokia, and Blackberry are the top contenders. Android seems to be catching up soon as well. Therefore, your website needs to be able to support all these browsers if you’re going to create a portal that can reach out to most of your customers.
The Existing Website
Does your existing website rely heavily on Flash or is graphic-intensive? If so, that’s going to be another challenge for your web developer. Apple has been quite notorious about their policies with flash, which means that as much as you may hate their guts for this, you can’t really ignore the large market share iPhone has and the fact that you need to create alternate solutions for these users.
Moreover, bandwidth is still a constraint for many mobile users. Therefore, you need to ensure that while you need to preserve the look and feel of your website, you can’t overburden your reader with the cost of displaying all that content. You’ll probably have to work on redesigning your web identity to fit into the world of mobile phones while ensuring that you retain the most essential elements of your brand.
You might want to do this in conjunction with your web developer, because based on their recommendations, you would have to come up with a suitable strategy; you wouldn’t want to create a whole new plan only to later find out that you can’t quite implement it, right? This may even increase the time required for development significantly.
Implementing Marketing Tactics
You may want to consider whether you’d like to implement some marketing tactics such as sending offers to people as texts — if that’s legally allowed in the region you’re targeting and if your subscribers have agreed to receive such updates. For example, SMS marketing is a major thing in India — the whole of Asia and even Europe as a matter of fact — at the moment. If the market you wish to target has scope for this, the right kind of SMS marketing coupled with a mobile website that is ready to accept orders could make a killing for you.
To sum it up, creating a mobile site for your business is definitely a great strategy and something nearly all kinds of modern-day businesses could use. However, it is nearly not the same or easy as having your usual website created. Moreover, it’s not something you have just for the sake of it like so many businesses do with static web pages they do not change for decades. If you want to corner this booming market of smartphones, you need to do a lot more than just create a web design concept or hire a good developer. It’s a akin to creating a new division in a real-world business, and you need to be just as careful and diligent with it.
How important do you think it is to have a mobile version of your site? We would love to hear your feedback in the comments.
Computer Programming Skills That Will Put You in Demand
A few days ago, the guys over at LangPop.com did a survey on the most popular programming languages based on the number of Internet pages on which each language was mentioned. Of course, as they admit it too, it is a fairly crude method; nonetheless, it is interesting to see which language has the highest footprint — so to speak — on the Internet.
It’s fascinating for a guy like me — someone who’s familiar with the concept of a programming language, knows to do kid’s stuff such as create a Fibonacci sequence in a few languages, and that’s about it — to see which of the languages are creating the most buzz these days.
So I figured I’d put together some information for guys who are interested in entering software development but aren’t sure which language to study.
Here’s the overall result of the analysis done at LangPop.com:
- Java and C scored nearly the same — Java managed to beat C by a very less margin
- C++ was right behind them
- PHP and JavaScript came in at 4th and 5th respectively, however, I doubt many people would be talking about desktop application development in terms of PHP
- Therefore, we’ll consider the next two languages on the list: Python and C#
Java
 The basic purpose of developing Java was to allow programmers to run their applications anywhere without having to further modify them for each system. This concept is called as WORA: write once, run anywhere. This is done with the help of a Java Virtual Machine, which is basically software that creates a virtual computer environment on your computer enabling it to run any Java application.
While this language was developed at Sun Microsystems by James Gosling, the best part about it is that Sun recently relicensed most of the Java technologies under the GNU General Public License, which makes it free and open for anyone to develop.
Salary Potential
The salary offered to a senior Java developer could be around $130,000 or more, where on average a relatively inexperienced developer could make anywhere around $65,000 to $70,000 a year.
Resources
JavaBeginner.com has an exhaustive list of tutorials for someone looking to learn all the basics of Java starting from its introduction to Java Swing.
C
 C has been the most popular programming language for the better part of its history, and any code written in C can be compiled on almost any system.
Developed by Dennis Ritchie at Bell Labs in 1972, C has influenced in some way or another the development of a number of other programming languages such as C++, Java, Python, Perl, D, and Limbo.
Salary Potential
On average a good C developer can get over $90,000 per year.
Resources
Cprogramming.com is a good resource for those looking to learn C.
C++
 C++ is one of the most widely-used programming languages for systems as well as application software, drivers, high-performance applications, and video games.
The language started off as an extension to C in order to add classes and other features such as operator overloading, multiple inheritance, etc. until a C++ programming language standard was finally ratified in 1998.
Just like its predecessor, C++ has influenced many popular programming languages such as Java and C#
Salary Potential
A C++ developer can earn around $100,000 a year.
Resources
Cprogramming.com is a good resource for those looking to learn C++. Another good and free resource is LearnCpp.com that has an exhaustive list of topics covered.
Python

Python was developed by Guido van Rossum in the Netherlands for the Amoeba distributed operating system. However, Python compilers are available for nearly every operating system, and this languague has gained considerable popularity in the recent years.
The most unique aspects of this programing language are that it has a very rigid yet extremely simple syntax that uses indentation for block delimiting, and the overall practice of the community to enforce the “there should be one — and preferably only one — obvious way to do it” principle as against the “there is more than one way to do it” approach that most other programming languages use.
Python has been used a scripting language for a number of web applications, video games, and many popular tools such as Google docs, the original BitTorrent client, and even YouTube.
Salary Potential
A Python developer on average earns around $90,000 per year.
Resources
The Python Tutorial on www.python.org is probably one of the best places to start for learning this fun programming language.
Other useful resource for learning Python is the book “Dive Into Python” by Mark Pilgrim, which is available for free from http://diveintopython3.org/
C#

C# was created by the big daddy of all proprietary operating systems, Microsoft. Anders Hejlsberg first started the development of C# in 1999 at Microsoft and continues to lead its development to this date.
While C# does have a few alternative free and open source compilers, the Microsoft Visual C# is considered as the reference compiler for C#.
While the programming language has been approved as a standard by Ecma and is used by a number of organizations, there are many people who have criticized it for being derivative with little innovation.
Salary Potential
On average, a C# developer earns around $90,000 per year.
Resources
The Visual C# Developer Center on the MSDN network mentions a number of resources and has some tutorials for newbies.
www.csharphelp.com is another popular resource for beginners.
This is a cursory overview of the popularity of programming languages, however, there are also a number of aspects of application development that determine what language needs to be used for it — for example, if someone is looking to create a web page, they would probably choose PHP, Python, or a Ruby on Rails framework over any other language. Therefore, if any of you readers can shed some light on the aspects of desktop app development that may warrant the use of a specific programming language, I invite you to share it in your comments.
Freelance Your Way to the Top with these Tools
It’s no secret that small businesses make up a major part of any developed country’s economy — including that of the US despite the fact that it has some of the biggest big-business giants in the world. And the good news for all these great guys is that with the advancement of IT (Information Technology), it’s getting ever more easy to manage their businesses.
This is great news for those who are looking to get out of day jobs and start their own businesses. All they need to do to set up a groundwork for a small freelance business infrastructure is install a few apps and get used to how they work. Of course, marketing and creating a good reputation is important for any business; however, for the purpose of today’s article, I’ll focus on the support system that any freelancer would need to handle the non-core aspects of their business.
To begin with, let’s look at the different things that you generally have to do to support your business activities:
- Creating a Website
- Managing your Finances
- Creating Letters and Documents
- Managing documents and collaboration between teams
- Managing email aDropbox:ccounts
Here are the different applications for each category and a short review for each of them:
Creating a Website
 Joomla!: This is a powerful open source Content Management System that has extensive online support and a number of themes available online. However, despite its easy-to-use interface, it is quite laborious to use. For example, in order to create a blog, you need at least 3-4 different extensions to ensure you can display archives, have social bookmarking enabled, allow multiple categories assigned to each post, etc.
Therefore, if you have a website that’s more content intensive, I would strongly recommend using WordPress.
WordPress: This is by far one of the easiest Content Management Systems to use. For example, I had the content ready for a trial website my sister wanted to create for her upcoming business: www.process3solutions.com. It took me less than 45 minutes to get this up and running on WordPress.
Managing Emails and Scheduling
 Evolution: This is a powerful email and calender application the comes with default on Ubuntu Linux. However, the only reason I don’t like to use it is because it doesn’t allow me to define my own fonts for outgoing messages. I know, many people scoff at the HTML format for sending emails, but it’s important for me. That’s where Evolution doesn’t quite cut it for me.
For those of you who don’t mind its lack of formatting features, it is the perfect solution for all your email, tasks, and calender needs as it integrates right into Ubuntu’s task management system.
For a more cross-platform solution, I highly recommend Mozilla Thunderbird.
Thunderbird: This email app blows MS Outlook right out the window in terms of stability and support for IMAP email. I have used it for nearly 3 years now, and I couldn’t have been happier. A small plugin called Lightning can added calendering and task-list capabilities to it in no time and works like a charm for your regular email and time-management uses.
Thunderbird’s smart settings detection makes creating new accounts a matter of seconds. It also has one of the most impressive spam detection — again, it is leagues apart from anything Outlook offers — and it’s search filters are equally impressive.
Managing your Finances
 GnuCash: This is one of the most extensive free accounting applications available on the market today. It comes with an excellent and detailed manual that I recommend for anyone trying to manage their own accounts – regardless of whether they choose to use GnuCash or not. The main reason for this is that the manual takes you through an excellent and easy tutorial of all the basic accounting concepts that can be used even to create your own books with pen and paper.
And if you’d like a little less complicated interface with similar capabilities, I would recommend another application that is also cross-platform and free, HomeBank
HomeBank: This is a free application that aims to provide a simpler user interface with capabilities similar to GnuCash. While I haven’t extensively used this application myself, I am planning to use it for a smaller section of my household expenses to give some of these features a test run:
- Its budgeting capabilities
- Reports it can generate
- Tagging transactions
- Automating transactions
- Transaction reminders
Creating Letters and Documents
 OpenOffice.org: This is the best free office suite, period. Nothing comes even close to the kind of features, stability, and cross-platform compatibility that OpenOffice.org offers. Hopefully, the tradition will continue with the creation of LibreOffice.
I was keenly looking forward for the project to step out of Oracle’s shadow and create an independent entity that continues to do the job without worrying about whether Oracle will choose to support them or not.
Online Office Suites: While Openoffice.org is the best free office suite, it’s possible that you may receive a file with such heavy MS Office-based elements that OpenOffice.org can’t map successfully. In such cases, online software such as Zoho Docs, ThinkFree Office, or even Google Docs can come to your rescue.
While I wouldn’t recommend using these online apps for all your documentation needs, they are definitely something you should have access to at all time.
Managing Documents and Collaboration
 Dropbox: This is one of the best application that helps you synchronize your stuff across multiple workstations and share things with your friends or colleagues.
With a simple daemon that sits quietly in your system tray, Dropbox keeps synchronizing every single change you do to the folders and files it is asked to watch. Each change is recorded separately as a version update and is available to you at all times even if you have deleted or moved the file — sort of like the Time Machine in Mac OSX.
The best part about Dropbox is that you can choose the bandwidth you’d like to allot for its synching activities. Moreover, it transfers only the changes to your files rather than the files themselves, which makes it very bandwidth-efficient.
Once the synch with the server is complete, the moment you start working on the other computer, all the changes will automatically be downloaded with the exact same directory structure so that you don’t ever have to email yourself another document again.
Apps for Invoicing
 For the purposes of my business, I have my own templates created in OOo Calc and Writer, which works well for me. However, for those who’d like to automate this process, there are a number of great and free applications you can choose.
In fact, GnuCash does this job quite well if you’re not looking for a jazzy invoice full of images and watermarks.
Other apps you could give a try are as follows:
- FreshBooks
- CurdBee
- Mint (this also serves as a great accounting tool)
The mistake most new business owners do is that they focus only on the core aspects of the job and do not pay enough attention to the rest of the necessary evils required to run a business successfully. They think that the rest of the stuff can be taken care of along the way. The problem with this approach is that once you get to work, things could get so busy that you never get enough time to set the rest of the stuff in order.
In other words, you would end up doing all your accounts at the end of the year without knowing about how many things you’ve lost track of along the way, you would have basic invoices that aren’t very professional, you wouldn’t know what kind of tax laws apply to your freelance activities, and you may end up paying a lot of money to consultants to help you with the mess that could have been avoided with a little planning at the beginning.
Create a Killer Document Template in OpenOffice
As you probably already know from my article on Windows vs Linux, I’m a Linux guy. I simply love the kind of things I can do on my Linux box using all free and open applications such as Firefox, Thunderbird, GnuCash, Rhythmbox, and most importantly, OpenOffice.org .
I have always had a special affinity for Office applications because of the beautiful documents, spreadsheets, and presentations they allowed me to create. My first job was in a BPO, and if you don’t know that already, these organizations thrive on productivity apps such as MS Word, Excel, and PowerPoint. I daresay that if for some reason all spreadsheet apps stopped working, most of these organizations would end up in utter chaos.
So when I switched from Windows to Linux, I took this love for documentation to OpenOffice.org. While it was a bit difficult at first, I see now that I can do nearly everything here that I could on MS Office. I agree that MS Office 2010 has a number of inbuilt features that let you do a number of things faster; however, OpenOffice.org can do just as good a job when it comes to creating beautiful documents if you know your way around it . And it’s not hard to do that at all.
To illustrate this point, I’ll show you how to create a simple yet elegant document template that can be used to create documents with consistent styling and visual elements. Even if you don’t like the particular colors and fonts I have used here, that’s OK. My main intent is to show you how to customize your page elements to suit your needs. Beyond that, let your creativity guide you in terms of other details.
Inserting Dummy Text
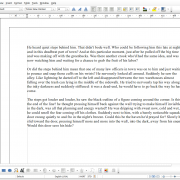
Nothing about formatting starts without dummy data. In OpenOffice.org, it’s very simple to generate it. Simply type “dt” and hit F3. It will populate your page with a bunch of text that you can break down into a few paragraphs.
Defining Your Styles
Every Document should have style definitions for a minimum of four elements:
Heading 1
Heading 2
Heading 3
Default Paragraph
These are the most highly used elements in any document, and therefore, it makes sense for us to define them before we do anything else.
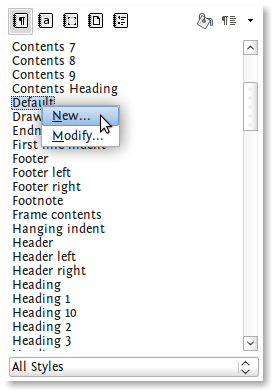
Go to “Format” and click on “Styles and Formatting”. As a result, the following window pops up.
At the bottom of this window, there’s a dropdown list. In this list, select “All Styles” in order to see all the paragraph styles available to you.
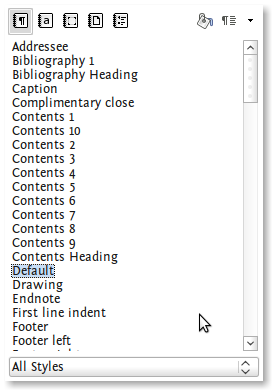
Creating Custom Paragraph Style
Scroll down to “Default” and right click on it. On the menu that shows up, select “New” as shown in the image below.
Once you click that, a new window shows up on which you can create your new style based on the “Default” style already present in the default document template. The reason why I right-clicked on “Default” is because this style is associated with paragraph text and has many settings such as font details, alignment, etc already set to what we want. That makes our job of defining a new style that much easier.
In the image below, I’ve named the new style as “Work-Default”. Feel free to give it whatever name you want. In the dropdown list for “Next Style”, I’ve chosen the same name “Work-Default”. What this means is that when I hit “Enter” after completing a paragraph in the style “Work-Default”, it will start my new paragraph with the same style — “Work-Default”. If I had chosen “Heading 1”, it would start the new paragraph as a Heading 1.
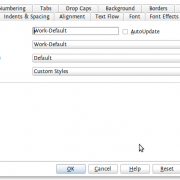
Here are the other definitions I have used for this style:
Font: Liberation Sans 10 point
Font Color (in the Font Effects tab): Gray 80%
Spacing: 6 pt above and below paragraph
Line Spacing: 1.5 lines
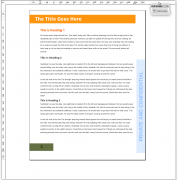
Here’s how my default font looks now:
Creating Custom Headings
We do this in a similar way as we did for the default paragraph text. You just need to keep a couple of things in mind though:
- Start with a new heading by right clicking on the corresponding default heading style already present in the document. Therefore, for creating a new style “Work-Heading 1”, you should start by clicking on “Heading 1”. This will also save you a lot of trouble when creating a table of contents automatically.
- For “Next Style”, always choose your newly-created style “Work-Default”. This will ensure that the moment you’ve written your heading and hit “Enter”, the new paragraph will automatically have the style “Work-Default” instead of “Work-Heading 1”. This will save you the trouble of manually selecting “Work-Default” every time you start a new paragraph after a heading.
Here are the font definitions I’ve used for my Headings:
Heading 1
Font: Droid Sans, Bold, 16 Point
Font Color: Ubuntu Orange
Heading 2
Font: Droid Sans, Bold, 14 Point
Font Color: Gray 80%
Heading 3
Font: Droid Sans, Bold, 12 Point
Font Color: Gray 80%
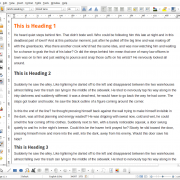
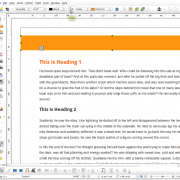
Here’s how the page looks with the dummy text and Headings:
Adding Visual Elements
Title Box
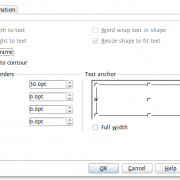
Click on “View –> Toolbars –> Drawing”. This will show the toolbar with options to create shapes and other stuff at the bottom of your OOo window. Now go to “Insert –> Header –> Default” and then “Insert –> Footer –> Default”.
This will create sections for adding a Header and Footer to your document. Now choose the rectangle drawing tool and create a rectangle at the top of the page as shown in the picture below:
Choose “Invisible” for its outline, and the area color as “Chart 10”. Ensure that the anchor of this box is in the “Header” area. This will ensure that the orange box will appear at the head of every new page you create henceforth.
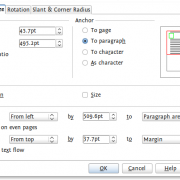
Here are the size and position specs of this box:
Now we can insert our text in this box — which forms the title of the document. Here are the font specs I have used for this:
Font: Droid Sans, Bold, 26 Point
Font Color: White
Position: (see image below)
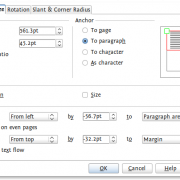
Extra Information Watermark
Using the same rectangle tool, create a box and type “Private and Confidential” in it. Again, ensure that its anchor point is either in the Header or the Footer so that it shows up on every page.
Choose invisible border. For its area, I created a new color with the profile: R-147, G-192, B-255; and I named it “Work-Watermark”. I also chose the transparency of this box area at 50%. In order to access these settings, simply right click on the rectangle and choose “Area”. A window pops up with various tabs, one of which says “Transparency”.
For the text inside the box, I chose the following font specifications:
Font: Liberation Sans, Bold, 26 Point, All Caps
Font Color: Work-Watermark
I also changed the text rotation to 90 degrees in the “Position and Size” window. You can do that by right-clicking on the rectangle (not the text inside) and choosing “Positiong and Size”.
Here is some more information about the position and size of the box:
Here’s how the rectangle looks like now:

Page Numbers
Put your cursor at the beginning of the Footer and go to “Insert –> Fields –> Page Number”. This will insert the Page Number field onto your footer. Choose the font specs as follows:
Font: UnDotum, Bold, 24 Point
Font Color: Chart 7
Now create a rectangle using the rectangle tool with the following specifications:

Choose invisible border and “Chart 7” as the area color. Also choose 25% as the transparency setting.
Here’s what the entire page should look like now:
And that’s it. Now save this file as “ODF Text Document Template (.ott)” in the path “.openoffice.org/3/user/template/. I’ve named it as “Work-Template.ott”.
The next time you wish to create a document using this template, all you need to do is start the main OpenOffice.org program, and click on “Templates”. A window opens up with a number of options as below. Choose the second option on the left that says “Templates”. Once you do that, the window shows the following information:
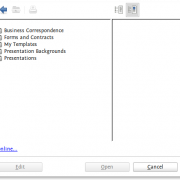
Choose “My Templates –> Work-Template” here and click on “Open”. A new document containing all your styles and visual elements will open up. Now all you need to do is start editing the text and get to work!
So you see, all it takes is a few minutes of tweaking and changing things, and you’re ready to create your unique brand of documents right away. Of course, there are a number of other elements such as tables, captions, etc. Each of these elements can be modified according to your needs using the same process that we’ve described above.
If you are truly interested in creating beautiful documents, take this tutorial as a starting point and play around with some more elements as you move along. Believe me, it will have an amazing impact on your productivity once you choose a good style for your documents and stick to it. This is very important especially if you’re looking to create a consistent brand image in every material that you send to your clients, vendors, or other business associates.
Please ask questions or share your favorite templates with us in the comments.
Microsoft Word Productivity Tips
Improving your productivity on Microsoft Word is one of the most important and the most neglected aspects of corporate life. The problem here is not that people aren’t aware of the importance of productivity; rather, it is that people aren’t aware of the fact that they are not productive. In fact, most people I have come across who say, “yes, I know how to use MS Word” usually just know about “Ctrl B,” “Ctrl C,” and “Ctrl U.” They don’t even know how much more there is to MS Word — or any capable word processing program such as OpenOffice.org.
Therefore, today I’ll focus on highlighting some of the productivity tips that can effectively make the use of mouse obsolete on MS Word for most users.
Inserting Dummy Text for Practice
In order to play around with a word processor and understand its various formatting options, shortcuts — basically, the works — it is very important to have a quick way of inserting dummy text on which you can experiment.
Luckily, the makers of Word have created a simple formula for you to achieve just that: =rand(<number of paragraphs>,<number of sentences in each paragraph>)
This means that if you write “=rand(5,4)” and hit “enter”, it will create 5 paragraphs of random text, each of which will contain 4 sentences in it.
Now you can start playing.
Selecting the Text
Doesn’t sound like much, does it? However, here are a few things that surprisingly few people know:
- When you keep the Ctrl key pressed and click on the left or right arrow keys, the cursor jumps a full word instead of a letter it would jump otherwise. This is a much quicker way of reading through each word of text while editing it
- When you hit “Shift+Home”, it selects all the text towards the left of your cursor right till the beginning of the line. And when you replace “Home” with the “End” key, it selects all the text to the right of your cursor all the way to the end of the line
- When you hit “Shift+Ctrl+Up”, it selects the entire part of the paragraph before the cursor; when you replace the up arrow key with the down one, it selects the entire part of the paragraph after the cursor
Aligning the Text
Okay, perhaps many of you already know this, but I’m sure there are some out there who would appreciate this tip:
- “Ctrl+L” aligns the text to the left
- “Ctrl+R” aligns the text to the right
- “Ctrl+E” aligns the text to the center
- “Ctrl+J” does something called as “right justification.” What this means is that the right margin of the paragraph gets neatly aligned in one vertical line just like its left margin, giving it a very polished look. Many companies prefer to use this type of alignment for all their documents
Changing the Font
Select the text you wish to change and hit “Alt+Shift+F”. You’ll see that the font box in the toolbar gets highlighted automatically. When that’s done, just start typing the name of the font you wish to apply and it will automatically suggest you the most likely option. When it does, hit “enter”.
Changing the Font Size
A number of people have different preferences for the ideal font size. Perhaps you prefer to keep things in “Arial” point 10, while the person sending you the document may not have graduated from the default “Times New Roman” point 12. Not that I’m suggesting it’s a bad font; it’s just that none of the corporate entities I’ve known ever keep it as their default font for paragraph text.
In such cases, once you change the font back to Arial using the previous tip, keep the selection of the text on. In case you’ve lost that, select the desired text again, and hit “Ctrl+[”. This will reduce the font size by one point. Hit it again to further reduce the size. In order to increase the size, you need to hit “Ctrl+]”. This does the exact opposite and increases the font size by one point.
More Comprehensive Font Formatting
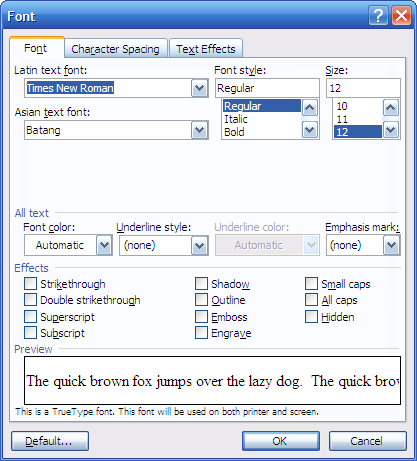
It’s possible that you need to do more than just change the font type and size. For example, you need to use Small caps or have more effects applied to the text. There’s a simple way to find all those options — just select the desired text and hit “Ctrl+D”. This will open up a dialog box using which you can apply a whole bunch of formatting options to your text.
Shortcut for Headings
Are you one of those who just bolds the text and increases the font size in order to create a heading? Don’t do that for three reasons:
- it’s really cumbersome to do it manually every time
- you can’t create a table of contents (TOC) from those headings automatically, and
- it’s really lame
Did point “b” grab your attention? Yes, if you use the built-in or user-defined heading styles in your document, you can create an entire table of contents automatically. This automatically generated TOC creates hyperlinks on the headings so that you can navigate to any point in your document by simply clicking on the required heading in the TOC. It also automatically updates the page numbers and the text for those headings should you happen to change something in your document at a later point. How cool is that!
Now let’s start with the actual shortcuts:
- Heading 1: Ctrl+Alt+1
- Heading 2: Ctrl+Alt+2
- Heading 3: Ctrl+Alt+3
By default, shortcuts for headings are available only till Heading 3; and for the most part, that is more than enough. You rarely ever require a Heading 4; and if you do, you can select it from the style menu in the toolbar at the top. Since Heading 4 is not as frequently required, there’s not much loss or gain in productivity either way. Of course, you can always create your own custom shortcut for it if you think it’s important for you.
Eliminating Double Paragraph Spaces
Have you noticed that a number of people who do not know or do not care about defining the paragraph spaces just leave a blank line between two paragraphs. However, if you’re one who does care about that and have just received a file from someone who doesn’t, you’d end up with a mile-long gap between the paragraphs with your settings.
In such cases, it’s very easy to fix things using the “Find and Replace” function. Hit “Ctrl+H” on your keyboard, and it will automatically pull up the find and replace dialog box. In the “Find” field, enter “^p^p”, and in the “Replace” field, enter “^p”. You have probably guessed that “^p” stands for the “end of paragraph” character. In other words, what our little operation does is replace each of the two “end of paragraph” symbols with one, thus eliminating all the blank lines in your document. To execute this command, hit “Alt+A”, and it will do the replacements throughout the document.
AutoFormat the Entire Document
Most organizations have their own styles requirements, for example, some organizations discourage the use of smart quotes and other special characters such as an ellipsis, an em-dash, etc. However, that may not be the case with your organization. And when a person from such an organization sends you a document, it could stick out as a sore thumb among your other documents.
In such cases, having pre-defined autocorrect options can save you a lot of time. You can change those options by hitting “Alt+T+A”. A window pops up with a number of tabs in it.
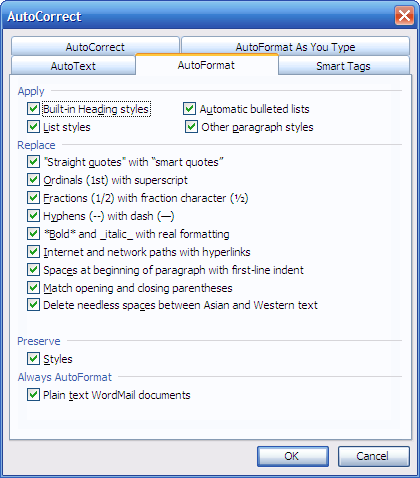
Select the “AutoFormat” tab and you’ll all the options that can be automatically applied. Once you selected all the changes you want to apply, close that window and hit “Alt+O+A”. Here’s a window that opens up once you do that:
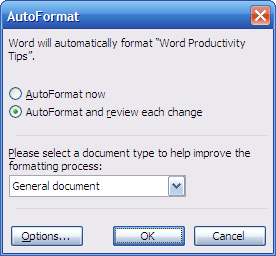
Here, if the second option “AutoFormat and review each change” isn’t already selected, I strongly suggest you select it. As soon as you hit “enter”, Word will automatically do all the replacements –straight quotes with smart ones, two hyphens with an em-dash, three dots with an ellipsis, etc. It will also give you the option of reviewing each of the changes, and accepting or rejecting it as per your requirements.
Even when dealing with single page of text, this option can save you a number of valuable minutes.
Changing the Case
Okay, how many times have you seen unscrupulous people create headings with the wrong case? For the most part, they need to be in something called as “Title Case,” don’t they? In other words, “Microsoft word productivity tips” should be written as “Microsoft Word Productivity Tips” when it’s the heading of a document.
Sometimes, it could also be the other way around where you need to change a piece of text to all caps, or make it all in lower case.
In MS Word, you can easily do that by selecting the desired text and hitting “Shift+F3”. Every time you hit this combination, it changes the text in this order — all caps, all lowercase, title case. In other words, if your selected text is in all caps already, it will first change it to lowercase, and if you hit the combination again, it will change it to title case.
When trying to change the case for a single word, you do not even have to select the entire word. Just ensure the cursor is somewhere on the word — the beginning or the middle — and hit “Shift+F3”.
Going Back to the Default Paragraph Style Setting
When you’re making some formatting changes to a paragraph and you realize that you’ve done something wrong. In such a case, most people would end up hitting “Ctrl+Z” a bunch of times till the text goes back to the way it was earlier.
However, there’s a shortcut that can help you do that in less than a second. All you have to do is select the whole paragraph — or the part you need to change back — and hit “Ctrl+Spacebar”. This will change that text back to the default paragraph style that was applied to it when you started out.
This works for Headings as well. If you select to a “Heading 1” type of text and hit “Ctrl+Spacebar”, it will go back to the default Heading 1 formatting of the style that was initially applied to it.
Inserting Table of Contents
Once you’ve written the entire manual or report, perhaps it’s time to insert the table of contents. You can do this by using this combination — “Alt+I+N+D”. This will open up the following window:
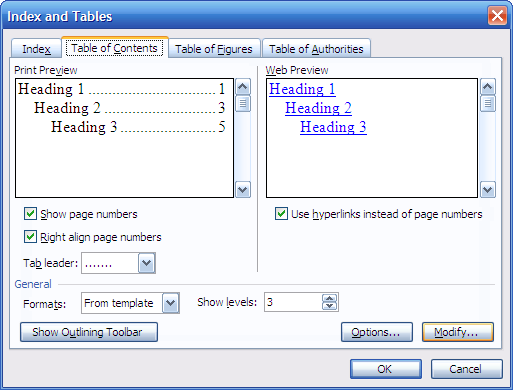
In case you have Word 2007 or 2010 and would like to do this using your mouse, you can go to the “References” tab and use the “Table of Contents” group. In case you have used the default styles, simply going with the default options will create a neat TOC for you where the cursor is in the document.
I hope you find these tips useful. Of course, I have barely even scratched the surface when it comes to all the things you can do in Word such as inserting references, inserting tables automatically, creating your own templates, creating your own shortcuts, inserting fields, headers and footers, page layouts, and much more.
Many of these topics justify an entire dedicated article on each of them; therefore, I couldn’t include all of those in this post today. Perhaps some other time.
Until then, here’s to a great productive time for all of us!
Although the images I have used have been taken on Windows XP and MS Office 2003, all the subsequent versions of MS Office are backward compatible with these shortcuts. If you find that’s not the case with any of these in the latest version of MS Word, please feel free to leave a comment. We would also love for you to share your own Word productivity tips.
Operating System SAGA: Linux vs. Windows
I remember when I first installed Ubuntu Linux on my computer. It was the then-latest version 7.04, which means it was somewhere around 2007 — that’s how they name Ubuntu. 7 means it was released in 2007, and 04 means it was April.
I’ll be honest here; I had two reasons for taking up Linux, and none included the fact that Linux was better and more robust than Windows. My reasons were:
- It was free of cost
- I had seen the kind of desktop effects Beryl was able to provide on Linux, and it had just blown my mind away. I absolutely wanted those cool effects to be on my computer too
But the more I used Linux, the more ridiculous the idea of switching back to Windows appeared to be. Sure, I had my hiccups where the webcam on my laptop wouldn’t work along with a few other minor issues. Therefore, I kept a dual boot option; but as newer versions of Ubuntu were introduced every six months, Windows got slowly edged out of my hard disk. Today, I run three computers solely on Linux; and I’ve been doing that for at least two years now.
Anyway, this post is not about me selling Linux to you. It’s just about the things that made me stick with Linux and ultimately throw Windows out of the window — so to speak.
Viruses
 The first and the most important thing that made me realize how easy Linux made things for me was the security from viruses part. I remember having nightmares when my XP box would start acting funny. My computer technician would come in and say, “this looks like virus trouble. We need to format this machine.” And I’d be like, “but I have the anti virus software; I have paid money for it to work!”
It didn’t matter how strong your antivirus was — which also cost money by the way — all your computer would need to get screwed up was one bad USB stick you borrow from your friend, and boom. And if you’re into browsing funny websites — you know what I mean, don’t you? — your life is really not going to be easy with Windows.
With Linux, it doesn’t matter. You see a funny “.exe” file on someone’s USB stick, just hit delete. Either way, it wouldn’t work on your Linux OS. So no more Norton, AVG, Avast, or Kaspersky!
Now let’s get to the next most important part of the Windows vs Linux saga: getting things done.
Functionality
Somehow, most people think that only geeks can get their job done with Linux. Well, I don’t mind being called a geek, but I had never used Linux in my life before I actually installed it on my computer. And believe me, everyone can get their job done on Linux. In fact, they can do it more easily than they can on Windows. Don’t believe me? Read on:
Productivity
 Say you just paid $200 for a home premium version of Windows 7. The glass effects look great, and you’re very happy for some money well spent. Now comes the trouble: you know that you can’t even create a letter on it yet, don’t you? You’d either have to spend $279 for buying the license of MS Office, buy some other Office alternative, download any of the free office suites available on the market, or use the online versions of office applications. Either way, your Windows box cannot really help you do any substantial productive work right out of the box.
The Ubuntu Linux OS, on the other hand, came with OpenOffice.org installed in it already. So I could start with my documents right away — even Microsoft files, which was great. Letters, memos, manuals, presentations; bring it on!
Listening to Music
Now let’s at least try and listen to some music on your new Windows OS. It’s a new computer, so you don’t have files on your hard disk. Therefore, you try to connect your iPod to play some tunes you have in it. But wait, did you install iTunes? Otherwise it won’t work.
When I installed Ubuntu, I had the option of installing all the codecs to play .mp3 and other file formats along with it. Therefore, as soon as I hooked up my iPod to the computer, Rhythmbox opened up and allowed me to browse and play all the songs I had on the iPod.
Watching Videos
 Okay, let’s see if you can watch some movies using the default Windows Media Player application. You try to open that .mkv or .avi file you ripped off your Blu-ray disc or DVD. Wait, it doesn’t play on Windows Media Player right away, does it? You need something called as codecs that you have to search for yourself and download. Alternatively, you need to download the mother of all media players, the VLC player.
Video files on Ubuntu are absolutely no problem. There’s no media format that the Totem player — which is included in the default install on Ubuntu — cannot handle. It can play even the .rmvb files that not many players can handle.
Instant Messengers
Finally, let’s try to chat with some of your friends using Windows. But you have friends on AIM, Gtalk, Yahoo, MSN — pretty much all over the place, don’t you? So you either go to some online portal where you can sign into all these accounts, or download each of these applications and install them on your computer. The system cannot help you out of the box here either.
On Ubuntu, I have the Empathy IM client installed by default. Not only can Empathy connect to all my friends in one window regardless of whether they’re on Yahoo, Gtalk, MSN, or AIM, but also help me do voice chat with the Gtalk friends with reasonable sound quality.
So if you’re just a regular non-geeky user of computers, tell me again, why did you pay $200 for Windows 7?
Peripheral Devices such as Printers, Camera, Cell Phones, etc.
 Be it a cell phone, a printer, or a digital camera, all I need to do to make it work on Ubuntu — at least the basic stuff like downloading photos and data from it, which is what most people do — is to hook it up to my USB port, and I’m good to go.
For tagging and doing minor edits to my photos, I have F-Spot; and for advanced manipulations, I have GIMP available to me by default. On Windows, I get Paint. I won’t even waste any words comparing Paint to the former two.
Text Editor
The default text editor for Ubuntu is Gedit. It can handle a number of syntaxes including those for HTML, CSS, and XML in addition to being an awesome app that comes with a built-in spell check feature. The default Windows text editor, Notepad, doesn’t even come close to being as useful.
Internet Browsing
For Internet browsing, I have Firefox installed by default on Ubuntu. On Windows, I get Internet Explorer. Again, no comparison there.
File Manager
 Last, but not the least — and this is something that few Win vs. *Nix comparisons ever cover — the main file manager apps for these two operating systems. For Windows, I have the Windows Explorer, which does the basic job of browsing through files, changing permissions, creating new folders, viewing information about files and folders, etc. quite well.
On the other hand, Nautilus, the default application for Ubuntu, does so much more. It has tabbed browsing; and it can open two views in the same window for you to compare the contents of two folders side-by-side. If you want to transfer stuff from one folder to another, just drag it from one view into another, and your file is transferred. Hit Ctrl + H and you can toggle between seeing all hidden files and not seeing them.
More importantly, you can browse FTP, SSH, and all kinds of fancy servers straight from Nautilus. Yes, you don’t need stuff like Filezilla or WinSCP for browsing your online servers or manipulating files on your website. Just click on “Places,” select “Connect to Server,” and enter the right settings. Nautilus will let you browse your entire server as if it were on your own computer.
You’d probably argue saying: okay, perhaps it’s not available out of the box, but you can get all these things in Windows by just installing additional software. But please don’t say that, because when you do, you’re defeating your own case. Here’s how:
On one hand, I pay $200 and still have to download all the right software to make myself productive. On the other hand, I don’t pay anything and don’t have to download anything to be productive either. You see where this is going?
New Applications
Now let’s look at the next most important aspect of using a computer: installing 3rd party software. Let’s face it, no matter how many applications an OS comes shipped with, there will always be some that we have to install for some specialist work — such as an IDE or a WYSIWYG web development platform, etc.
On Windows, I have to go to the relevant 3rd party website, download that application, and then install it manually. On Ubuntu, I just need to open the software center, which has a list of all the possible applications I could need. All I have to do is click “Install” and enter my super-user password. My system automatically downloads the application and installs it on its own.
In fact, if I use the advanced “Synaptic Package Manager,” I can install a number of applications at one go without having to even load my web browser.
Customization and Flexibility
 Perhaps these are not prime aspects for a regular user, however for those who do care about flexibility to change the way their system looks, no operating system comes even close to being as flexible as Linux is. I have changed the looks of my OS at least 15-20 times in the past three years.
I just love all the desktop effects and functionality I get including multiple workspaces, wobbly windows, the ability to change the color scheme and window borders for free, and so on.
Even for those rare occasions where I get an MS Office file that doesn’t render correctly on OpenOffice.org, I can use the free Zoho office or ThinkFree office apps online and work on those files without ever needing to use MS Office.
My entire business runs on Linux, and I’ve delivered more than $100,000 worth of work on these computers over the past year without so much as a hiccup. Therefore, it doesn’t make sense for me to pay money for doing the same things on another operating system just because over 90% of the world does it, right?
Admitedly everyone’s requirements are different. However, if research shows that my needs can be taken care of by a system that offers more advantages and provides complete freedom to modify it whenever I want, I would definitely give it a shot — as I already have with a lot of success.
Please realize that this entire post talks about Ubuntu Linux and not Linux in general, however, most popular Linux distros come with a similar set of applications that can help you be just as productive as Ubuntu does. Ultimately it comes down to the kind of default set of applications that work best for you. Choose your flavor of Linux accordingly.